Excel VBA でプログレス バーを作成する
Visual Basic for Applications は、Microsoft アプリケーションで使用されるイベント駆動型プログラミング言語です。 これにより、ユーザーはタスクを自動化し、要件に応じていくつかの機能を書き直すことができます。
VBA を使用すると、ユーザーは、マクロの形式で格納されたいくつかのコード ステートメントを使用して、複数のタスクを実行できます。 マクロを使用すると、ユーザーはコードを何度も再利用できます。
Microsoft Excel の進行状況バー
データは常に Microsoft Excel で操作されます。 データベースからのデータのアップロード、レコードの操作、および結果の要約は、特にビジネスにおいて Microsoft Excel の最も一般的な用途です。
Microsoft Excel は、基本的な機能を利用してすべてのタスクを実行するための強力なツールを提供します。 Microsoft Excel が提供する基本機能を構築するために、VBA が使用されます。
VBA は、さまざまなタスクを自動化するための優れたオプションです。 Microsoft Excel の基本機能に基づいて構築し、ニーズに合わせたプログラムを作成できます。
VBA でプログレス バーを作成するのは非常に簡単です。 これにより、アクティビティを追跡できます。
進捗状況を監視し、並行タスクを実行できます。 進行状況バーを使用して、複数のタスクを同時に追跡できます。
プログレス バーを少し追加するだけで、プログラムの効率に大きな違いが生じる可能性があります。 これにより、タスクをより効率的に実行できます。
Excel でプログレス バーを作成する方法
Microsoft Excel のUserFormでは、progressbarコントロールを使用してシートの進行状況バーを作成できます。 ただし、作成されたプログレス バーを継続的に更新するには、このジョブを実行するいくつかのコード ステートメントをリンクする必要があります。
この記事では、Microsoft Excel でプログレス バーを作成する 2つの方法について説明します。
番号付き進行状況バー
このソリューションは、派手なプログレス バーを作成したくない場合に最適です。 番号付きの進行状況バーには、次の方法で出力が表示されます。

この単純なプログレス バーを Microsoft Excel に実装するには、次のコードを使用します。
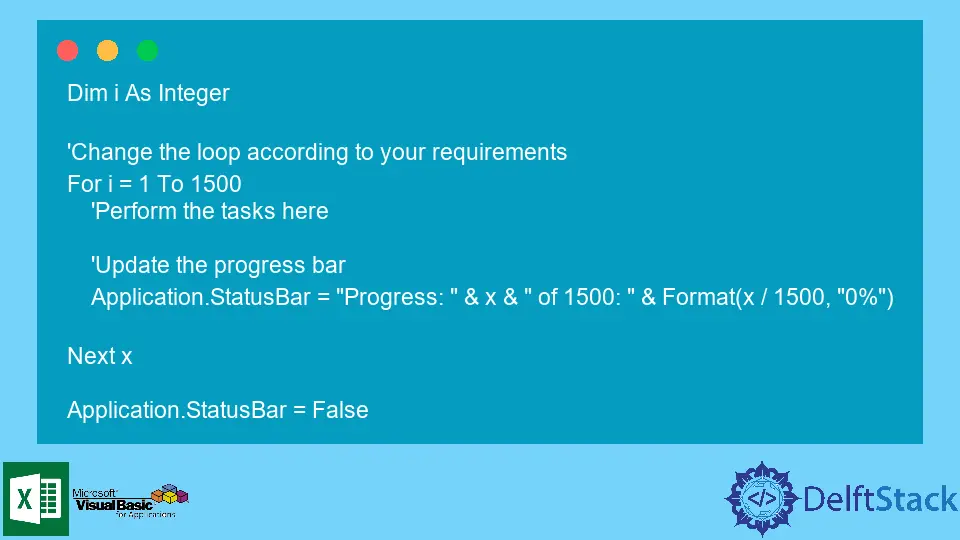
Dim i As Integer

'Change the loop according to your requirements
For i = 1 To 1500
    'Perform the tasks here

    'Update the progress bar
    Application.StatusBar = "Progress: " & x & " of 1500: " & Format(x / 1500, "0%")

Next x

Application.StatusBar = False
番号付きのプログレス バーは非常に簡単に実装できます。 多くの労力を必要とせず、完璧に機能します。
ファンシープログレスバー
このソリューションは、凝ったプログレス バーをデザインしたい場合に理想的です。 Excel の StatusBar は、Unicode 文字を使用してプログレス バーに偽装されています。
9608 から 9615 の範囲の Unicode 文字がバーとして使用されます。 範囲から1文字を選択できます。
プログレス バーの長さは、コード内の lent 変数によって定義されます。
' ProgressBar Class Module

Option Explicit

Private Const lent As Integer = 50
Private Const maxlent As Integer = 255
Private charBar As String
Private charSpace As String
Private statusBarVar As Boolean
Private enableEventsVar As Boolean
Private screenUpdatingVar As Boolean

Private Sub initialization()
    ' The initial state of the variables is saved for the progress bars
    charBar = ChrW(9608)
    charSpace = ChrW(9620)
    statusBarVar = Application.DisplayStatusBar
    enableEventsVar = Application.EnableEvents
    screenUpdatingVar = Application.ScreenUpdating
    Application.DisplayStatusBar = True
    Application.ScreenUpdating = False
    Application.EnableEvents = False
End Sub

Private Sub classend()
    ' Restore all the settings
    Application.DisplayStatusBar = statusBarVar
    Application.ScreenUpdating = screenUpdatingVar
    Application.EnableEvents = enableEventsVar
    Application.StatusBar = False
End Sub

Public Sub Update(ByVal Value As Long, _
                  Optional ByVal MaxValue As Long= 0, _
                  Optional ByVal Status As String = "", _
                  Optional ByVal DisplayPercent As Boolean = True)

    If Value < 0 Or MaxValue < 0 Or (Value > 100 And MaxValue = 0) Then Exit Sub

    ' If the maximum is set, then adjust the value to be in the range of 0 to 100
    If MaxValue > 0 Then Value = WorksheetFunction.RoundUp((Value * 100) / MaxValue, 0)

    ' Message to set the status bar to
    Dim display As String
    display = Status & "  "

    ' Set bars
    display = display & String(Int(Value / (100 / lent)), charBar)

    ' set spaces
    display = display & String(lent - Int(Value / (100 / lent)), charSpace)

    ' Closing character to show the end of the bar
    display = display & charBar

    If DisplayPercent = True Then display = display & "  (" & Value & "%)  "

    ' chop off to the maximum length if necessary
    If Len(display) > maxlent Then display = Right(display, maxlent)

    Application.StatusBar = display
End Sub
上記のコードは、関数 DisplayStatusBar の初期値を True に、ScreenUpdating を False に、EnableEvents を False に設定します。
Update() サブルーチンは、受け取ったパラメーターに応じて進行状況バーの表示を編集します。
classend() サブルーチンは、機能 DisplayStatusBar、ScreenUpdating、および EnableEvents の値をリセットします。
クラスのインスタンスを作成するには、次のコードを使用します。
Dim fancyProgressBar As New ProgressBar
Dim i As Integer

For i = 1 To 100
    Call fancyProgressBar.Update(i, 100, "Progress Bar", True)
    ' Required tasks can be mentioned here
Next i
Unicode 文字を試して、さまざまなプログレス バーをデザインできます。 9608 から 9615 までの範囲は、間隔の異なるプログレスバーのデザインが異なります。
変数を試して、自分用にカスタマイズされたプログレス バーを設計してください。
まとめ
複数のタスクが並行して実行されている場合、進行状況バーは非常に役立ちます。 タスクのアクティビティを並べて追跡できます。
さらに、さまざまなタスクに必要な時間を測定することもできます。 これにより、理想的な方法でタスクをスケジュールできます。

Hello, I am Bilal, a research enthusiast who tends to break and make code from scratch. I dwell deep into the latest issues faced by the developer community and provide answers and different solutions. Apart from that, I am just another normal developer with a laptop, a mug of coffee, some biscuits and a thick spectacle!
GitHub