How to Pass State Back to Parent Component in React
- Return Data to the Parent Component With a Callback Function
- Pass State Back to the Parent Component With Props
- Pass Data to the Parent Component From More than One Child Component
- Conclusion
One thing that makes a great developer stand out from the average is the ability to write clean, well-formatted codes.
That is the brain behind the React function that allows a coder to store information and carry out operations inside one component and then let another component access the data and use it. That is the relationship between the child and parent components in React.
The parent component or the originating component already has an operation to process. A coder who wants to carry out another process to replace, update or add data to the parent component creates the child component to do this.
There are also instances where the developer might want to pass multiple data to the parent. Creating multiple children component is also an ideal way to do this.
This will cause the parent component to be shorter and tidier, with less code.
Return Data to the Parent Component With a Callback Function
The callback function is a React concept that lets you call a function once the operation of that function is processed. It is a straightforward way to call the function in the child component back to the parent.
We will start by creating a new project from our terminal. We type in npx create-react-app illustrationone.
After the project is created, we go to the folder in our editor, move to the src folder and create a new file, Child.js. We will work with the App.js and Child.js in the example.
Our App.js will serve as our parent component, and we will initiate the callback function like this:
Code Snippet (App.js):
import React from 'react';
import Child from './Child'
class App extends React.Component{

    state = {
        name: "",
    }

    handleCallback = (childData) =>{
        this.setState({name: childData})
    }

    render(){
        const {name} = this.state;
        return(
            <div>
                <Child parentCallback = {this.handleCallback}/>
                {name}
            </div>
        )
    }
}
export default App
We first create the name state, then declare the callback function that will get the data corresponding with the name variable from the Child.js component.
Once we get back the data from the child component, we create a function that will return the data assigned to the name variable in the Child.js.
Next, we move to the Child.js, and here, we declare the operation we want to do.
Code Snippet (Child.js):
import React from 'react'
class Child extends React.Component{

    onTrigger = (event) => {
        this.props.parentCallback(event.target.myname.value);
        event.preventDefault();
    }

    render(){
        return(
        <div>
            <form onSubmit = {this.onTrigger}>
                <input type = "text"
                name = "myname" placeholder = "Enter Name"/>
                <br></br><br></br>
                <input type = "submit" value = "Submit"/>
                <br></br><br></br>
            </form>
        </div>
        )
    }
}
export default Child
Output:
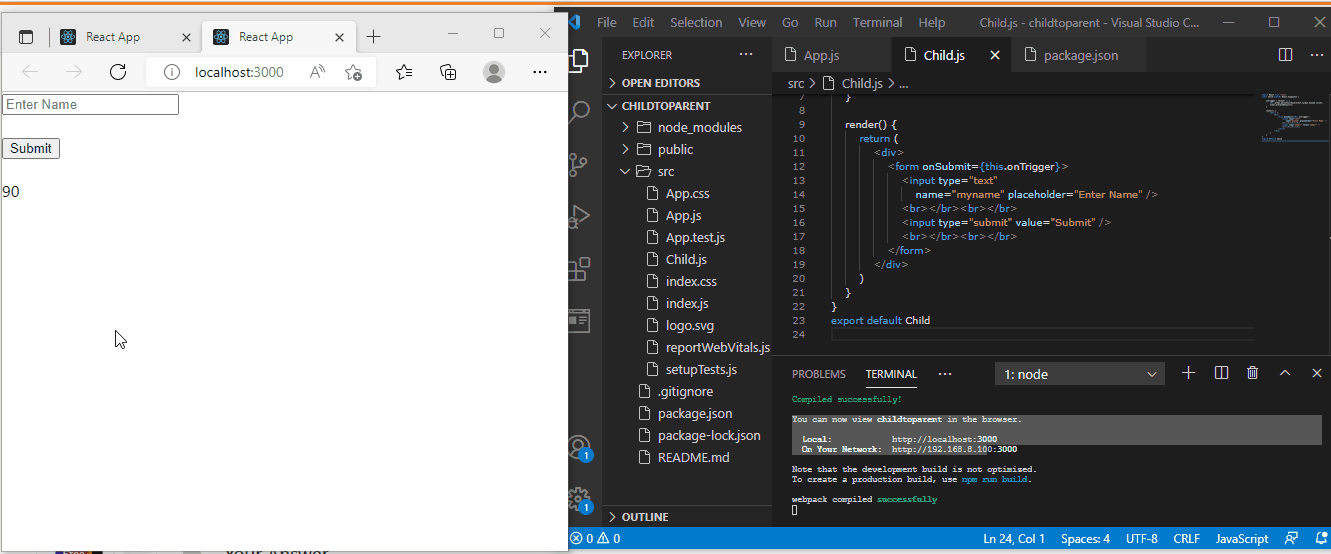
Because we want to pass this data back to the parent, we need a function that will initiate the callback function inside the child component. This is where we need the onTrigger event listener.
Once we click the Submit button and the result is displayed, the onTrigger immediately activates the callback function, carrying the value assigned to the name variable back to the parent component.
Pass State Back to the Parent Component With Props
This is a more straightforward method compared to the previous example. We use props to return the processed result to the parent component.
We navigate to the src folder and create a new file, User.js. This will be our child component.
The App.js is our parent component, and we will pass these codes:
Code Snippet (App.js):
import React from 'react'
import './App.css';
import User from './User'
function App() {
  function getName(name) {
    alert(name)
  }
  return (
    <div className="App">
      <h1>Returning State Back to Parent</h1>
      <User getData={getName} />
    </div>
  );
}

export default App;
We create a name function that dictates to the React framework that we want it to get the date assigned to the name function. Then we want to alert it, i.e., we want to return in the form of a pop-up.
Then we put a bit more code into our User.js, which is the child component:
Code Snippet (User.js):
function User(props)
{
    const name="Oluwafisayo"
    return(
        <div>
            <h1>My Name is : </h1>
            <button onClick={()=>props.getData(name)} >Click Me</button>
        </div>
    )
}

export default User;
Output:
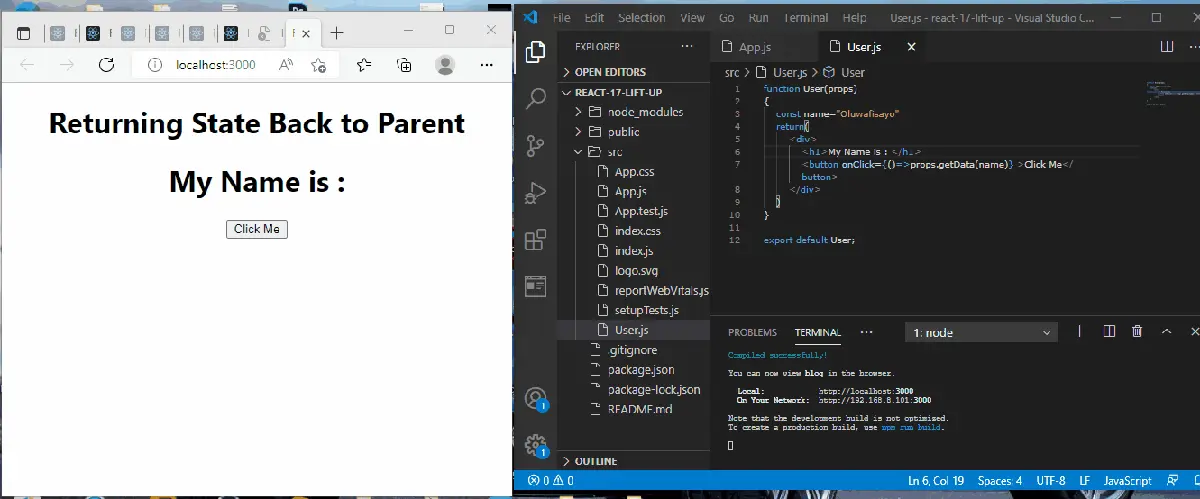
Here we assign the data to the name function, and then once the Click me button is pressed, it activates the onClick event listener, which returns the data to the parent as props. Keep in mind that props is short for properties.
Pass Data to the Parent Component From More than One Child Component
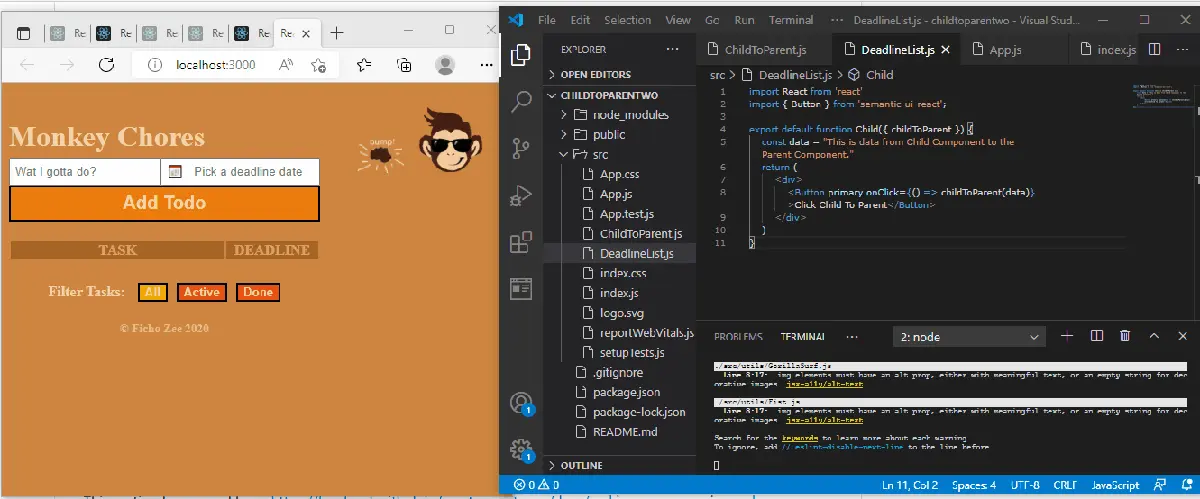
Since we are passing data to the parent component from two child components, we will create a file, TodoList.js for the parent component and two files, Todo.js and DeadlineList.js for the child components.
The parent component will house the codes that will define the functions to derive the data that we want to retrieve from the child components:
Code Snippet (TodoList.js):
import React from "react";
import Todo from "./Todo";
import DeadlineList from "./DeadlineList";

const TodoList = ({ todos, toggleTodo }) =>
  console.log(todos) || (
    <table>
      <tbody>
        <tr>
          <th className="taskTH">TASK</th>
          <th className="deadlineTH">DEADLINE</th>
        </tr>
        <tr>
          <td className="taskTD">
            {todos.map((todo) => (
              <Todo
                key={todo.id}
                text={todo.text}
                completed={todo.completed}
                toggleTodoItem={() => toggleTodo(todo.id)}
              />
            ))}
          </td>
          <td className="deadlineTd">
            {" "}
            {todos.map(
              (todo) =>
                console.log("TODO", todo) || (
                  <DeadlineList
                    key={todo.id}
                    value={todo.date}
                    completed={todo.completed}
                    onClick={() => toggleTodo(todo.id)}
                  />
                )
            )}
          </td>
        </tr>
      </tbody>
    </table>
  );

export default TodoList;
Next, we work on the Todo.js, a form. Once the data has been input and we click the Add Todo button, it returns the data:
Code Snippet (Todo.js):
import React, { useState } from 'react';
import wooHooSound from '../utils/wooHoo.js'

const Todo = (props) => {

    const { toggleTodoItem, completed, text } = props;

    let [ shouldPlaySound, setShouldPlaySound ] = useState(true);

    function wooHooEverySecondClick() {
        if (shouldPlaySound) {
            wooHooSound.play();
            setShouldPlaySound(false);
        } else {
            setShouldPlaySound(true);
        }
    }

    return (
        <li className="bananaLi"
            onClick={() => {
                toggleTodoItem();
                wooHooEverySecondClick();
            }}
            style={{
                textDecoration: completed ? 'line-through' : 'none'
            }}
        >

            {text}

        </li>
    );
};

export default Todo;
Then the DeadlineList.js is responsible for rendering the list to the parent in the form of a list format:
Code Snippet (DeadlineList.js):
import React from "react";

const DeadlineList = ({ onClick, completed, value }) => {
  return (
    <li
      className="deadlineLi"
      onClick={onClick}
      style={{
        textDecoration: completed ? "line-through" : "none"
      }}
    >
      {new Intl.DateTimeFormat("en-US").format(value)}
    </li>
  );
};

export default DeadlineList;
Then we import everything inside the App.js:
Code Snippet (App.js):
import React from 'react';
import AddTodo from '../containers/AddTodo'
import VisibleTodoList from '../containers/VisibleTodoList';
import Footer from './Footer';

const App = () => (

    <div className="appCSS">

        <AddTodo />
        <VisibleTodoList />
        <Footer />

    </div>

);

export default App;
Output:
Conclusion
When developers build a project as a team, writing coherent shortcodes per component makes it easy to get help from teammates. In contrast, a project with clogged-up codes will easily put off a fellow developer that wants to assist.

Fisayo is a tech expert and enthusiast who loves to solve problems, seek new challenges and aim to spread the knowledge of what she has learned across the globe.
LinkedIn