How to Implement Kalman Filter Using OpenCV in Python
Computer Vision tackles various complicated tasks associated with image and video processing in Artificial Intelligence. We use Python’s opencv library to handle some of these tasks.
This library implements different algorithms and techniques using objects to tackle some of these problems.
One such task is predicting the trajectory of a given object. One of the most common algorithms used for this is the Kalman Filter.
This tutorial will demonstrate the Kalman Filter using opencv in Python.
Kalman Filter Using opencv in Python
The Kalman Filter uses the object’s previous state to predict its next state. This algorithm uses a linear stochastic difference equation to determine the next state.
We need to be familiar with a few matrices associated with this equation.
First, a state transition matrix links the current state to the previous state. Optionally, we can control the input using a control input matrix.
We need to transform the state into some measurement domain which is achieved using a transformation matrix. There also needs to be a process noise vector with covariance.
In Python, we can use the KalmanFilter class from the opencv library to implement this algorithm and predict states. We will define the attributes of an object for this class and assign the necessary matrices.
The measurementMatrix, transitionMatrix, and processNoiseCov attributes specify the previously discussed measurement matrix, transition matrix, and the process noise matrix with covariance, respectively. We can then use the object to make some predictions using the predict() function.
Let us understand this better with an example.
import cv2
import numpy as np

measured = []
predicted = []
dr_frame = np.zeros((400, 400, 3), np.uint8)
mp = np.array((2, 1), np.float32)
tp = np.zeros((2, 1), np.float32)


def on_mouse(k, x, y, s, p):
    global mp, measured
    mp = np.array([[np.float32(x)], [np.float32(y)]])
    measured.append((x, y))


def paint_canvas():
    global dr_frame, measured, predicted
    for i in range(len(measured) - 1):
        cv2.line(dr_frame, measured[i], measured[i + 1], (0, 100, 0))
    for i in range(len(predicted) - 1):
        cv2.line(dr_frame, predicted[i], predicted[i + 1], (0, 0, 200))


def reset_canvas():
    global measured, predicted, dr_frame
    measured = []
    predicted = []
    dr_frame = np.zeros((400, 400, 3), np.uint8)


cv2.namedWindow("Sample")
cv2.setMouseCallback("Sample", on_mouse)
kalman_fil = cv2.KalmanFilter(4, 2)
kalman_fil.measurementMatrix = np.array([[1, 0, 0, 0], [0, 1, 0, 0]], np.float32)
kalman_fil.transitionMatrix = np.array(
    [[1, 0, 1, 0], [0, 1, 0, 1], [0, 0, 1, 0], [0, 0, 0, 1]], np.float32
)
kalman_fil.processNoiseCov = (
    np.array([[1, 0, 0, 0], [0, 1, 0, 0], [0, 0, 1, 0], [0, 0, 0, 1]], np.float32)
    * 0.03
)

while True:
    kalman_fil.correct(mp)
    tp = kalman_fil.predict()
    predicted.append((int(tp[0]), int(tp[1])))
    paint_canvas()
    cv2.imshow("Output", dr_frame)
    k = cv2.waitKey(30) & 0xFF
    if k == 27:
        break
    if k == 32:
        reset_canvas()
Output:
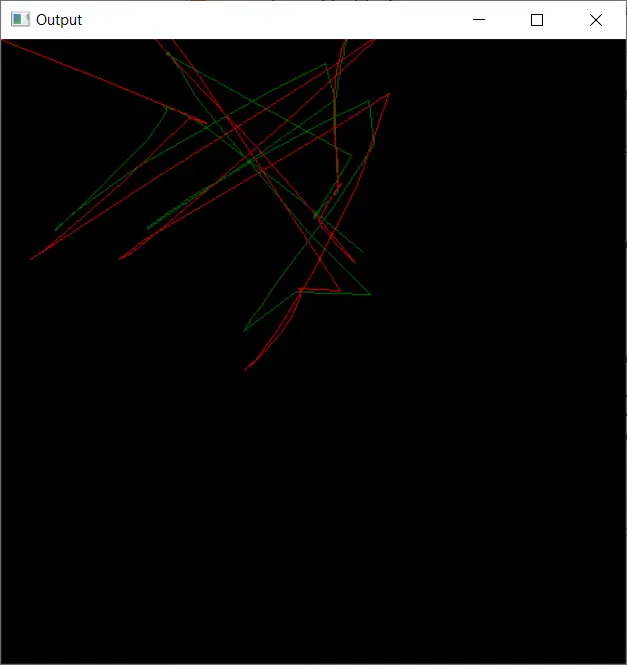
In the above example, we implement the Kalman Filter and use it to predict our mouse movement. We create a canvas and move the cursor on this canvas (green color), and simultaneously the Kalman Filter will attempt to predict the cursor movement (red color).
Let us understand what is happening in the code.
We start by creating a canvas frame on which we can draw the cursor movement. The on_mouse() function is used to append the values of the cursor.
The paint_canvas() method takes these values and the predicted values and draws them on the canvas. The setMouseCallback() function is also called whenever the cursor is moved.
We create a KalmanFilter class called the kalman_fil object. The required matrices were assigned using the previously discussed attributes.
Then we run a loop to draw on the canvas and make the predictions.
This class’ correct() method updates the predicted state from the measurement. The predict() function makes the predictions.
These predicted values are given to the paint_canvas() method.
To break out of the loop, we use the break statement, and it is called when the user presses the Esc key (key number 27 on the keyboard). If we press the spacebar, the canvas is cleared of the previous measurement by calling the reset_canvas() method.
Conclusion
To wrap up, we discussed the basics of a Kalman Filter in this tutorial. We discussed the necessary logic and attributes behind it.
We implemented this algorithm using the KalmanFilter class from the opencv library. Different parameters and member functions of this class were demonstrated.
We use the algorithm to predict the cursor’s movement on a drawing canvas.

Manav is a IT Professional who has a lot of experience as a core developer in many live projects. He is an avid learner who enjoys learning new things and sharing his findings whenever possible.
LinkedIn