How to Install Pandas Using Homebrew
- Error in Installing the Pandas Module
- Install the Pandas Module Without a Package Manager
- Install the Pandas Module With a Package Manager

This tutorial demonstrates how to install the pandas module - a data manipulation and analysis module while using the Homebrew package manager.
Error in Installing the Pandas Module
Handling and operating on data is crucial in this technological age, especially when its scale is increasing at a tremendous age. This calls for different methods and practices to be able to store and operate on the data.
In comes pandas, a Python module that aims to allow its users to operate and analyze the data in many ways. It has become quite popular over time, and the same is true with Python as it continues to gain popularity at a tremendous rate.
Though it may seem simple to install pandas, sometimes things don’t work quite well, and the installation is halted due to an unexpected error. Be it some permission problem or pandas simply failing to install correctly.
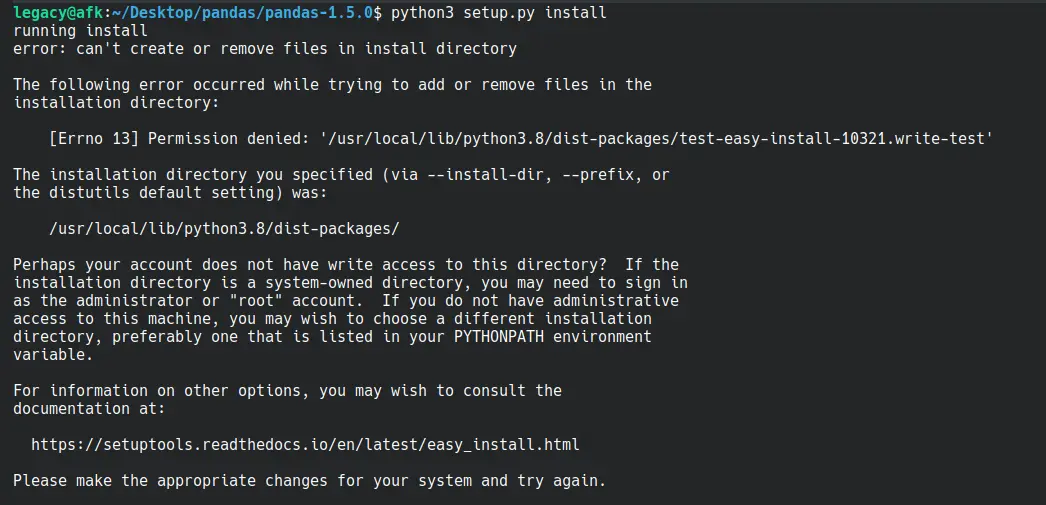
To install pandas, we download the source distribution, extract it and execute the setup.py:
legacy@afk:~/Desktop/pandas$ python3 setup.py install
This leads to the following output:
running install

error: can't create or remove files in the install directory

The following error occurred while trying to add or remove files in the

installation directory:
    [Errno 13] Permission denied: '/usr/local/lib/python3.8/dist-packages/test-easy-install-10321.write-test'

The installation directory you specified (via --install-dir, --prefix, or
the distutils default setting) was:
    /usr/local/lib/python3.8/dist-packages/

Perhaps your account does not have written access to this directory?  If the
The installation directory is a system-owned directory; you may need to sign in
as the administrator or "root" account.  If you do not have administrative
access to this machine, you may wish to choose a different installation
directory, preferably one that is listed in your PYTHONPATH environment
variable.

For information on other options, you may wish to consult the

documentation at:
  https://setuptools.readthedocs.io/en/latest/easy_install.html
To fix issues related to installing Python, we have the solutions below divided into two parts:
- Install without a package manager
- Install with a package manager
Install the Pandas Module Without a Package Manager
In case you want more freedom over installing a particular module or have made changes to the module, using a package manager might not be the best idea to install the module. Installing the module via the setup.py file inside the module’s source folder is best.
Let’s have a look at what command we executed to install:
python3 setup.py install
Now, the output:
Focusing on the error, we can see the exact reason on line 5:
[Errno 13] Permission denied: '/usr/local/lib/python3.8/dist-packages/test-easy-install-10321.write-test'
As well as on line 9:
Perhaps your account does not have written access to this directory?.....
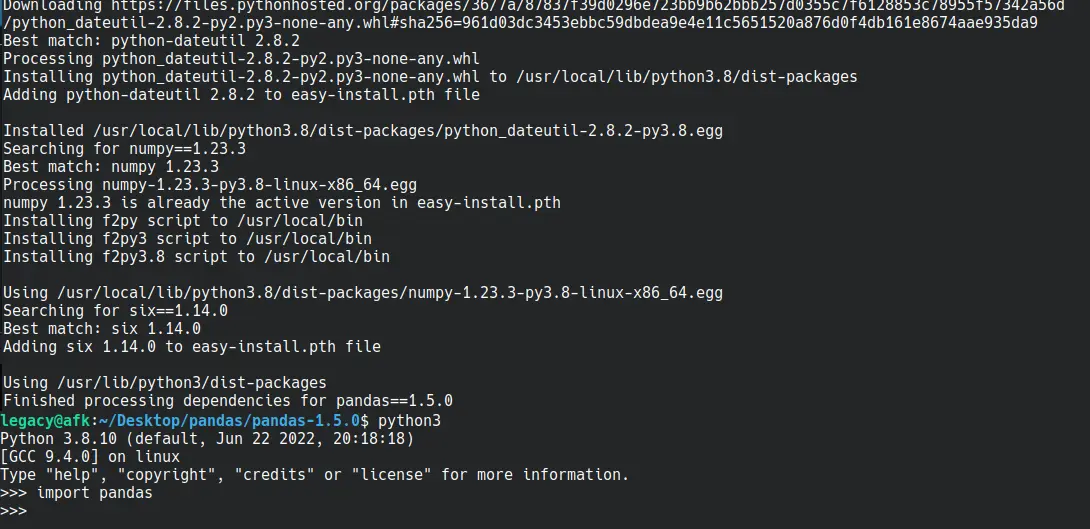
Keeping this in mind, we can conclude that the installation is not completed due to the installer not having enough permissions. This can be fixed quite easily by rerunning the command with elevated privileges.
You can add sudo before the command on Mac/Linux, whereas on Windows, you can run the command prompt (or your preferred terminal) as administrator.
Now, pandas will be successfully installed.
Install the Pandas Module With a Package Manager
To reduce the overall complexity of the installation of modules, you can use a package manager, allowing it to do all the heavy lifting for you. It will take care of all dependencies required and find the correct version based on your specifications.
Tip: If you are on Linux, you can skip the installation of Homebrew and install pip using a built-in package manager.
Debian or Ubuntu:
### Python 2

sudo add-apt-repository universe
sudo apt install curl
curl https://bootstrap.pypa.io/pip/2.7/get-pip.py --output get-pip.py
sudo python2 get-pip.py

### Python 3

sudo apt update
sudo apt install python3-pip
Fedora, CentOS, or Red Hat:
sudo yum -y install python-pip
Homebrew Installation
Homebrew is an open-source and free package manager for macOS, Linux, and WSL (Windows Subsystem for Linux). It aims to ease the installation of modules, with the plethora of modules just a single command away.
To start with Homebrew, we are first required to install it.
Before installation, ensure that the following requirements are met:
- macOS
- 64-bit Intel CPU or Apple Silicon CPU
- macOS Catalina 10.15+
- Command Line Tools (CLT) for Xcode
- The Bourne-again shell (i.e.
bash)
- Linux
- GCC 4.7.0+
- Linux 2.6.32+
- Glibc 2.13+
- 64-bit x86_64
- Build tools
Build Tools for Debian or Ubuntu:
sudo apt-get install build-essential procps curl file git
Build Tools for Fedora, CentOS, or Red Hat:
sudo yum groupinstall 'Development Tools'
sudo yum install procps-ng curl file git
sudo yum install libxcrypt-compat # needed by Fedora 30 and up
Installation:
On your terminal, paste the following and execute the command:
/bin/bash -c "$(curl -fsSL https://raw.githubusercontent.com/Homebrew/install/HEAD/install.sh)"
Homebrew will now start downloading; depending on your internet connection, it may take a little while. Once it is installed, you can continue to the next step.

Add Brew to $PATH
Now that brew has been successfully installed, you need to add it to the path so you can easily access it from anywhere without explicitly declaring the full path of brew every time you wish to use it.
For macOS:
echo 'PATH="/usr/local/bin:$PATH"' >> ~/.bash_profile
For Linux:
test -d ~/.linuxbrew && eval "$(~/.linuxbrew/bin/brew shellenv)"
test -d /home/linuxbrew/.linuxbrew && eval "$(/home/linuxbrew/.linuxbrew/bin/brew shellenv)"
test -r ~/.bash_profile && echo "eval \"\$($(brew --prefix)/bin/brew shellenv)\"" >> ~/.bash_profile
echo "eval \"\$($(brew --prefix)/bin/brew shellenv)\"" >> ~/.profile
Pip Installation
Dubbed as the recommended and de-facto package manager for Python, it is widely used to install different modules for usage in Python scripts. Connecting to the online repository named Python Package Index, it aids in the download and installation of different modules to be used with Python.
Since Homebrew installs separately and in its environment, you must also install Python.
brew install python
This command will install Python, setuptools, and pip.
Pandas Installation
With pip installed, you can now install pandas. Use the following command to install pandas:
# Python 3
pip3 install pandas
If any dependencies (such as numpy) are not installed on your device, pip will take care of them and install them. After which, you can test whether pandas has been installed correctly or not.
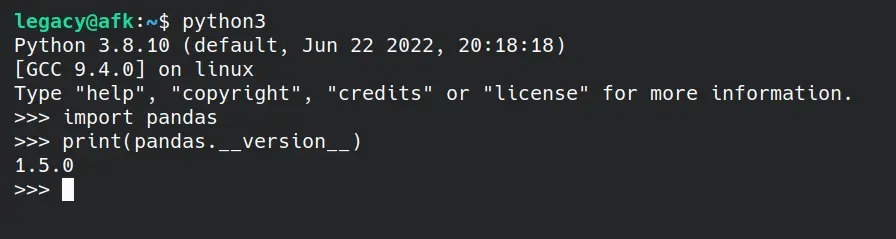
And with a small sample program:
import pandas

dataframe = pandas.DataFrame(
    {"X": [78, 85, 96, 80, 86], "Y": [84, 94, 89, 83, 86], "Z": [86, 97, 96, 72, 83]}
)

print(dataframe)
Output:
    X   Y   Z
0  78  84  86
1  85  94  97
2  96  89  96
3  80  83  72
4  86  86  83

Hello! I am Salman Bin Mehmood(Baum), a software developer and I help organizations, address complex problems. My expertise lies within back-end, data science and machine learning. I am a lifelong learner, currently working on metaverse, and enrolled in a course building an AI application with python. I love solving problems and developing bug-free software for people. I write content related to python and hot Technologies.
LinkedIn