How to Validate Checkbox in JavaScript
- Understanding Checkbox Validation
- Basic Checkbox Validation Example
- Advanced Checkbox Validation with Multiple Checkboxes
- Customizing Validation Messages
- Conclusion
- FAQ
In this article, we will learn how to validate a checkbox in JavaScript. Checkbox validation is an essential part of web development, especially when creating forms that require user consent or agreement. Whether you’re building a registration form, a survey, or any other interactive element, ensuring that users check the necessary boxes helps maintain data integrity and enhances user experience. We’ll explore various methods to validate checkboxes, including some practical examples. By the end of this article, you will have a clear understanding of how to implement checkbox validation in your JavaScript projects effectively.
Understanding Checkbox Validation
Checkbox validation involves checking whether a user has selected a checkbox before submitting a form. This is crucial for scenarios where user consent is required, such as agreeing to terms and conditions or opting into newsletters. JavaScript provides a straightforward way to handle this validation by manipulating the DOM and responding to user actions.
To validate a checkbox, you typically need to access the checkbox element, check its state, and provide feedback to the user. This can be done using simple JavaScript functions that listen for form submissions and validate the checkbox state accordingly.
Basic Checkbox Validation Example
To get started, let’s look at a basic example of how to validate a checkbox using JavaScript. In this example, we will create a simple form with a checkbox that users must check before they can submit the form.
<!DOCTYPE html>
<html lang="en">
<head>
    <meta charset="UTF-8">
    <meta name="viewport" content="width=device-width, initial-scale=1.0">
    <title>Checkbox Validation Example</title>
</head>
<body>
    <form id="myForm">
        <label>
            <input type="checkbox" id="myCheckbox"> I agree to the terms and conditions
        </label>
        <button type="submit">Submit</button>
    </form>
    <script>
        document.getElementById('myForm').addEventListener('submit', function(event) {
            const checkbox = document.getElementById('myCheckbox');
            if (!checkbox.checked) {
                alert('You must agree to the terms and conditions.');
                event.preventDefault();
            }
        });
    </script>
</body>
</html>
Output:
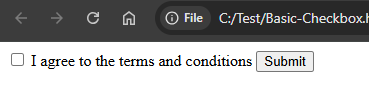
In this example, we have a form with a checkbox and a submit button. We attach an event listener to the form that listens for the submit event. Inside the event listener, we check whether the checkbox is checked. If it is not, we display an alert and prevent the form from being submitted. This simple validation ensures that users cannot proceed without agreeing to the terms.
Advanced Checkbox Validation with Multiple Checkboxes
In many cases, you might need to validate multiple checkboxes. For instance, a user may need to select at least one option from a group of checkboxes. Let’s explore how to achieve this with JavaScript.
<!DOCTYPE html>
<html lang="en">
<head>
    <meta charset="UTF-8">
    <meta name="viewport" content="width=device-width, initial-scale=1.0">
    <title>Multiple Checkbox Validation Example</title>
</head>
<body>
    <form id="multiCheckboxForm">
        <label><input type="checkbox" class="option"> Option 1</label><br>
        <label><input type="checkbox" class="option"> Option 2</label><br>
        <label><input type="checkbox" class="option"> Option 3</label><br>
        <button type="submit">Submit</button>
    </form>
    <script>
        document.getElementById('multiCheckboxForm').addEventListener('submit', function(event) {
            const checkboxes = document.querySelectorAll('.option');
            let isChecked = false;
            checkboxes.forEach((checkbox) => {
                if (checkbox.checked) {
                    isChecked = true;
                }
            });
            if (!isChecked) {
                alert('You must select at least one option.');
                event.preventDefault();
            }
        });
    </script>
</body>
</html>
Output:
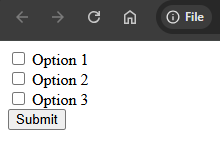
In this example, we have a form with multiple checkboxes. The script iterates through all checkboxes with the class “option” and checks if at least one is selected. If none are checked, an alert is displayed, and the form submission is prevented. This method ensures that users make a selection from the available options before proceeding.
Customizing Validation Messages
Customizing validation messages can enhance user experience. Instead of using alerts, you can display messages directly on the page. This approach provides a more seamless interaction. Let’s see how to implement this.
<!DOCTYPE html>
<html lang="en">
<head>
    <meta charset="UTF-8">
    <meta name="viewport" content="width=device-width, initial-scale=1.0">
    <title>Custom Validation Message Example</title>
    <style>
        .error {
            color: red;
            display: none;
        }
    </style>
</head>
<body>
    <form id="customMessageForm">
        <label><input type="checkbox" id="customCheckbox"> I agree to the terms and conditions</label>
        <div class="error" id="errorMessage">You must agree to the terms and conditions.</div>
        <button type="submit">Submit</button>
    </form>
    <script>
        document.getElementById('customMessageForm').addEventListener('submit', function(event) {
            const checkbox = document.getElementById('customCheckbox');
            const errorMessage = document.getElementById('errorMessage');
            if (!checkbox.checked) {
                errorMessage.style.display = 'block';
                event.preventDefault();
            } else {
                errorMessage.style.display = 'none';
            }
        });
    </script>
</body>
</html>
In this example, we’ve added a div to display the error message instead of using an alert. The message is hidden by default and only shown when the checkbox is not checked. This method not only improves the user interface but also provides a more engaging experience by integrating error messages directly into the form.
Conclusion
Validating checkboxes in JavaScript is a fundamental skill for web developers. By implementing simple validation techniques, you can enhance user experience and ensure that users provide necessary consent before submitting forms. We explored various methods, from basic validation to more advanced techniques involving multiple checkboxes and customized messages. With these tools at your disposal, you can create forms that are both functional and user-friendly.
FAQ
-
How can I validate multiple checkboxes at once?
You can use JavaScript to iterate through the checkboxes and check if at least one is selected before allowing form submission. -
Can I customize the error message displayed when a checkbox is not checked?
Yes, you can display custom error messages directly on the page instead of using alerts, enhancing the user experience. -
Is it possible to validate checkboxes using only HTML?
While HTML offers basic validation attributes likerequired, JavaScript provides more robust options for handling validation logic. -
What happens if I don’t validate checkboxes in my forms?
Failing to validate checkboxes can lead to incomplete data submissions, which may affect the integrity of the information collected. -
Can I use CSS to style the validation messages?
Absolutely! You can use CSS to customize the appearance of error messages, making them more visually appealing.

Sahil is a full-stack developer who loves to build software. He likes to share his knowledge by writing technical articles and helping clients by working with them as freelance software engineer and technical writer on Upwork.
LinkedIn