How to Pull Master Into Branch in Git
- Git Pull Master Into Another Branch
-
Use the
git mergeCommand to Pull Changes FrommasterInto Another Branch -
Use the
git rebaseCommand to Pull Changes FrommasterInto Another Branch -
Use the
git pullCommand to Pull Changes FrommasterInto Another Branch - Conclusion
While developing software with the Git tool, you can create different branches for different features. When making changes to master, those changes are not automatically added to other branches.
This article will explain how to pull all changes from master into another branch in Git.
Git Pull Master Into Another Branch
When using the Git tool, you may need to pull the changes you made in the master to a different branch. These changes are not transferred automatically, so you have to make them manually.
The rest of the article will explain how to pull changes from the master to the dev branch in three different ways.
main.Use the git merge Command to Pull Changes From master Into Another Branch
Another way to achieve this is by using the git merge command
Step 1: Check Out the master Branch
Start by switching to the master branch. You can do this using the git checkout command:
git checkout master
This command ensures that you’re on the master branch, which is the source of the changes you want to bring into your feature branch.
Step 2: Pull Latest Changes
Before merging, it’s crucial to make sure that your local master branch is up-to-date with the remote master branch. To do this, use the git pull command:
git pull origin master
This command fetches the latest changes from the remote master branch and merges them into your local master branch.
Step 3: Check Out Your Feature Branch
Now, switch back to your feature branch where you want to pull the changes. Use the git checkout command, replacing feature-branch with the actual name of your feature branch:
git checkout feature-branch
Step 4: Merge master Into Your Feature Branch
With your feature branch checked out, you can merge the changes from the master branch into it using the git merge command:
git merge master
A Closer Look at git merge
The git merge command is used to incorporate changes from one branch into another. In this case, we’re merging the changes from master into your feature branch.
Git will automatically create a new merge commit if there have been new changes in both branches since they diverged. If there are no conflicting changes, the merge will be straightforward.
Step 5: Resolve Conflicts (If Any)
If Git encounters conflicts during the merge, it will pause and indicate which files have conflicts. You’ll need to open these files, locate the conflict markers, and decide how to resolve them. Once you’ve resolved the conflicts, save the files.
After resolving conflicts in a file, mark it as resolved using the git add command:
git add <conflicted-file>
Repeat this process for each file with conflicts.
Step 6: Commit the Merge
Once you’ve resolved all conflicts and marked the files as resolved, commit the merge with a meaningful commit message:
git commit -m "Merge branch 'master' into feature-branch"
This commit message describes the merge operation for future reference.
Step 7: Push the Updated Feature Branch
Now that you’ve successfully merged the changes from master into your feature branch, push the updated feature branch to the remote repository:
git push origin feature-branch
Use the git rebase Command to Pull Changes From master Into Another Branch
Another way to achieve this is by using the git rebase command. We will walk you through the process of using git rebase to pull changes from the master branch into another branch.
Step 1: Check Out the master Branch
Start by switching to the master branch. You can do this using the git checkout command:
git checkout master
This command ensures that you are on the master branch, which is the source of the changes you want to incorporate into your feature branch.
Step 2: Pull Latest Changes
Before rebasing, it’s crucial to ensure that your local master branch is up-to-date with the remote master branch. To do this, use the git pull command:
git pull origin master
This command fetches the latest changes from the remote master branch and merges them into your local master branch.
Step 3: Check Out Your Feature Branch
Now, switch back to your feature branch where you want to pull the changes. Use the git checkout command, replacing dev with the actual name of your feature branch:
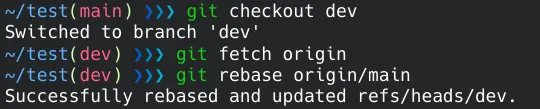
git checkout dev
Step 4: Rebase dev on master
With your feature branch checked out, you can now rebase it onto the updated master branch. Use the git rebase command followed by the name of the branch you want to rebase onto, which is master in this case:
git rebase master
Git will automatically apply your feature branch’s commits on top of the master branch. During this process, if there are any conflicts between your changes and the changes in master, Git will pause the rebase and ask you to resolve these conflicts manually.
The git rebase command is a powerful tool for rewriting commit history.
When you run git rebase master in this context, Git takes the entire commit history of your feature branch (starting from where it diverged from master) and replays each commit on top of the current master branch.
This essentially moves your feature branch to the tip of master, as if you had created it from the current master branch state.
One of the advantages of using git rebase over git merge is that it results in a linear commit history, making it easier to understand and navigate.
However, because it rewrites commit history, it’s essential to use it judiciously, especially in collaborative environments.
Step 5: Resolve Conflicts (If Any)
If Git encounters conflicts during the rebase, it will pause and show you which files have conflicts. You’ll need to open these files, locate the conflict markers, and decide how to resolve them. Once you’ve resolved the conflicts, save the files.
After resolving all conflicts in a file, mark it as resolved using the git add command:
git add <conflicted-file>
Repeat this process for each file with conflicts.
Step 6: Continue the Rebase
After resolving all conflicts and marking the files as resolved, you can continue the rebase using the following command:
git rebase --continue
Git will apply the remaining commits from your feature branch on top of the master branch.
Step 7: Push the Updated Feature Branch
Now that you’ve successfully rebased your feature branch onto master, you can push the updated feature branch to the remote repository:
git push origin dev
Use the git pull Command to Pull Changes From master Into Another Branch
Let’s walk through the steps of using git pull to update your working branch with changes from the main branch.
Step 1: Check Out Your Working Branch
Start by switching to the branch you want to update with changes from main. You can use the git checkout command to do this. Replace feature-branch with the name of your working branch:
git checkout feature-branch
This command ensures that you are on the branch that you want to update.
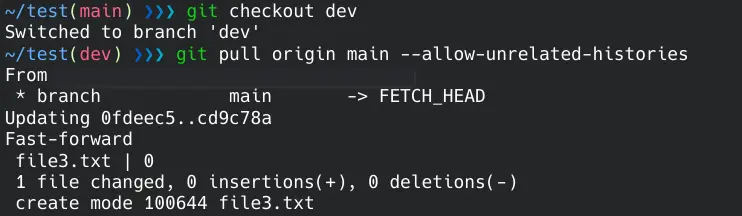
Step 2: Pull Changes From main
Now that you’re on your working branch, you can use the git pull command to fetch and merge the latest changes from the main branch.
The git pull command is a combination of two Git commands: git fetch and git merge. It retrieves changes from a remote repository and integrates them into your current branch.
git pull origin main --allow-unrelated-histories
Here’s what each part of this command does:
git pull: Initiates the pulling process.origin: The default name of the remote repository. If you’re working with a different remote, replaceoriginwith its name.main: The branch from which you want to pull changes. You can specify a different branch name if needed.--allow-unrelated-histories: This option allows Git to merge unrelated histories, which can be useful when you’re combining branches that have different commit histories.
Understanding --allow-unrelated-histories
The --allow-unrelated-histories option is necessary when you’re pulling changes from a branch that has a different commit history than your current branch.
This can happen when you’re merging or pulling in changes from a branch that was created independently or doesn’t share a common ancestor with your current branch.
By using --allow-unrelated-histories, you tell Git to proceed with the merge even if the commit histories don’t have a clear common starting point. It’s a way to integrate unrelated branches into a single branch.
Step 3: Resolve Conflicts (If Any)
During the merge process, Git may identify conflicts if changes in your working branch and main branch overlap or conflict with each other. When conflicts occur, Git will pause and indicate which files have conflicts.
To resolve conflicts, open the conflicting files in your code editor. Inside these files, you’ll see sections demarcated by conflict markers, such as <<<<<<<, =======, and >>>>>>>. Manually edit the file to choose which changes to keep and which to discard.
After resolving conflicts in a file, save the changes.
Step 4: Mark Conflicts as Resolved
Once you’ve resolved the conflicts in a file, you need to mark it as resolved using the git add command. Replace <conflicted-file> with the actual filename:
git add <conflicted-file>
Repeat this process for each file with conflicts.
Step 5: Commit the Merge
After resolving conflicts and marking the files as resolved, you need to commit the merge with a meaningful commit message:
git commit -m "Merge changes from main into feature-branch"
This commit message should describe the purpose of the merge for future reference.
Step 6: Push Your Updated Branch
Finally, push the changes you’ve made on your working branch to the remote repository:
git push origin feature-branch
This command ensures that the changes are saved on the remote repository, making them accessible to other team members if you’re collaborating on the project.
Conclusion
In software development, maintaining different branches for various features or bug fixes is a common practice. However, it’s essential to keep these branches up-to-date with the latest changes from the main branch to ensure a smooth integration process later on.
In this article, we explored three different ways to pull changes from the main branch into another branch: using git merge, git rebase, and git pull. Each method has its advantages and use cases.

Yahya Irmak has experience in full stack technologies such as Java, Spring Boot, JavaScript, CSS, HTML.
LinkedIn