How to Write to the Output Window in C#
-
Write to the Debug Window of the Microsoft Visual Studio IDE Using the
Debug.WriteLine()Method in C# -
Write to the Debug Window of the Microsoft Visual Studio IDE Using the
Debug.Write()Method in C# -
Write to the Debug Window of the Microsoft Visual Studio IDE Using the
Debug.Print()Method in C# - Conclusion
Debugging is an integral part of software development, and having effective ways to output information during debugging can significantly aid the process. In C#, the Debug class provides various methods for writing information to the debug output.
In this article, we’ll explore different methods to write to the debug window in C# with detailed examples and explanations. We will discuss how to write data to the Microsoft Visual Studio IDE debug window in C#.
Write to the Debug Window of the Microsoft Visual Studio IDE Using the Debug.WriteLine() Method in C#
The Debug.WriteLine() method is a simple and widely-used way to output information to the debug window. It automatically appends a newline character at the end of the output.
The Debug.WriteLine() method in C# writes the information to the debug window of the Microsoft Visual Studio IDE in. It works just like the conventional Console.WriteLine() method but prints to the debug window.
The following code example shows us how we can use the Debug.WriteLine() method to print a whole line to the Microsoft Visual Studio IDE debug window.
using System.Diagnostics;
namespace write_to_debug_window {
  class Program {
    static void Main(string[] args) {
      Debug.WriteLine("This is line1 in the Debug window");
      Debug.WriteLine("This is line2 in the Debug window");
    }
  }
}
Debug Window Output:
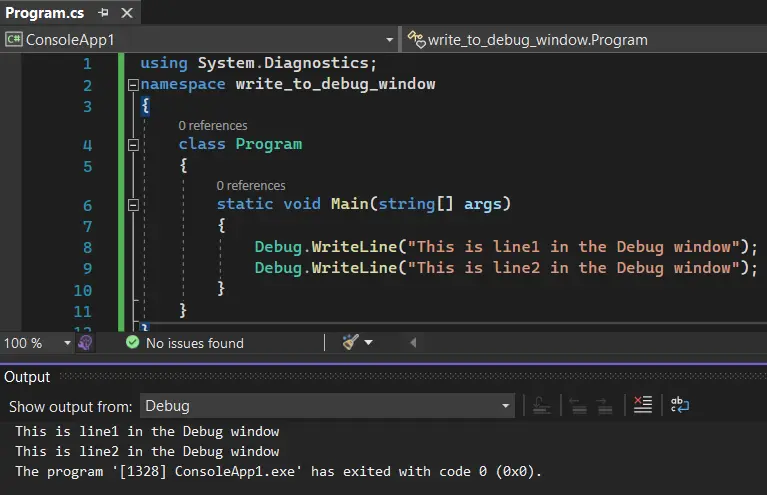
In the above code, we printed two lines in the Microsoft Visual Studio IDE debug window with the Debug.WriteLine() method.
Write to the Debug Window of the Microsoft Visual Studio IDE Using the Debug.Write() Method in C#
The Debug.Write() method is similar to Debug.WriteLine(), but it does not automatically append a newline character. This can be useful when you want to concatenate multiple outputs on the same line.
The Debug.Write() method in C# writes the information to the debug window of the Microsoft Visual Studio IDE. It works just like the conventional Console.Write() method but prints to the debug window.
The difference between the Debug.Write() method and the Debug.WriteLine() method is that the Debug.Write() method only writes the string to the debug window, but the Debug.WriteLine() method writes the string and takes a whole line in the debug window.
We have to use the System.Diagnostics namespace to use the Debug.Write() method in C#. The following code example shows us how we can write something to the Microsoft Visual Studio IDE debug window with the Debug.Write() method in C#.
using System.Diagnostics;
namespace write_to_debug_window {
  class Program {
    static void Main(string[] args) {
      Debug.Write("Hello, This is written in the Debug window");
    }
  }
}
Debug Window Output:

In the above code, we printed the message Hello, This is written in the Debug window in the Microsoft Visual Studio IDE debug window. This output only appears in the debug window if we run our application in the debug mode.
To run our application in the debug mode, we have to run our application by clicking on the Start button on the top. There are a few more functions like the Debug.Print() method discussed below.
Write to the Debug Window of the Microsoft Visual Studio IDE Using the Debug.Print() Method in C#
The Debug.Print() method is part of the System.Diagnostics namespace in C# and is specifically designed for sending output to the Debug Window in Visual Studio. It is a versatile tool for developers to print messages, variable values, or any relevant information during the debugging process.
Let’s explore various use cases for Debug.Print() in C# with detailed examples.
1. Printing Text Messages
using System.Diagnostics;
namespace write_to_debug_window {
  class Program {
    static void Main(string[] args) {
      Debug.Print("This is the print method");
      Debug.Print("This is the 2nd print method");
    }
  }
}
Debug Window Output:

In the above code, we printed two lines in the Microsoft Visual Studio IDE debug window with the Debug.Print() method in C#. This is helpful for adding descriptive information about the state of the program.
2. Printing Variable Values
using System.Diagnostics;

class Program {
  static void Main() {
    int value = 42;
    Debug.Print($"Debugging information: The value is {value}");
  }
}
Debug Window Output:
Debugging information: The value is 42
Here, the method leverages string interpolation to include the value of a variable (value) in the debug output. This is beneficial for tracking the state of variables during debugging.
3. Printing Information Conditionally
using System.Diagnostics;

class Program {
  static void Main() {
    int condition = 0;

    if (condition == 0) {
      Debug.Print("Debugging information: Condition is zero");
    }
  }
}
Debug Window Output:
Debugging information: Condition is zero
The Debug.Print() method in C# can be used within conditional statements, allowing developers to print information based on specific conditions. This is advantageous for selectively displaying debug output.
4. Printing Stack Trace
using System.Diagnostics;
using System;

class Program {
  static void Main() {
    try {
      // Some code that may throw an exception
    } catch (Exception ex) {
      Debug.Print($"Exception: {ex.Message}\nStackTrace: {ex.StackTrace}");
    }
  }
}
In scenarios where exceptions may occur, using Debug.Print() to output the exception message and stack trace can aid in identifying the root cause of errors.
5. Logging Method Entry and Exit
using System.Diagnostics;

class Program {
  static void Main() {
    PerformTask();
  }

  static void PerformTask() {
    Debug.Print("Entering PerformTask method");

    // Task implementation

    Debug.Print("Exiting PerformTask method");
  }
}
Debug Window Output:
Entering PerformTask method
Exiting PerformTask method
Logging method entry and exit points can be useful for understanding the flow of execution. Debug.Print() helps in creating a trace of method invocations.
6. Displaying Timestamped Messages
using System;
using System.Diagnostics;

class Program {
  static void Main() {
    Debug.Print($"[{DateTime.Now}] Debugging information: Timestamped message");
  }
}
Debug Window Output:
[01/25/2024 10:27:56 pm] Debugging information: Timestamped message
For time-sensitive debugging, incorporating timestamps into debug messages provides a chronological view of events. This is achieved by embedding DateTime.Now in the message.
Conclusion
The article explores different methods for writing information to the debug window in C# using the Debug class. It delves into three main methods: Debug.WriteLine(), Debug.Write(), and Debug.Print().
Each method serves specific purposes in debugging scenarios.
Debug.WriteLine()Method:- Appends a newline character automatically.
- Suitable for printing information where each piece merits a separate line in the debug output.
Debug.Write()Method:- Similar to
Debug.WriteLine()but does not append a newline character. - Useful when concatenating multiple outputs on the same line is preferred.
- Similar to
Debug.Print()Method:- Part of the
System.Diagnosticsnamespace, offering comprehensive functionality. - Versatile tool for developers to print text messages, variable values, conditional information, stack traces, method entry/exit points, and timestamped messages.
- Part of the
The article emphasizes the importance of effective debugging tools and concludes by highlighting how mastering these techniques can significantly enhance the debugging process, making it more efficient and productive for software development.

Maisam is a highly skilled and motivated Data Scientist. He has over 4 years of experience with Python programming language. He loves solving complex problems and sharing his results on the internet.
LinkedIn