Package Managers for C++
Complex software requires lots of dependencies in their systems. Compiler languages like Python have pip to manage their packages, but we rarely hear package managers for C/C++.
This article covers how to install and implement package managers for C++.
VC Package (vcpkg) - A Package Manager for C++
Dependencies vary from library packages to third-party libraries, which must be kept inside a virtual environment to make a software system work.
This article’s first package manager for C++ is vcpkg.
This section will discuss installing and using the VC package manager library manager on Windows Visual Studio 2017. VC package was originally a package manager for Visual Studio on Windows only.
Today, the VC package is cross-platform and works on OS like Linux and Mac.
To run this package manager, three things are required:
- Visual Studio
- Git
- PowerShell
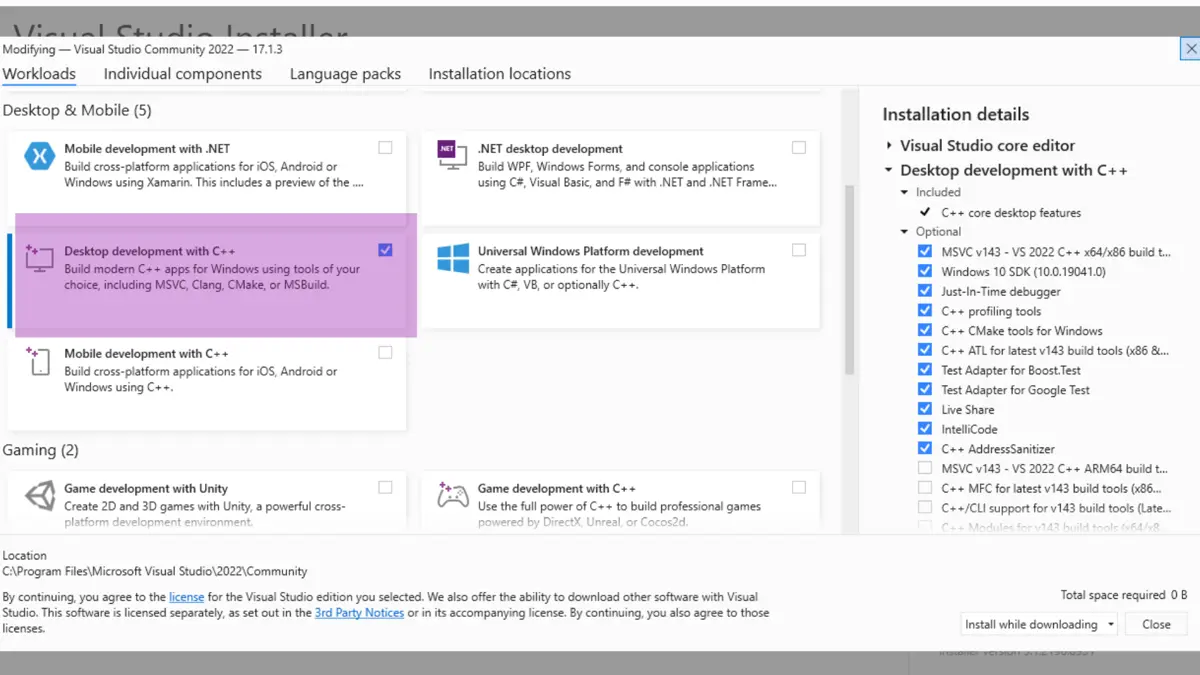
Download and install Visual Studio 2017 or later. While installing, it must be noted that the installation includes Desktop Development with C++, and it must be checked.
Visual Studio is an Integrated Development Environment (IDE) from which packages will be loaded into codes. There is no central repository of C++ libraries, so most are scattered online.
After IDE is installed, Git needs to be installed into the system. It is the software that is used in the distribution of numerous packages available on GitHub.
Git can be downloaded from here.
Install Git
On the first setup page, make sure to check both the boxes for Windows Explorer integration. This will enable Git to be executed from any directory in Windows Explorer.
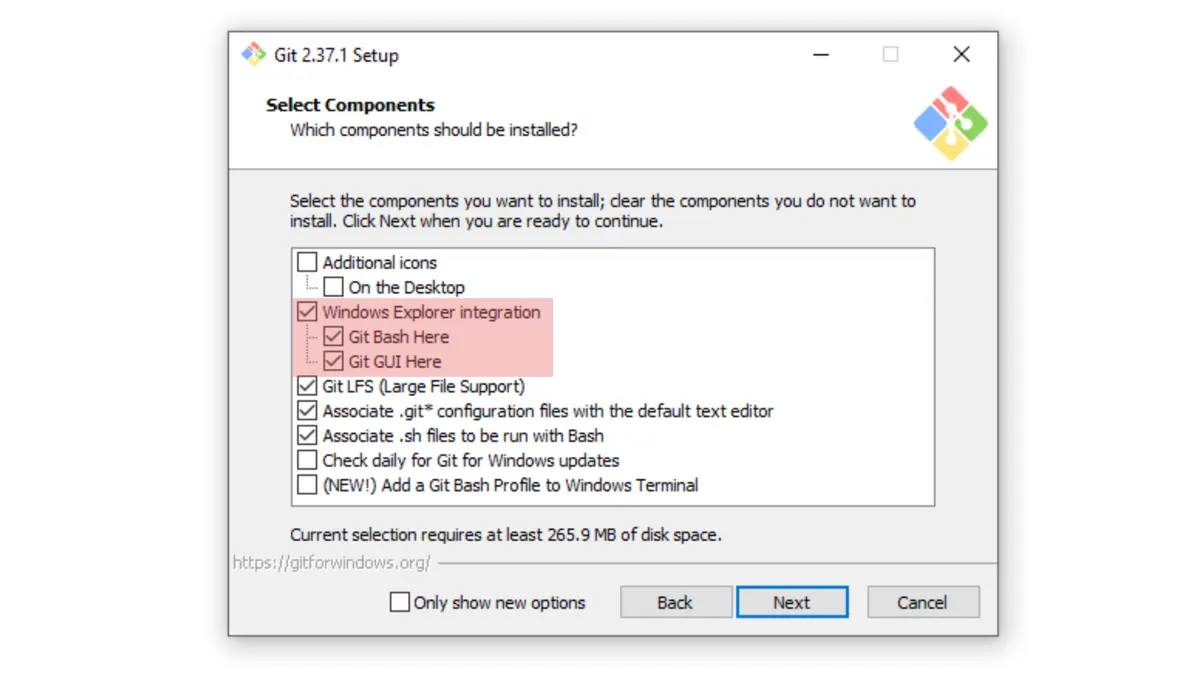
Going with all the recommended choices from the Git installer after the first page is beneficial. Once installed, options to load Git bash will appear inside the dialog box every time the cursor is right-clicked.
Install PowerShell
PowerShell is a command line framework made for configuring systems. It is needed to build the VC package after its cloning.
PowerShell can be downloaded from here. Downloading the Msi package is recommended as it is an automated installer.
Install the VC Package
There are two ways through which this can be executed:
- Clone Git Repository
When a Git Repository is cloned, it creates a directory inside the local system similar to that inside the repository but with only essential packages. The package is then built inside the system using PowerShell.
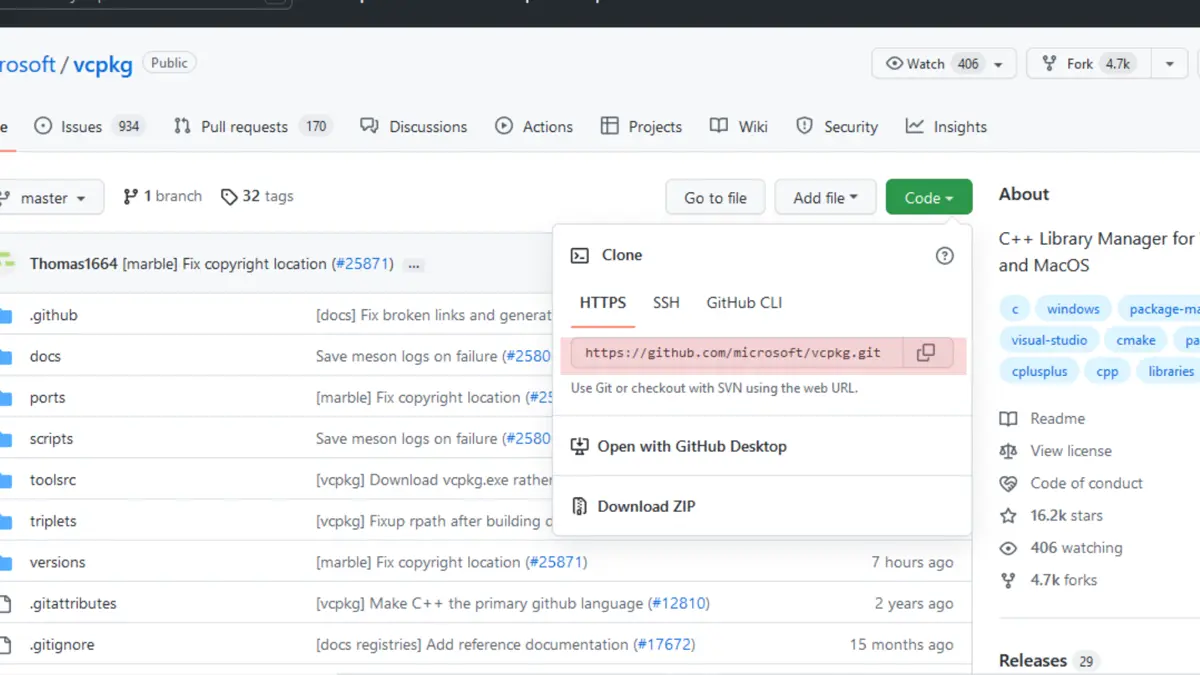
To clone the vcpkg repository, copy the HTTPS link from the GitHub web page.
After copying the link, create a folder dev or src in the C drive and clone the directory by right-clicking inside the directory and clicking on PowerShell 7 > Open here as administrator.
A PowerShell command prompt opens inside that directory. Inside it, write the following command:
git clone https://github.com/microsoft/vcpkg.git
The above command clones the VC Package inside the dev folder we created inside the C drive. After cloning is completed, get inside the cloned directory by typing:
cd cvpkg
C:\dev drive.- Extract an Archive
This method requires downloading an archive from the GitHub webpage and extracting the contents manually to the dev folder in the C drive. Once the archive is extracted, go inside the directory, right-click, and open PowerShell as an administrator.
Whichever of the above two methods are followed, the steps followed are the same after the directory is created.
Inside the directory, the system needs to build the package. This will be done by bootstrapping the builder using PowerShell.
.\bootstrap-vcpkg.bat
The below command will make all libraries from the VC package available for Visual Studio:
.\vcpkg integrate install
At this point, VC Package gets installed into the machine.
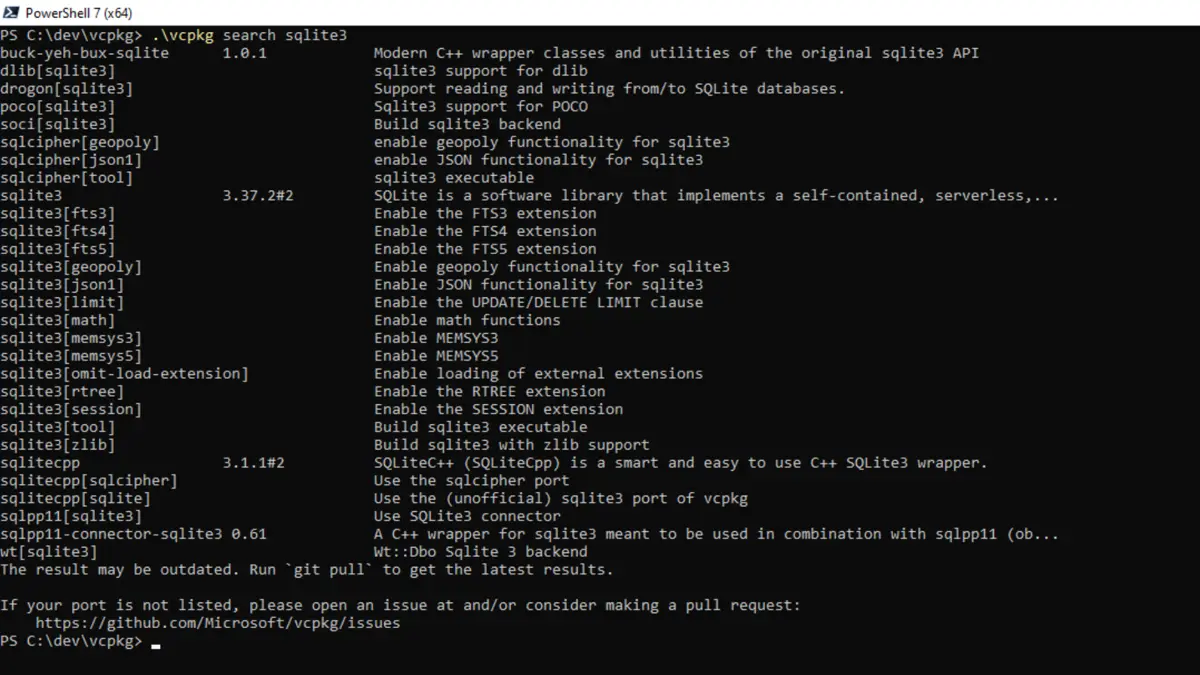
Now, if a particular library is required, like sql3, it can be checked using:
.\vcpkg search sqlite3
If the searched package is available, it will be displayed on the screen.
To install the package, type the command:
.\vcpkg install sqlite3
By default, VC Package installs the 32-bit version of the library. To install the 64-bit, use this command:
.\vcpkg install sqlite3:x64-windows
Use the Installed Library From Visual Studio
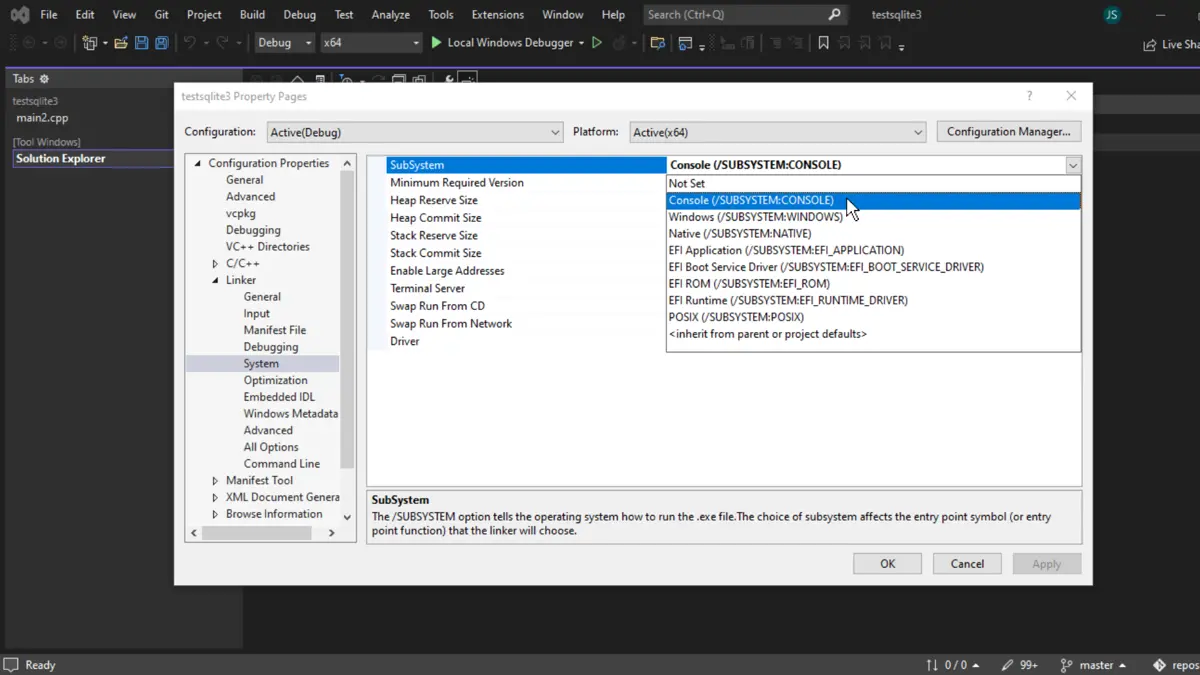
Start by creating a C++ empty project and enable the console sub-system option.
To enable the console sub-system, right-click on the project inside Solution Explorer and click on Properties. Inside Properties, go to linker > system in the left-hand side panel.
The sub-system can be found as the first option there.
Now VC package can be used to load libraries and use them inside the Visual Studio. Let’s write a SQL program in C++ to check if the imported package works properly.
#include <sqlite3.h>

#include <iostream>

int main() {
  sqlite3* db;
  int fd = sqlite3_open("mydb.db", &db);

  if (fd == SQLITE_OK) {
    std::cout << "Success opening the database.\n";
  } else {
    std::cerr << "Error:\n";
    std::cerr << sqlite3_errmsg(db) << '\n';
    exit(1);
  }

  sqlite3_close(db);
}
Output:
Success opening the database.

C:\Users\Win 10\source\repos\testsqlite3\x64\Debug\testsqlite3.exe (process 14648) exited with code 0.
Press any key to close this window . . .
Bpt Package Manager for C++
Another package manager for C/C++ is a Build and packaging tool available on GitHub and Bpt websites. The installation of this package manager is similar to vcpkg, but it cannot be run on an IDE; it must be run independently.
Install the Bpt Package Manager
Bpt can be cloned from GitHub or its installer can be downloaded from here.
Bpt is a standalone application, so it does not need to be built inside the system. Though, its executable file must be placed inside User Path in Windows.
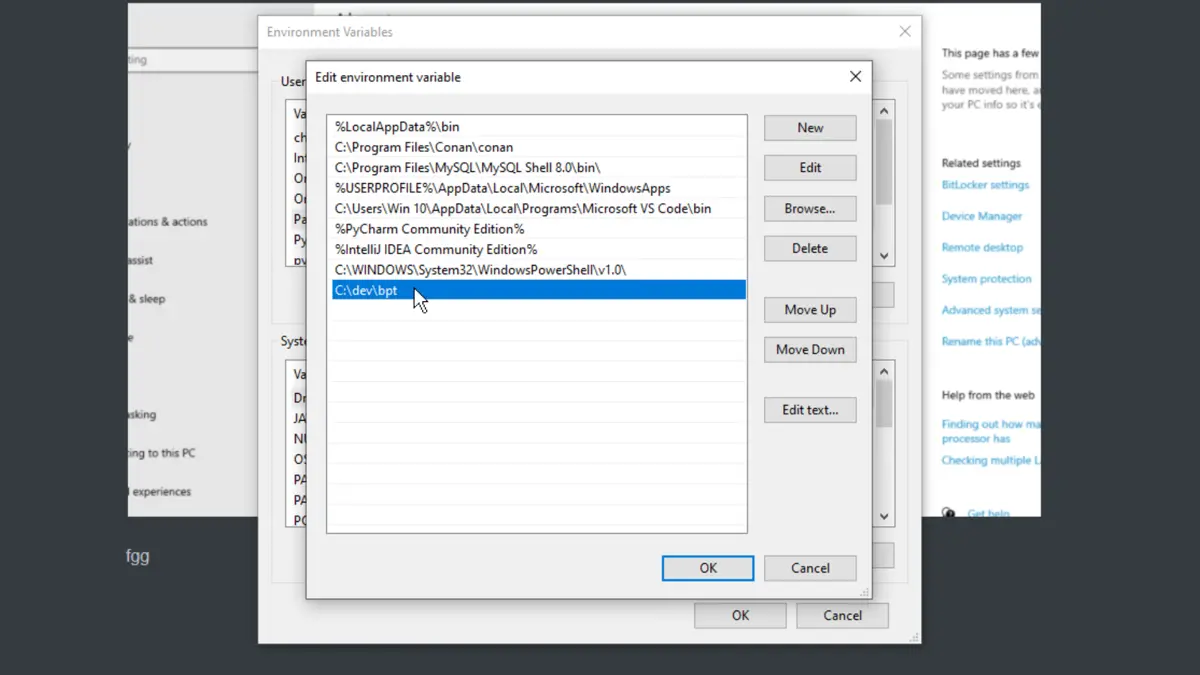
To add Bpt into the file path, move the .exe file to a directory in the C:\ drive, preferable in a subdirectory like C:\dev\bpt, and paste this file path to the user variable in Environment system variables.
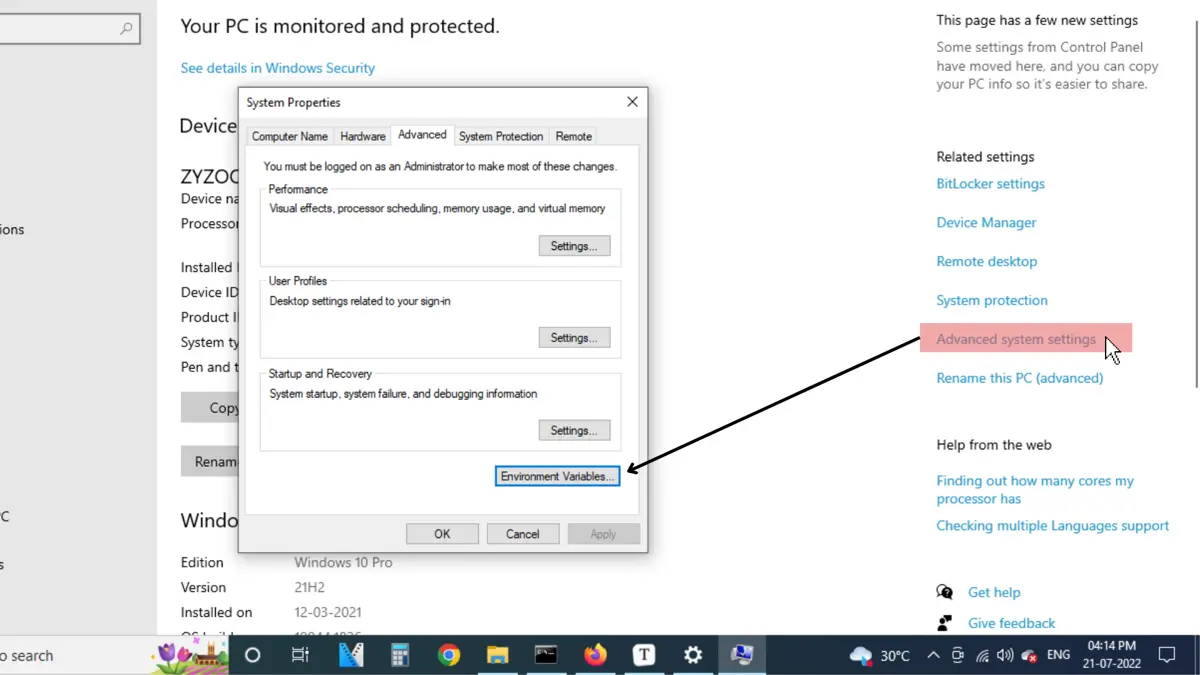
To go to user variables, right-click on This PC Windows 10 or later, and click on Properties. Inside the new window, go to Advanced System Setting>Environment Variables.
Inside Environment Variables, select the path on the upper hand User Variable section and click on Edit...
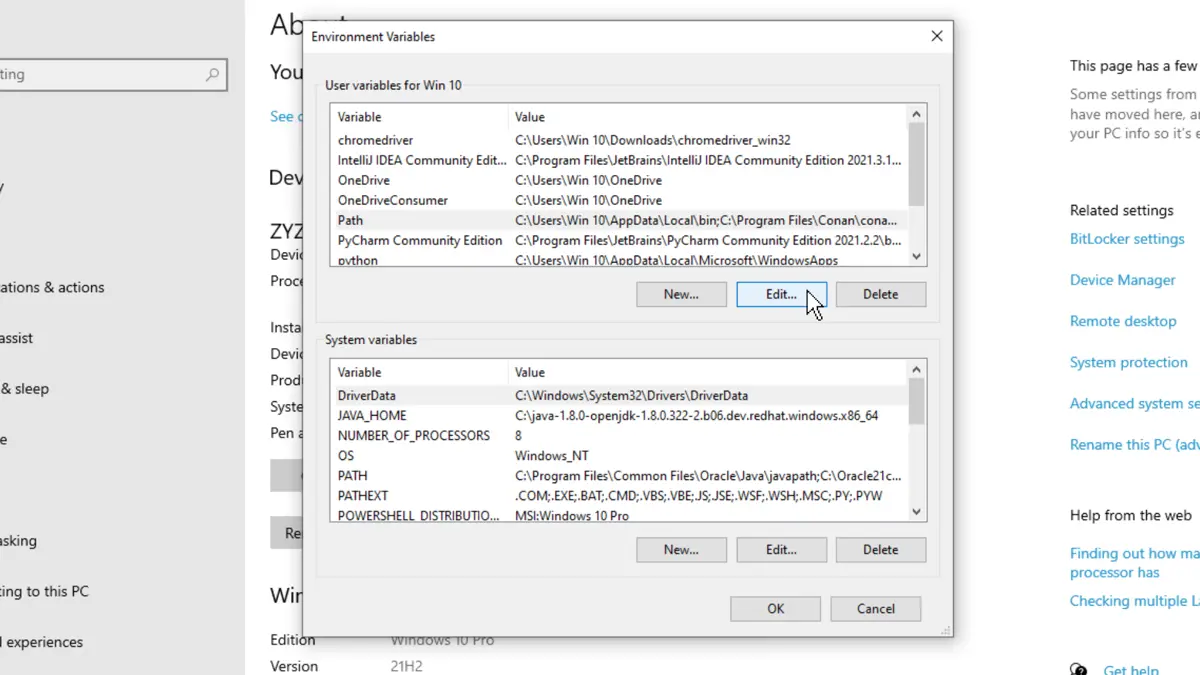
Lastly, click on New, paste the file path, and click OK on all the open dialog boxes.
If done correctly, Bpt will be added to User Variables and can be accessed from Command Prompt. To check, write the command:
bpt --help
It will display a list of commands for Bpt.
Create a Hello World Program
The bpt new command can be used to create a very simple project:
bpt new hello-bpt
A few questions will be asked by bpt. Use the default for the time being.
This will make a new directory called hello-bpt/ and a new project called hello-bpt. bpt new creates projects by default in subdirectories that share the same name as the projects themselves.
Bpt will generate an src/ directory and a bpt.yaml file inside the new project directory. It will also generate an include/ directory if you decide to split headers and sources.
The project’s information is declared in the bpt.yaml file, which the Bpt will use to create, package, test, and distribute the project.
The project’s source code is kept under the src/ (and maybe include/) subdirectory. When you add source files to these directories, including any nested subdirectories of those top-level directories, Bpt will look for and compile them.
The directories src/ and include/ are the source roots.
Make an Entry Point for the Program
A file must be created in a source root with the proper file extension to add a source file to our project. In this example, a source file is added to the source root, root>/src/.
Additionally, since we wish to develop a program, it must be indicated that the source file includes a main() function, which serves as the application’s entry point. To do it, add .main to the file extension.
Create a file like - <root>/src/hello-app.main.cpp, and put the code inside:
#include <iostream>

int main() { std::cout << "Build Complete" }
Compile the Program
The Bpt details the programming toolchain to compile the program. A few made-in toolchain choices in Bpt can be used immediately and will work for our needs.
The toolchain name is: gcc if the program is compiled using GCC, whereas the toolchain name: clang and msvc need to be used if the program is compiled using Clang and Microsoft Visual C++, respectively.
Run the bpt build command as shown in the example below to carry out the build, using the proper toolchain name for the toolchain.
bpt build -t :gcc
If everything goes according to plan, Bpt will emit details about the compilation and link procedure and exit cleanly.
The default location for build results is a directory called _build under the package root. This directory contains the executable with the name hello-app (with a .exe suffix if on Windows).
Running the executable will display the output:
> ./_build/hello-app
Build Complete
Conclusion
This article explains two prominent C++ package managers, vcpkg and Bpt. After going through this article, the reader can easily download, install and configure these package managers.