How to Make A Rich Text Editor in Angular
We will introduce how to make a rich text editor in Angular and which libraries we can create one.
Use Angular-Editor Library to Create Rich Text Editor in Angular
When creating a content management system or any web software that needs the functionality to allow users to edit content, we have two options: use plain text or make a rich text editor. A rich text editor is used to format text using many options it comes.
We can add images, links, audio, and videos that will be converted into HTML content.
There are a lot of libraries in Angular that can help us integrate a rich text editor in our web application, such as Angular-Editor, Angular Trix, Angular Meditor, ngQuill, and Angular inline text editor.
The library we will use to make a rich text editor is @kolkov/angular-editor. We can install @kolkov/angular-editor using the npm package manager.
# CLI
npm install @kolkov/angular-editor --save
After it is installed, we need to import HttpClientModule from @angular/common/http and AngularEditorModule from @kolkov/angular-editor in app.module.ts.
Our app.module.ts will look like below.
# angular
import { NgModule } from '@angular/core';
import { BrowserModule } from '@angular/platform-browser';
import { FormsModule } from '@angular/forms';
import { HttpClientModule} from '@angular/common/http';

import { AppComponent } from './app.component';
import { HelloComponent } from './hello.component';
import { AngularEditorModule } from '@kolkov/angular-editor';


@NgModule({
  imports:      [ BrowserModule, FormsModule, AngularEditorModule, HttpClientModule ],
  declarations: [ AppComponent, HelloComponent ],
  bootstrap:    [ AppComponent ]
})
export class AppModule { }
Now we can configure our rich text editor using AngularEditorConfig. We can make the following configurations.
| Configuration | Type | Default | Description |
|---|---|---|---|
editable |
Boolean |
true |
Making editor enabled or disabled |
spellcheck |
Boolean |
true |
Enable or disable spell checking |
translate |
string |
yes |
Enable or disable translating |
sanitize |
Boolean |
true |
Enable or disable DOM sanitizing |
height |
string |
auto |
We can set the height of the editor using it |
minHeight |
string |
0 |
We can set the minimum height of the editor using it |
maxHeight |
string |
auto |
We can set the maximum height of the editor using it |
width |
string |
auto |
We can set the width of the editor using it |
minWidth |
string |
0 |
We can set the minimum width of the editor using it |
enableToolbar |
Boolean |
true |
Enable or disable toolbar |
showToolbar |
Boolean |
true |
Show or hide toolbar |
toolbarPosition |
string |
top |
We can set the position of the toolbar as top or bottom |
placeholder |
string |
- | We can set a placeholder for the editor |
defaultParagraphSeparator |
string |
- | We can define default paragraph separator such as p tag |
defaultFontName |
string |
- | We can set the default font such as Arial |
defaultFontSize |
string |
- | We can set default font size |
uploadUrl |
string |
- | We can set the image upload endpoint and return a response with the imageUrl key. {"imageUrl" : } |
upload |
function |
- | We can image upload function using it. |
uploadWithCredentials |
Boolean |
false |
We can make image upload password protected or not. |
fonts |
Font[] |
- | We can set an array of fonts that can be used, such as [{name, class}] and so on. |
customClasses |
CustomClass[] |
- | We can set an array of available classes that can be used in the editor. |
outline |
Boolean |
true |
We can set the editor’s outline in focus. |
toolbarHiddenButtons |
string[][] |
- | We can set an array of button names or elements that will be hidden. |
Using the configurations above, we will configure our rich text editor.
# angular
import { Component } from '@angular/core';
import { AngularEditorConfig } from '@kolkov/angular-editor';

@Component({
  selector: 'my-app',
  templateUrl: './app.component.html',
  styleUrls: ['./app.component.css'],
})
export class AppComponent {
  name = 'Angular 6';
  htmlContent = '';

  config: AngularEditorConfig = {
    editable: true,
    spellcheck: true,
    height: '10rem',
    minHeight: '5rem',
    placeholder: 'Enter text in this rich text editor....',
    defaultParagraphSeparator: 'p',
    defaultFontName: 'Arial',
    customClasses: [
      {
        name: 'Quote',
        class: 'quoteClass',
      },
      {
        name: 'Title Heading',
        class: 'titleHead',
        tag: 'h1',
      },
    ],
  };
}
We will create a template using angular-editor tag to display our rich text editor and the output of our rich text editor; we will use the htmlContent variable, which we defined in app.component.ts.
Our code in app.component.html will look like below.
# angular
<h1>AngularEditor</h1>
<angular-editor [(ngModel)]="htmlContent" [config]="config"></angular-editor>
<h1>HTML Output</h1>
<div class="html">
  {{ htmlContent }}
</div>
Output:
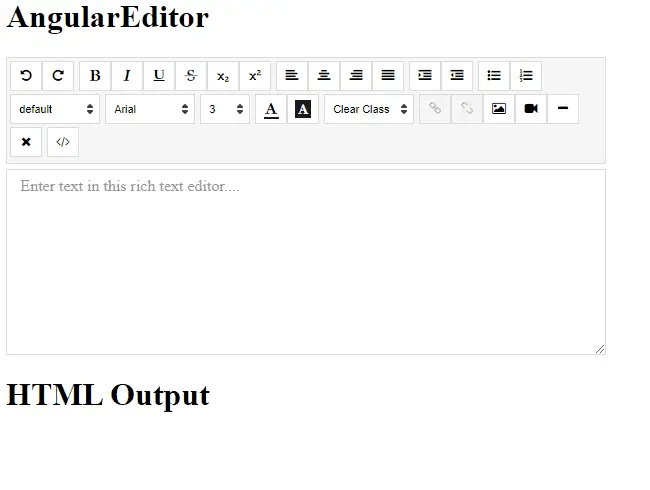
In this easy way, we can create a rich text editor.

Rana is a computer science graduate passionate about helping people to build and diagnose scalable web application problems and problems developers face across the full-stack.
LinkedIn