Angular 中的 routerlink

我們將在 Angular 中引入 routerLink 方法並使用該方法進行導航。
Angular 中的路由連結
導航是任何 Web 應用程式或網站中最重要的部分之一。即使在建立只有一頁的單頁應用程式 (SPA) 時,我們仍然使用導航從一個部分跳轉到另一個部分。
導航使使用者可以輕鬆地在 Web 應用程式中找到他們要查詢的內容。通過提供簡單易懂的導航,我們可以使我們的應用程式使用者友好且易於使用。
Angular 提供了許多導航方法,可以輕鬆實現從簡單到複雜的路由。Angular 提供了一個單獨的模組 RouterModule 來在我們的 Web 應用程式中設定導航。
單頁應用程式 (SPA) 沒有要連結到的不同頁面,但它顯示不同的檢視。通常我們使用 HTML 顯示一個連結,如下所示。
# angular
<a href="/link">
  Example link in HTML.
</a>
Angular 為我們提供了一個指令 routerLink,它可以用來代替 href,如下所示。
# angular
<a routerLink="/home">
  Link Name.
</a>
routerLink 有兩種使用方式,一種作為字串使用,另一種作為陣列使用,如下圖。
# angular
<a routerLink="/home">
  Link used as a string.
</a>
<a [routerLink]="['/', 'user', 'fakhar']">
  Link used as an array.
</a>
當我們想要在連結中傳遞引數時使用 [routerLink],而當我們想要連結時使用 routerLink。我們將通過一個示例,在該示例中,我們將使用 routerLink 瀏覽不同的元件。
因此,讓我們使用以下命令建立一個新應用程式。
# angular
ng new my-app
在 Angular 中建立我們的新應用程式後,我們將使用此命令轉到我們的應用程式目錄。
# angular
cd my-app
讓我們執行我們的應用程式來檢查所有依賴項是否都安裝正確。
# angular
ng serve --open
我們將使用命令生成元件。首先,我們將生成我們的 home 元件。
# angular
ng generate component home
一旦我們生成了我們的 home 元件,我們將生成我們的 about 元件。
# angular
ng generate component about
最後,我們使用以下命令生成我們的 services 元件。
# angular
ng generate component services
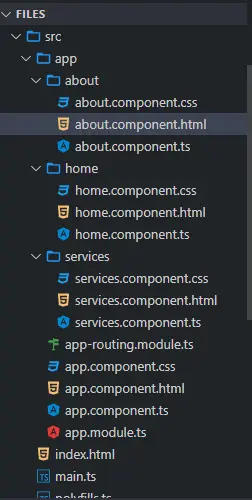
生成我們的元件後,我們將在單獨的資料夾中擁有三個元件,其中包含 3 個檔案。
輸出:
一旦我們生成了我們的元件,我們將建立檢視。首先,我們將從 about 資料夾中開啟 about.component.html 並新增以下程式碼。
# angular
<div class="container" >
  <h1> This is about Component </h1>
  <h3> Try navigating to other components </h3>
</div>
我們將開啟 home 資料夾中的 home.component.html 檔案並新增以下程式碼。
# angular
<div class="container">
 <h1> This is home component </h1>
 <h3> Try navigating to other components </h3>
</div>
我們將開啟 services 資料夾中的 services.component.html 檔案並新增以下程式碼。
# angular
<div class="container">
 <h1> This is Services component </h1>
 <h3> Try navigating to other components </h3>
</div>
一旦我們準備好我們的元件和檢視,我們將在 app-routing.module.ts 中定義我們的路由。我們將匯入 ngModule。
我們還將從 router 匯入 Routes 和 RouterModule 並匯入我們建立的元件。
# angular
import { NgModule } from '@angular/core';
import { Routes, RouterModule } from '@angular/router';
import { AboutComponent}  from './about/about.component';
import { HomeComponent} from './home/home.component';
import { ServicesComponent } from './services/services.component';

@NgModule({
  imports: [RouterModule.forRoot(routes)],
  exports: [RouterModule]
})
export class AppRoutingModule { }
匯入所有內容後,我們將定義到元件的路由,如下所示。
# angular
const routes: Routes = [

    { path: 'about', component: AboutComponent },
    { path: 'home', component: HomeComponent},
    { path: 'services', component: ServicesComponent },
 ];
我們將在 app.component.html 中建立導航選單。我們將使用 routerLink 從我們剛剛定義的路由中獲取連結,並使用 router-outlet 來顯示我們元件的內容。
<ul class="nav navbar-nav">
  <li>
    <a routerLink="/home">Home</a>
  </li>
  <li>
    <a routerLink="/about">About</a>
  </li>
  <li>
    <a routerLink="/services">Services</a>
  </li>
</ul>

<router-outlet> </router-outlet>
輸出:
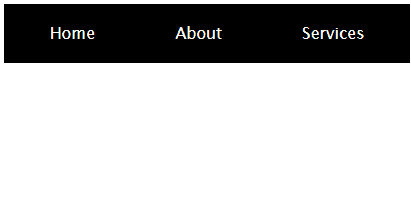
上面的例子表明,我們可以使用 routerLink 並定義路由輕鬆地從一個元件導航到另一個元件。
所以在本教程中,我們學習瞭如何建立元件和定義路由,使用 routerLink 在元件之間輕鬆導航,以及使用 routerLink 和 [routerLink]。

Rana is a computer science graduate passionate about helping people to build and diagnose scalable web application problems and problems developers face across the full-stack.
LinkedIn