Tkinter Tutorial - Layout Management

In the previous sections, we have introduced several Tkinter widget types, such as label, button, drop-down menu, etc. Meanwhile, we have also mentioned briefly how to layout these widgets in the program window. This is the key point that you will learn in this section - Tkinter’s geometry management methods.
Tkinter has three geometry management methods, that is, pack, grid, and place. Let’s go through them one by one.
Tkinter pack Layout Method
pack method, as literally indicated, packs the widget to the window frame after it is created. We come across this layout method in the section Tkinter Label where all the pack options are also listed.
We will show you how to layout widgets with pack method (also its options). A few examples help to demonstrate the right configuration.
Tkinter pack Layout - Relative Position
import tkinter as tk

app = tk.Tk()
app.geometry("300x200")

buttonW = tk.Button(app, text="West", width=15)
buttonW.pack(side="left")

buttonE = tk.Button(app, text="East", width=15)
buttonE.pack(side="right")

app.mainloop()
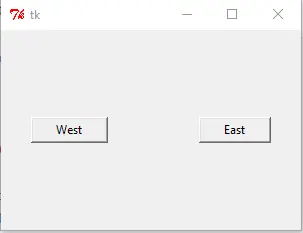
Run the program, you will get a window like this,
As you can see, buttonWest snaps to the left side of the window and buttonEast snaps to the right side of the window. You can try to scale the size of the window below, but you will find that they will still cling to the sides of the window and the relative position will not change.
buttonW.pack(side="left")
side has four options -
topbottomleftright
It places the widget on the side of the window. As illustrated in the example, buttonW is allocated on the left side of the window, because side='left', while buttonE is on the right side of the window, because side='right'.
Now we have an interesting scenario, what happens if two widgets have the same side property, how the layout will be?
Try to answer it yourself, or check it by running the following codes.
import tkinter as tk


app = tk.Tk()
app.geometry("300x200")

buttonW = tk.Button(app, text="West", width=15)
buttonW.pack(side="left")

buttonE1 = tk.Button(app, text="East 1", width=15)
buttonE1.pack(side="right")

buttonE2 = tk.Button(app, text="East 2", width=15)
buttonE2.pack(side="right")

app.mainloop()
Tkinter pack to Add Widget Internal and External Padding
In some cases, you need to add some padding inside or outside the widget so that there is less congestion between the widgets, and also between the widget text and the widget boundaries. Now, you need options as padx, pady, ipadx and ipadx.
import tkinter as tk

app = tk.Tk()
app.geometry("300x200")

buttonW = tk.Button(app, text="West")
buttonW.pack(side="left", ipadx=20, padx=30)

buttonE = tk.Button(app, text="East")
buttonE.pack(side="right", ipadx=20, padx=30)

app.mainloop()
Both buttons add inner 20 units padding and outer 30 units in the x, and the unit is pixel but not the width of one character.
Tkinter pack Layout Filling in X, Y Direction
The following code implementation could automatically fill the widget dimension to the same width or the same height as the window, and when you zoom the window, the size of the control can automatically change with the size of the window.
import tkinter as tk

app = tk.Tk()
app.geometry("300x200")

buttonX = tk.Button(app, text="Fill X", bg="red", height=5)
buttonX.pack(fill="x")

buttonY = tk.Button(app, text="Fill Y", bg="green", width=10)
buttonY.pack(side="left", fill="y")

app.mainloop()
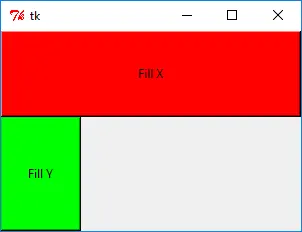
butonX.pack(fill='x') means buttonX will fill the width of the whole window. Similarly, fill='y' will fill the height of the whole window, and meanwhile fill='both' will fill both the width and height.
Tkinter pack Layout Option expand - Automatically Expand
Above fill= option will automatically fill the widget in x and/or y direction when the window size is modified. Another similar requirement is how to automatically display all the contents if the widget includes multiple options, like a list?
import tkinter as tk
import calendar

app = tk.Tk()

buttonX = tk.Button(app, text="Label ", bg="blue", height=5)
buttonX.pack(fill="x")

listboxA = tk.Listbox(app, width=10)
listboxA.pack(fill="both", expand=1)

for i in range(1, 13):
    listboxA.insert(tk.END, calendar.month_name[i])

app.mainloop()
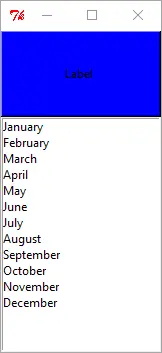
When expand=True or expand=1, the list box will list all the items, from January to December as demonstrated in the above example.
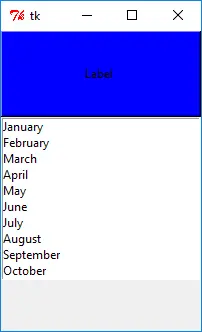
If expand is set to be False, then the list box only shows the first 10 items by default. You need to use the mouse or direction keys to show the hidden items after the list box is selected.
listboxA.pack(fill="both", expand=0)
expand=0 disables the list box to automatically show all items.
Tkinter grid Layout Method
Tkinter grid is another and also the most important layout geometry method. This is the one you should learn if you only want to learn one single method among all geometry managers.
grid is often used in dialog boxes, and you could place the widgets based on the position coordinates of the grid. grid layout method could have stable relative positions of all widgets.
The following example will create a relatively complicated GUI compared to the above examples, which uses as many options of grid as possible that will be explained in the next sections.
import tkinter as tk

app = tk.Tk()

labelWidth = tk.Label(app, text="Width Ratio")
labelWidth.grid(column=0, row=0, ipadx=5, pady=5, sticky=tk.W + tk.N)

labelHeight = tk.Label(app, text="Height Ratio")
labelHeight.grid(column=0, row=1, ipadx=5, pady=5, sticky=tk.W + tk.S)


entryWidth = tk.Entry(app, width=20)
entryHeight = tk.Entry(app, width=20)

entryWidth.grid(column=1, row=0, padx=10, pady=5, sticky=tk.N)
entryHeight.grid(column=1, row=1, padx=10, pady=5, sticky=tk.S)


resultButton = tk.Button(app, text="Get Result")
resultButton.grid(column=0, row=2, pady=10, sticky=tk.W)

logo = tk.PhotoImage(file="python.gif")
labelLogo = tk.Label(app, image=logo)

labelLogo.grid(
    row=0,
    column=2,
    columnspan=2,
    rowspan=2,
    sticky=tk.W + tk.E + tk.N + tk.S,
    padx=5,
    pady=5,
)

app.mainloop()
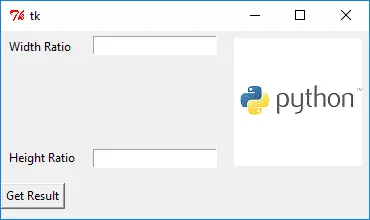
Tkinter grid column and row Options
labelWidth.grid(column=0, row=0, ipadx=5, pady=5, sticky=tk.W + tk.N)
Every widget shall be placed in the absolute cell in the grid layout method. The cell coordinate is determined by column and row.
labelWidth widget is placed in the cell of position (0, 0). The coordinate starts from the upper left corner of the window.
ipadx, ipady, padx and pady options are the same as those in pack method.
Tkinter grid sticky Option
sticky determines how the widget sticks to the cell when the widget is smaller than the cell.
sticky |
Meaning |
|---|---|
W |
stick to left |
E |
stick to right |
N |
stick to top |
S |
stick to bottom |
The default sticky option is center, that is W+E+N+S.
Tkinter columnspan and rowspan Options
labelLogo.grid(
    row=0,
    column=2,
    columnspan=2,
    rowspan=2,
    sticky=tk.W + tk.E + tk.N + tk.S,
    padx=5,
    pady=5,
)
The cell coordinate of labelLogo is (column=2, row=0) and the size of logo is relatively large, therefore it is allocated with cell size of 2x2. columnspan=2 and rowspan=2 means the widget has spans of two cells both in X and Y directions starting from the position of the widget.
Tkinter place Method
Tkinter place method places the widget in an absolute or relative position in the window. We still use the same approach as above to introduce the options of this layout method.
import tkinter as tk

app = tk.Tk()
app.geometry("300x300")

labelA = tk.Label(app, text="Label (0, 0)", fg="blue", bg="#FF0")
labelB = tk.Label(app, text="Label (20, 20)", fg="green", bg="#300")
labelC = tk.Label(app, text="Label (40, 50)", fg="black", bg="#f03")
labelD = tk.Label(app, text="Label (0.5, 0.5)", fg="orange", bg="#0ff")

labelA.place(x=0, y=0)
labelB.place(x=20, y=20)
labelC.place(x=40, y=50)
labelD.place(relx=0.5, rely=0.5)

app.mainloop()
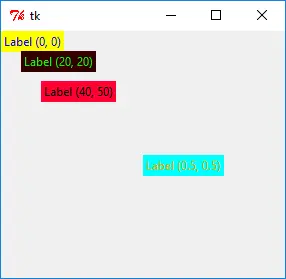
Tkinter place Absolute Position
labelA.place(x=0, y=0)
labelB.place(x=20, y=20)
x= and y= options in place determines the absolute positions of the widget, which have the unit as pixel. For example, lableB.place(x=20, y=20) means labelB is placed in the coordinate of (20, 20).
Tkinter place Relative Position
The drawback of the absolute position is that if there are other widgets in the window placed with relative positions, when the window is zoomed, the widget using the absolute position layout will possibly have the overlap with other widgets.
place layout method also has the relative position option, that is,
labelD.place(relx=0.5, rely=0.5)
Where relx and rely are in the range of 0.0~1.0. It is the relative percentage of the widget position to the window size.
For example, relx=0.5, rely=0.5 means the widget is placed in the 50% of the window width and 50% of the window height.
relx=1.0 is the right boundary of the window, and rely=1.0 is the bottom boundary of the window.

Founder of DelftStack.com. Jinku has worked in the robotics and automotive industries for over 8 years. He sharpened his coding skills when he needed to do the automatic testing, data collection from remote servers and report creation from the endurance test. He is from an electrical/electronics engineering background but has expanded his interest to embedded electronics, embedded programming and front-/back-end programming.
LinkedIn Facebook