PyQt5 Tutorial - Grid Layout
We will learn another layout method in PyQt5 in this tutorial - grid layout.
PyQt5 Grid Layout
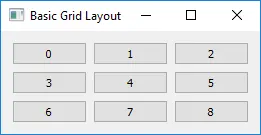
The QGridLayout class lays out widgets in a grid. QGridLayout takes the available space to it and divides it up into rows and columns and then puts each widget into the correct cell.
import sys
from PyQt5.QtWidgets import QWidget, QGridLayout, QPushButton, QApplication


class basicWindow(QWidget):
    def __init__(self):
        super().__init__()
        grid_layout = QGridLayout()
        self.setLayout(grid_layout)

        for x in range(3):
            for y in range(3):
                button = QPushButton(str(str(3 * x + y)))
                grid_layout.addWidget(button, x, y)

        self.setWindowTitle("Basic Grid Layout")


if __name__ == "__main__":
    app = QApplication(sys.argv)
    windowExample = basicWindow()
    windowExample.show()
    sys.exit(app.exec_())
Where,
grid_layout = QGridLayout()
QGridLayout from QWidgets specifies the layout format to be grid layout.
self.setLayout(grid_layout)
It sets the class layout to be just defined layout out method - grid layout.
grid_layout.addWidget(button, x, y)
addWidget method of QGridLayout class puts the widget button to the cell gird at x , y. The top-left position is by default (0, 0).
PyQt5 Grid Layout Span
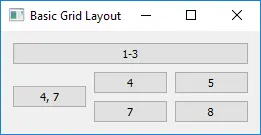
Normally, each widget consumes one cell of the grid, but it is also possible for the widget to occupy more cells using row and column spanning numbers of addWidget() overloaded method.
addWidget(self, QWidget, row, column, rowSpan, columnSpan, Qt.Alignment alignment=0)
The third and fourth parameters are row and column spanning, equal to one by default. If the spanning is -1, the cell widget will extend to the right or bottom edge.
import sys
from PyQt5.QtWidgets import QWidget, QGridLayout, QPushButton, QApplication


class basicWindow(QWidget):
    def __init__(self):
        super().__init__()
        grid_layout = QGridLayout()
        self.setLayout(grid_layout)

        button = QPushButton("1-3")
        grid_layout.addWidget(button, 0, 0, 1, 3)

        button = QPushButton("4, 7")
        grid_layout.addWidget(button, 1, 0, -1, 1)

        for x in range(1, 3):
            for y in range(1, 3):
                button = QPushButton(str(str(3 * x + y)))
                grid_layout.addWidget(button, x, y)

        self.setWindowTitle("Basic Grid Layout")


if __name__ == "__main__":
    app = QApplication(sys.argv)
    windowExample = basicWindow()
    windowExample.show()
    sys.exit(app.exec_())
PyQt5 Grid Layout Stretch
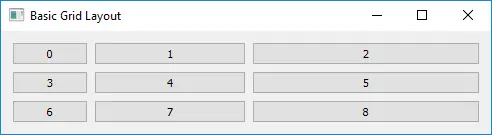
setColumnStretch and setRowStretch sets the stretch factor of column or row. The stretch factor is a relative number compared to other column/row. Columns/rows with a higher factor take more of the available space.
import sys
from PyQt5.QtWidgets import QWidget, QGridLayout, QPushButton, QApplication


class basicWindow(QWidget):
    def __init__(self):
        super().__init__()
        grid_layout = QGridLayout()
        self.setLayout(grid_layout)

        for x in range(3):
            for y in range(3):
                button = QPushButton(str(str(3 * x + y)))

                grid_layout.addWidget(button, x, y)

            grid_layout.setColumnStretch(x, x + 1)

        self.setWindowTitle("Basic Grid Layout")


if __name__ == "__main__":
    app = QApplication(sys.argv)
    windowExample = basicWindow()
    windowExample.show()
    sys.exit(app.exec_())
grid_layout.setColumnStretch(x, x + 1)
It sets the stretch factor of the three rows to be 1, 2, 3 respectively, therefore, the order of column width is Third Column > Second Column > First Column.

Founder of DelftStack.com. Jinku has worked in the robotics and automotive industries for over 8 years. He sharpened his coding skills when he needed to do the automatic testing, data collection from remote servers and report creation from the endurance test. He is from an electrical/electronics engineering background but has expanded his interest to embedded electronics, embedded programming and front-/back-end programming.
LinkedIn Facebook