PyQt5 チュートリアル - グリッドレイアウト Grid Layout
胡金庫
2023年1月30日
このチュートリアルでは、PyQt5 の別のレイアウト方法であるグリッドレイアウトを学習します。
PyQt5 グリッドレイアウト
この QGridLayout クラスは、ウィジェットをグリッドに配置します。QGridLayout 使用可能なスペースを取得し、行と列に分割してから、各ウィジェットを正しいセルに配置します。
import sys
from PyQt5.QtWidgets import QWidget, QGridLayout, QPushButton, QApplication
class basicWindow(QWidget):
def __init__(self):
super().__init__()
grid_layout = QGridLayout()
self.setLayout(grid_layout)
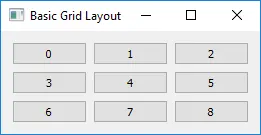
for x in range(3):
for y in range(3):
button = QPushButton(str(str(3 * x + y)))
grid_layout.addWidget(button, x, y)
self.setWindowTitle("Basic Grid Layout")
if __name__ == "__main__":
app = QApplication(sys.argv)
windowExample = basicWindow()
windowExample.show()
sys.exit(app.exec_())
コードでは、
grid_layout = QGridLayout()
QWidgets の QGridLayout は、レイアウト形式をグリッドレイアウトに指定します。
self.setLayout(grid_layout)
レイアウトを、定義したばかりのレイアウトメソッド(グリッドレイアウト)に設定します。
grid_layout.addWidget(button, x, y)
QGridLayout クラスの addWidget メソッドは、ウィジェット button を x , y のセルに配置します。左上隅の座標のデフォルトは (0,0) です。
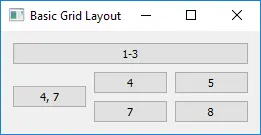
PyQt5 グリッドレイアウトスパン
通常、各ウィジェットはグリッドの 1つのセルを占有しますが、ウィジェットは addWidget() オーバーロードメソッドを使用して、行と列をより多くのセルにまたがることもできます。
addWidget(self, QWidget, row, column, rowSpan, columnSpan, Qt.Alignment alignment=0)
3 番目と 4 番目のパラメーターは行と列にまたがっており、デフォルトでは 1 です。スパニングが -1 の場合、セルウィジェットは右端または下端に拡張されます。
import sys
from PyQt5.QtWidgets import QWidget, QGridLayout, QPushButton, QApplication


class basicWindow(QWidget):
    def __init__(self):
        super().__init__()
        grid_layout = QGridLayout()
        self.setLayout(grid_layout)

        button = QPushButton("1-3")
        grid_layout.addWidget(button, 0, 0, 1, 3)

        button = QPushButton("4, 7")
        grid_layout.addWidget(button, 1, 0, -1, 1)

        for x in range(1, 3):
            for y in range(1, 3):
                button = QPushButton(str(str(3 * x + y)))
                grid_layout.addWidget(button, x, y)

        self.setWindowTitle("Basic Grid Layout")


if __name__ == "__main__":
    app = QApplication(sys.argv)
    windowExample = basicWindow()
    windowExample.show()
    sys.exit(app.exec_())
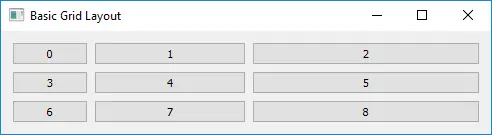
PyQt5 グリッドレイアウトストレッチ
setColumnStretch と setRowStretch は列または行の伸長因子を設定します。ストレッチ係数は、他の列/行と比較した相対的な数値です。より高い係数の列/行は、使用可能なスペースをより多く使用します。
import sys
from PyQt5.QtWidgets import QWidget, QGridLayout, QPushButton, QApplication


class basicWindow(QWidget):
    def __init__(self):
        super().__init__()
        grid_layout = QGridLayout()
        self.setLayout(grid_layout)

        for x in range(3):
            for y in range(3):
                button = QPushButton(str(str(3 * x + y)))

                grid_layout.addWidget(button, x, y)

            grid_layout.setColumnStretch(x, x + 1)

        self.setWindowTitle("Basic Grid Layout")


if __name__ == "__main__":
    app = QApplication(sys.argv)
    windowExample = basicWindow()
    windowExample.show()
    sys.exit(app.exec_())
grid_layout.setColumnStretch(x, x+1)
3 行のストレッチ係数を 1, 2, 3 それぞれに設定します。したがって、列幅の順序は Third Column > Second Column > First Column です。
チュートリアルを楽しんでいますか? <a href="https://www.youtube.com/@delftstack/?sub_confirmation=1" style="color: #a94442; font-weight: bold; text-decoration: underline;">DelftStackをチャンネル登録</a> して、高品質な動画ガイドをさらに制作するためのサポートをお願いします。 Subscribe
著者: 胡金庫
