PyQt5 튜토리얼-그리드 레이아웃
이 튜토리얼에서 PyQt5의 또 다른 레이아웃 방법 인 그리드 레이아웃을 배웁니다.
PyQt5 그리드 레이아웃
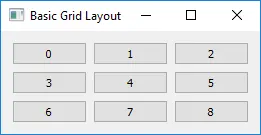
QGridLayout 클래스는 위젯을 그리드에 배치합니다. QGridLayout 은 사용 가능한 공간을 가져 와서 행과 열로 나눈 다음 각 위젯을 올바른 셀에 넣습니다.
import sys
from PyQt5.QtWidgets import QWidget, QGridLayout, QPushButton, QApplication


class basicWindow(QWidget):
    def __init__(self):
        super().__init__()
        grid_layout = QGridLayout()
        self.setLayout(grid_layout)

        for x in range(3):
            for y in range(3):
                button = QPushButton(str(str(3 * x + y)))
                grid_layout.addWidget(button, x, y)

        self.setWindowTitle("Basic Grid Layout")


if __name__ == "__main__":
    app = QApplication(sys.argv)
    windowExample = basicWindow()
    windowExample.show()
    sys.exit(app.exec_())
어디,
grid_layout = QGridLayout()
QWidgets 의 QGridLayout 은 레이아웃 형식을 그리드 레이아웃으로 지정합니다.
self.setLayout(grid_layout)
클래스 레이아웃을 정의 된 레이아웃 출력 방법 인 그리드 레이아웃으로 설정합니다.
grid_layout.addWidget(button, x, y)
QGridLayout 클래스의 addWidget 메소드는 위젯 button 을 x, y 의 셀 거더에 넣습니다. 왼쪽 상단 위치는 기본적으로(0, 0)입니다.
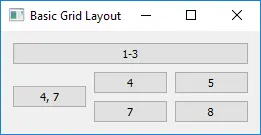
PyQt5 그리드 레이아웃 범위
일반적으로 각 위젯은 그리드의 하나의 셀을 소비하지만, 행과 열 스패닝 번호 addWidget()오버로드 된 메소드를 사용하여 위젯이 더 많은 셀을 차지할 수도 있습니다.
addWidget(self, QWidget, row, column, rowSpan, columnSpan, Qt.Alignment alignment=0)
세 번째 및 네 번째 매개 변수는 기본적으로 1과 동일한 행 및 열 범위입니다. 스패닝이 -1이면 셀 위젯이 오른쪽 또는 아래쪽 가장자리로 확장됩니다.
import sys
from PyQt5.QtWidgets import QWidget, QGridLayout, QPushButton, QApplication


class basicWindow(QWidget):
    def __init__(self):
        super().__init__()
        grid_layout = QGridLayout()
        self.setLayout(grid_layout)

        button = QPushButton("1-3")
        grid_layout.addWidget(button, 0, 0, 1, 3)

        button = QPushButton("4, 7")
        grid_layout.addWidget(button, 1, 0, -1, 1)

        for x in range(1, 3):
            for y in range(1, 3):
                button = QPushButton(str(str(3 * x + y)))
                grid_layout.addWidget(button, x, y)

        self.setWindowTitle("Basic Grid Layout")


if __name__ == "__main__":
    app = QApplication(sys.argv)
    windowExample = basicWindow()
    windowExample.show()
    sys.exit(app.exec_())
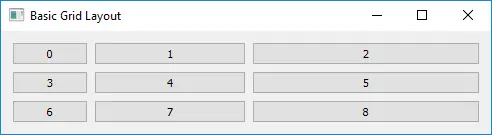
PyQt5 그리드 레이아웃 스트레치
setColumnStretch 및 setRowStretch 는 열 또는 행의 신축 계수를 설정합니다. 신축 계수는 다른 열 / 행에 비해 상대적인 숫자입니다. 계수가 높은 열 / 행은 사용 가능한 공간을 더 많이 차지합니다.
import sys
from PyQt5.QtWidgets import QWidget, QGridLayout, QPushButton, QApplication


class basicWindow(QWidget):
    def __init__(self):
        super().__init__()
        grid_layout = QGridLayout()
        self.setLayout(grid_layout)

        for x in range(3):
            for y in range(3):
                button = QPushButton(str(str(3 * x + y)))

                grid_layout.addWidget(button, x, y)

            grid_layout.setColumnStretch(x, x + 1)

        self.setWindowTitle("Basic Grid Layout")


if __name__ == "__main__":
    app = QApplication(sys.argv)
    windowExample = basicWindow()
    windowExample.show()
    sys.exit(app.exec_())
grid_layout.setColumnStretch(x, x + 1)
세 행의 신축 계수를 각각 ‘1, 2, 3’으로 설정하므로 열 너비의 순서는 Third Column> Second Column> First Column 입니다.

Founder of DelftStack.com. Jinku has worked in the robotics and automotive industries for over 8 years. He sharpened his coding skills when he needed to do the automatic testing, data collection from remote servers and report creation from the endurance test. He is from an electrical/electronics engineering background but has expanded his interest to embedded electronics, embedded programming and front-/back-end programming.
LinkedIn Facebook