HOWTO · Java
JavaFX에서 setAlignment 메서드 사용
이 자습서에서는 JavaFX에서 setAlignment 메서드를 사용하는 방법을 보여줍니다.
이 페이지의 내용
HBox는 모든 구성 요소를 배치하는 레이아웃 구성 요소입니다. 기본적으로 모든 구성 요소를 가로 행으로 구성하지만 때로는 왼쪽, 오른쪽, 중앙, 상단, 버튼 등을 정렬해야 할 수도 있습니다.
이 기사에서는 HBox를 자체 형식으로 정렬하는 방법을 살펴봅니다. 예제를 보고 이해하기 쉽도록 한 줄씩 설명하겠습니다.
JavaFX에서 setAlignment() 메서드 사용
예제에서 사용할 라이브러리는 다음과 같습니다.
import javafx.application.Application; // Package for the whole application
import javafx.geometry.Pos; // Geometric positioning Package for the variable "Pos"
import javafx.scene.Scene; // Package for the scene
import javafx.scene.control.Button; // Package for the button
import javafx.scene.layout.HBox; // The HBox Package
import javafx.stage.Stage; // Package for the stage
이들은 우리가 포함해야 하는 필수 라이브러리이며 목적은 코드에 설명되어 있습니다. 이제 전체 코드를 설명하겠습니다.
우리의 주요 코드는 아래와 같을 것이며 각 줄의 목적은 그 옆에 주석이 달려 있습니다.
public class FxHBox extends Application { // Our main class extends to the Application class
  Button buttonOne, buttonTwo; // Declared two buttons
  HBox _hbox; // Declared a HBox
  Scene scene; // Declared a scene

  public void start(Stage BasicStage)
      throws Exception { // We have to use Exception Handling here as it can generate errors if
                         // anything goes wrong.
    BasicStage.setTitle("HBox Set Allignment"); // Set the  title of the application
    buttonOne = new Button("Button 1"); // Created button 1 with title
    buttonTwo = new Button("Button 2"); // Created button 2 with title

    _hbox = new HBox(buttonOne,
        buttonTwo); // Created an HBox element that holds the two buttons buttonOne & buttonTwo
    _hbox.setAlignment(
        Pos.CENTER); // Here we are customizing the default alignment and place our componet in
                     // center. Here 'Pos' provides the geometic allignment.

    scene = new Scene(_hbox, 400, 300); // Creates the scene with necessary heights and weights
    BasicStage.setScene(scene); // Set the scene
    BasicStage.show(); // Visualize the scene
  }

  public static void main(String[] args) {
    Application.launch(args); // Launch the application
  }
}
여기서 주의해야 할 주요 사항은 setAlignment() 메소드가 사용된 방법입니다. 이를 통해 Hbox의 위치를 사용자 정의할 수 있습니다.
요소에 제공할 수 있는 다양한 정렬이 있습니다. 아래에 나열되어 있습니다.
| 위치 | 설명 |
|---|---|
Pos.BASELINE_LEFT |
기준선 수직 정렬 수평 정렬 왼쪽 |
Pos.BASELINE_CENTER |
기준선 수직 정렬 수평 정렬 가운데 정렬 |
Pos.BASELINE_RIGHT |
기준선 수직 정렬 수평 정렬 오른쪽 정렬 |
Pos.BOTTOM_LEFT |
세로 정렬 하단 가로 정렬 왼쪽 정렬 |
Pos.BOTTOM_CENTER |
세로정렬 하단 가로정렬 중앙정렬 |
Pos.BOTTOM_RIGHT |
세로 정렬 하단 가로 정렬 오른쪽 정렬 |
Pos.CENTER_LEFT |
세로정렬 중앙정렬 가로정렬 왼쪽정렬 |
Pos.CENTER |
세로정렬 중앙정렬 가로정렬 중앙정렬 |
Pos.CENTER_RIGHT |
세로정렬 중앙정렬 가로정렬 오른쪽정렬 |
Pos.TOP_LEFT |
수직 정렬 상단 수평 정렬 왼쪽 정렬 |
Pos.TOP_CENTER |
세로정렬 상단 가로정렬 중앙정렬 |
Pos.TOP_RIGHT |
세로 정렬 위쪽 가로 정렬 오른쪽 정렬 |
이제 예제 코드와 출력의 전체 보기를 살펴보겠습니다. 아래 코드를 복사하여 붙여넣어 테스트 실행을 할 수 있습니다.
import javafx.application.Application;
import javafx.geometry.Pos;
import javafx.scene.Scene;
import javafx.scene.control.Button;
import javafx.scene.layout.HBox;
import javafx.stage.Stage;

public class FxHBox extends Application {
  Button buttonOne, buttonTwo;
  HBox _hbox;
  Scene scene;

  public void start(Stage BasicStage) throws Exception {
    BasicStage.setTitle("HBox Set Allignment");
    buttonOne = new Button("Button 1");
    buttonTwo = new Button("Button 2");

    _hbox = new HBox(buttonOne, buttonTwo);
    _hbox.setAlignment(Pos.CENTER);

    scene = new Scene(_hbox, 400, 300);
    BasicStage.setScene(scene);
    BasicStage.show();
  }

  public static void main(String[] args) {
    Application.launch(args);
  }
}
성공적으로 컴파일하고 실행하면 아래와 같은 출력이 표시됩니다.
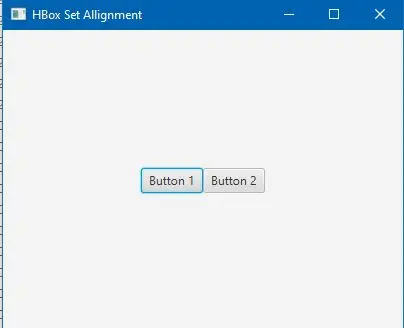
IDE가 라이브러리 자동 포함을 지원하지 않는 경우 컴파일하기 전에 필요한 라이브러리 파일을 수동으로 포함해야 할 수 있습니다.