How to Use Mocha in TypeScript
We will introduce Mocha and how to install and run tests with it in TypeScript.
Mocha in TypeScript
When working on a commercial app or an application that millions of users will use, we need to ensure that our application runs perfectly without any errors. For this purpose, we use Mocha, a JavaScript testing framework.
We can use Mocha to run asynchronous tests and coverage reports, and we can use it to test any of the assertion libraries.
In this tutorial, we will introduce how to install Mocha in TypeScript. As we know, it is a JavaScript framework, and setting up Mocha with TypeScript is not an easy task and will take time and effort.
A TypeScript framework is available that handles all the tasks regarding the changes and updates of Mocha and ts-node and allows us to only worry about writing tests. The ts-mocha library is a handy library we can use to implement and use Mocha easily.
To install it in our project, we can run the following command.
npm i ts-mocha
It is also important to install mocha and expect types in our project by running the following command.
npm i @types/mocha @types/expect
While adding tests and running them, most of us get errors related to typescript-require. We can easily solve this by installing the dependency of ts-node using the following command.
npm i ts-node
This command will install the required library, and we can easily create and run the tests using mocha. Mocha is mostly used with another framework known as chai.
It is a BDD/TDD assertion library for Node.js. This library is paired with any testing frameworks and helps write the tests.
Now, let’s go through an example in which we will create an example Mocha test and check how we can create and use them in our applications. First of all, we need to install our new project.
For this purpose, we will create a new directory with the name mocha and initialize our project by running the command below in our terminal.
npm init
It will ask us for options for our project and create a package.json file. Once we have completed this step, now we will install Express with dotenv using the following command.
npm i --save express dotenv
After installing Express, we will install mocha, chai, typescript, nodemon, supertest, ts-node, and tsconfig-paths in our project. As mentioned earlier, mocha and chai are used together to write tests.
We will install typescript because we will create tests in typescript.
We will use nodemon because it allows us to update the project every time we make changes in our project files. We will install supertest because it allows us to test endpoints in our Mocha test.
This helps us to test out APIs. We will install ts-node, which will allow us to use TypeScript in our node project, and we will need tsconfig-paths, which allows us to use absolute imports throughout the node project in our Mocha tests.
We can run the command below to install them, as shown below.
npm i -D mocha chai typescript nodemon supertest ts-node tsconfig-paths
Now, we will install the types of these dependencies because TypeScript needs to know the types. We can easily install them by using the following command.
npm i -D @types/chai @types/mocha @types/node @types/supertest
We will add build and dev commands in our package.json scripts section, as shown below.
"scripts": {
    "build": "tsc -p .",
    "dev": "NODE_ENV=dev nodemon -r tsconfig-paths/register src/app.ts",
    "test": "echo \"Error: no test specified\" && exit 1"
  },
We will also need to initialize the TypeScript config in our project. We can easily do that by using the following command.
tsc --init
This command will create a new file named tsconfig.json which will have all the configurations of TypeScript. In this file, we need to make a couple of changes.
First, we need to change our output directory so that when TypeScript compiles, it can output a bunch of JavaScript that can be usable on the browser, and we are going to put it inside the dist folder, and some other changes, as shown below.
"rootDir": "./src",
"moduleResolution": "node",
"baseUrl": "./src",
Now, we will set up or add the test command in the package.json file, as shown below.
"test": "NODE_ENV=test mocha --check-leaks -r tsconfig-paths/register -r ts-node/register \"test/**/*.spec.ts\""
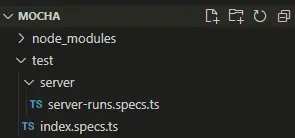
We will create a new directory for tests and add the index.specs.ts file to our test directory. We will create another directory inside our test directory with the name of the server containing a file server-runs.specs.ts, as shown below.
Let’s create some sample tests in both files. The test in the index.specs.ts is shown below.
describe('test', function(){
    it("testing", function(){
        console.log('Looks fine')
    });
})
Let’s create the test in server-runs.specs.ts, as shown below.
describe('server checking', function(){
    it("server is created without any error", function(){
        console.log('Looks fine')
    });
})
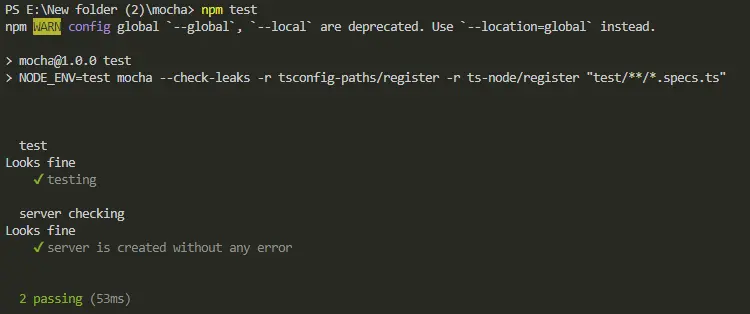
Let’s run the tests and check how they work with the following command.
npm test
Output:

Rana is a computer science graduate passionate about helping people to build and diagnose scalable web application problems and problems developers face across the full-stack.
LinkedIn