How to Image Moments Using OpenCV in Python

Python uses the opencv library to perform various Computer Vision tasks. These tasks involve reading and processing images very efficiently.
There are many properties of an image. The opencv library provides many functions to work with contours.
Contours are associated with helping provide information about the curve along the boundary of an object in the image and its associated shapes. One such feature of contours is called moments.
Moments of an image are defined in terms of Computer Vision. It can be described as the weighted average of the intensity of the pixels of the given image.
We can find information about the area, orientation of the shape, and its centroid using image moments.
This tutorial will discuss image moments using opencv in Python.
Use the moments() Function to Calculate Moments Using OpenCV in Python
In Python, we can use the image moments using the moments() function from the opencv library. The moments up to the third order of a polygon are calculated using this function, and it returns the moments in an array.
We can use the values returned in the given array to calculate the properties like the centroid of a shape.
Let us now see an example of the same.
import cv2

i = cv2.imread("img6.jpg")
img_g = cv2.cvtColor(i, cv2.COLOR_BGR2GRAY)
ret, img = cv2.threshold(img_g, 127, 255, 0)

M = cv2.moments(img)
X = int(M["m10"] / M["m00"])
Y = int(M["m01"] / M["m00"])

cv2.circle(i, (X, Y), 5, (255, 255, 255), -1)
cv2.imshow("Output", i)
cv2.waitKey(0)
cv2.destroyAllWindows()
Output:
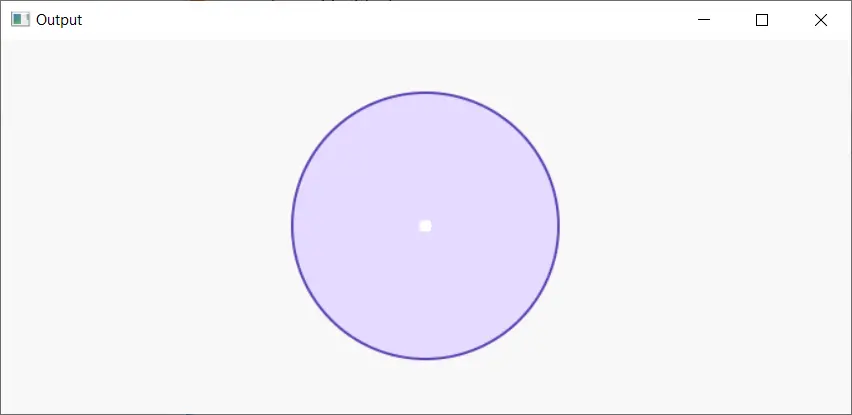
In the above example, we find the centroid of a circle using the image moments, which are calculated using the moments() function.
First, we read the required image. The image is converted to grayscale using the cvtColor function that converts an image to the required color space.
Then we apply the thresholding technique to this image. This will help tackle the noise and filter the pixels with extreme values.
We use the threshold() function and supply the threshold value within the function. In our case, every pixel greater than 127 gets changed to 255, and below 12 gets set as zero.
Then we calculate the image moments. We use the values from the returned array to find the position of the centroid of the circle.
The centroid is plotted on the original image using the circle() function. This function creates a small circle at the coordinates of the centroid.
The final output is displayed, and we use the waitKey() and destroyAllWindows() functions to wait for the user to press some key before closing the output window automatically.
Conclusion
This tutorial discussed image moments in the field of Computer Vision and how to calculate moments using the opencv library in Python. We used the moments() function from the opencv library for this.
The moments are returned in an array and can be used to find details like orientation, area, and centroid of a shape. We calculate the centroid of a circle in our example.
The code is illustrated, and every line is explained.
Manav is a IT Professional who has a lot of experience as a core developer in many live projects. He is an avid learner who enjoys learning new things and sharing his findings whenever possible.
LinkedIn