Pygame get_rect Method
The main aim of this article is to demonstrate how to manipulate an image and move it around the screen using the get_rect() method from the Pygame library.
Use Pygame’s get_rect Method in Python
While working on a project or game in Pygame, one must be able to manipulate the position of the image on the screen. For example, if we want to move the player across the screen, it must change its position on the screen as the player presses a certain button.
Consider the following example:
import pygame
import sys
from pygame.locals import *

pygame.init()

# Set up the window
WIN = pygame.display.set_mode((400, 400))

# Load two images
imgOne = pygame.image.load("images\\img 1.jpg")
imgTwo = pygame.image.load("images\\img 2.jpg")

# Fill bg with black color
WIN.fill((0, 0, 0))

# Place the images
WIN.blit(imgOne, (0, 0))
WIN.blit(imgTwo, (300, 0))

pygame.display.update()

# Obtain the rectangle for each image
imgOneRect = imgOne.get_rect()
imgTwoRect = imgTwo.get_rect()

imgTwoRect.x = imgOneRect.x
imgTwoRect.y = imgOneRect.y

WIN.blit(imgTwo, (imgTwoRect.x, imgTwoRect.y))
pygame.display.update()

while True:
    for event in pygame.event.get():
        if event.type == QUIT:
            pygame.quit()
            sys.exit()
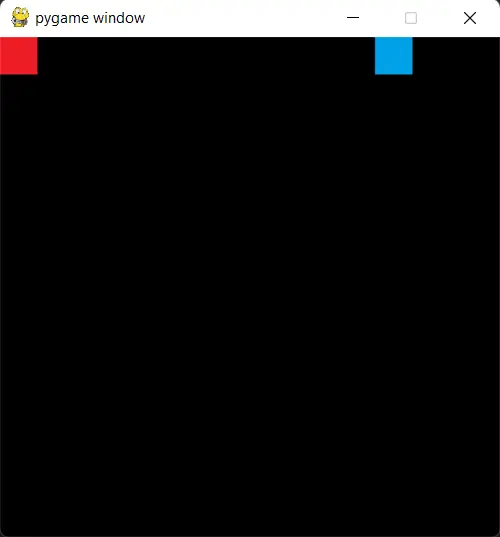
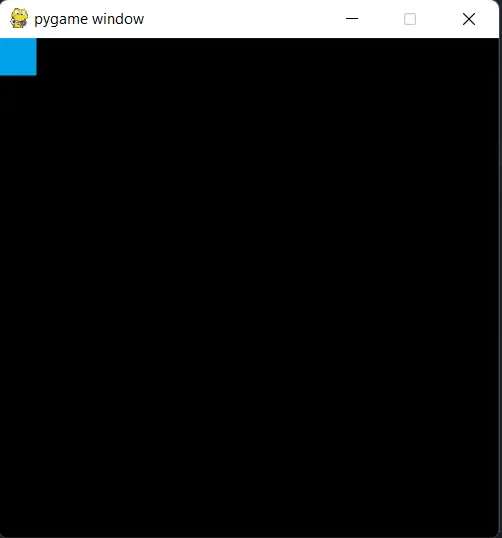
Output when the two images are loaded:
Output after moving the second (blue) image on top of the right one:
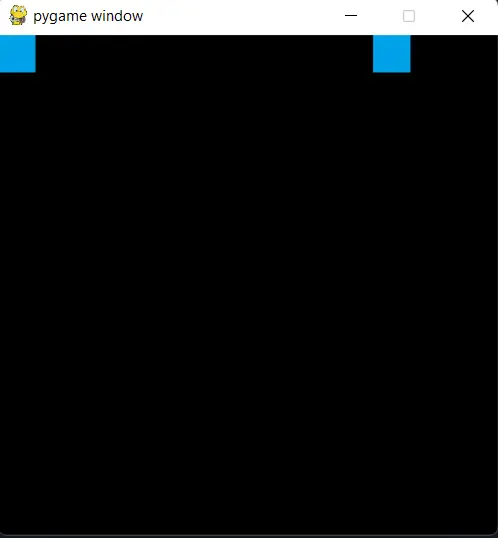
As seen from the above images, we are trying to move the blue image on top of the first image. Instead of getting the desired input, we see that the blue image gets “duplicated”, and instead of completely moving on top of the red image, it is now present in its original position.
Let us see how we can fix this so that the blue image does not get “duplicated”.
the Solution to Duplicated Image When Using Pygame get_rect
Consider the following code:
import pygame
import sys
import time
from pygame.locals import *

pygame.init()

# Set up the window
WIN = pygame.display.set_mode((400, 400))

# Load two images
imgOne = pygame.image.load("images\\img 1.jpg")
imgTwo = pygame.image.load("images\\img 2.jpg")

# Fill bg with black color
WIN.fill((0, 0, 0))

# Place the images
WIN.blit(imgOne, (0, 0))
WIN.blit(imgTwo, (300, 0))

pygame.display.update()

# Make a rect of the size of the image
# set its top-left coords to (300, 0).
img2_rect = imgTwo.get_rect(topleft=(300, 0))

# Set the rect's x value to 0 (x value of red image)
img2_rect.x = 0

# Wait for two seconds
time.sleep(2)

# Redraw the background as a black color
WIN.fill((0, 0, 0))

# Draw the image (blue image) at the coordinates of the rect
WIN.blit(imgTwo, img2_rect)

# Update the screen to show newly drawn images
pygame.display.update()

while True:
    for event in pygame.event.get():
        if event.type == QUIT:
            pygame.quit()
            sys.exit()
Output after loading the two images:
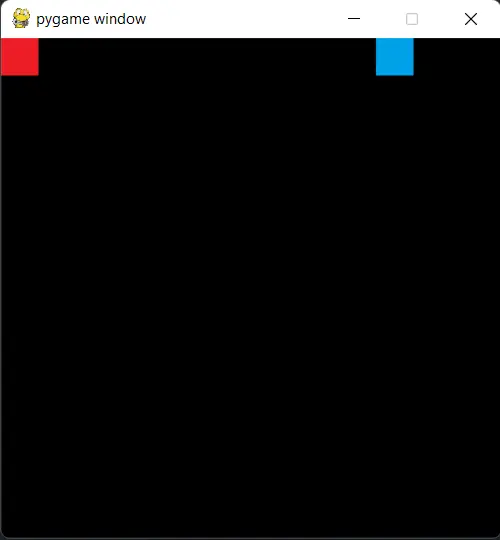
Output after moving the blue image on top of the red image:
The main idea to achieve this is to create a rect using the get_rect method.
The initial position of the rectangle will be (0,0). We must set it to the position of the image we wish to move.
After initializing the rectangle, change the position of the rectangle to wherever we wish the image to be. After that, redraw the background of the image to ensure that any old image instances are removed from the instance of the screen.
Once the background is drawn, we can draw the image to our desired location by calling the blit method and passing it to the image and the rectangle we created earlier. The image will be created at the coordinates of the rect.
The overall workflow of the program is as follows:
-
Initialize Pygame using the
initmethod. -
Set the window by calling the
display.set_mode, normally used to configure the size of the screen, adjust some flags, and color-depth. -
Load the two images using
load. -
Fill the background with the desired color; in this case, the background was set to black using the r,g,b representation of black
(0,0,0). -
Draw the images on the screen using
blit, which requires the x and y coordinates to be passed. Usually given in the form of a tuple. -
Use the
updatemethod to refresh the screen and show any new changes made to the canvas/screen. In this case, it will fill the background with black color and show the two loaded images. -
Use the
get_rectmethod to create arect, and pass a tuple of coordinates to set its initial position. Otherwise, it is normally assigned the position(0,0).In this case, we set the position of the rectangle to the position of the image we wish to move (blue image).
-
Update the rectangle’s position to the new position we wish to set. Normally we set it to the position where we want the image to move.
In this case, its x-coordinate was set to the x-coordinate of the first (red) image.
-
Wait for a few seconds to see the changes after a delay. In this case, the time to wait was set to 2 seconds.
-
Redraw the image’s background; this is done to ensure that any old image instances/pixels that need to be “removed” get overwritten with the background. In this case, it was set to black.
-
After the background is drawn, draw the image we wish to move to its desired location. This is done using the
blitmethod.Two parameters get passed to in this case. First is the image that needs to be drawn, and the second is the
rectwe created earlier.The
rectgives the image the position to be drawn on the screen. The position is usually in the form of x-y coordinates. -
To ensure that all the changes made above, such as moving the images, redrawing the background and reflecting on the screen, we call the
pygame.display.updatefunction. -
The final infinite loop keeps the window running until closed manually. Each event is fetched using the
pygame.event.getmethod, and then based on the type of event, an action is performed.Normally if we want to capture keystrokes, it is also done here. Also sometimes referred to as the “Main loop”.

Hello! I am Salman Bin Mehmood(Baum), a software developer and I help organizations, address complex problems. My expertise lies within back-end, data science and machine learning. I am a lifelong learner, currently working on metaverse, and enrolled in a course building an AI application with python. I love solving problems and developing bug-free software for people. I write content related to python and hot Technologies.
LinkedIn