How to Delete a Record in Flask SQLAlchemy
In this guide, we will see what SQLAlchemy is, how to download SQLAlchemy on our systems and how to implement it. Also, we will demonstrate how the delete function is used in SQLAlchemy.
Use Flask SQLAlchemy
Application developers can use SQLAlchemy to take full advantage of SQL’s power and flexibility with its Python SQL toolkit and Object Relational Mapper. An easy-to-use Python domain language that provides a complete suite of enterprise persistence patterns designed for high-performance and efficient database access.
SQLAlchemy includes dialects for SQLite, PostgreSQL, MySQL, Oracle, MS-SQL, Firebird, Sybase, and others. It supports Python 2.5 and above.
Other supported platforms include Jython and Pypy.
A very famous example of SQLAlchemy is Yelp!
A big advantage of using this is because of the database. We don’t have to change our Python code but only the URI of the database, where URI is like a URL but for the database.
Download Flask SQLAlchemy
There is a simple command used to install SQLAlchemy in our systems. For further details, you can visit the website by clicking here.
pip install flask-sqlalchemy
After installing this, we will import SQLAlchemy from the flask_sqlalchemy library to use the provided functions.
Delete a Record in Flask SQLAlchemy
One of the features of SQLAlchemy is delete(), which is an operation for deleting the data from the front end to the back end.
SQLAlchemy uses the delete() operation to remove data from a database table. Similar objects and instances will be created using an engine when creating a database.
The following are the significant functions used in our example code.
the Customer Function
This function’s sole purpose is to create a table in the database. Using this function, we can add and delete objects.
Further explanation will be provided below.
the Session Basics
Each query generates a session ID, which is used as the holding zone for the data to facilitate future reference. In simple words, the session establishes all interactions with the database and stores all the objects we have used in its lifespan.
In the example provided at the end of this guide, we will use three calls from Session: session.add(), session.delete(), and session.commit().
The session.add() and session.delete() calls are used to add and delete a specific object mentioned in its parameters. It usually starts as a baseless form at first, until we use the session.commit(), then it stores the data given to it.
the session.commit() Call
If all the operations are successful, this call will execute and then continue to save all the data provided to it. But if any operation is not executed or an exception is shown, then a call known as session.rollback() will roll back the transaction performed.
But we only have to know about session.commit(), so we won’t look into this call.
Below is an example of the code that uses the call mentioned above and will show how to delete or remove any data from the database.
the insert Function
This function creates a new object in the table created in the Customer class. It calls the session.add() call to insert the object provided to its parameters.
Then, the session.commit() will be used to save the updated table in the database.
the delete Function
This function is the opposite of the insert function. This function is used to delete the object provided in its parameters.
Here, we use session.delete() to delete the specified object and then use session.commit() to save the updated table in the database.
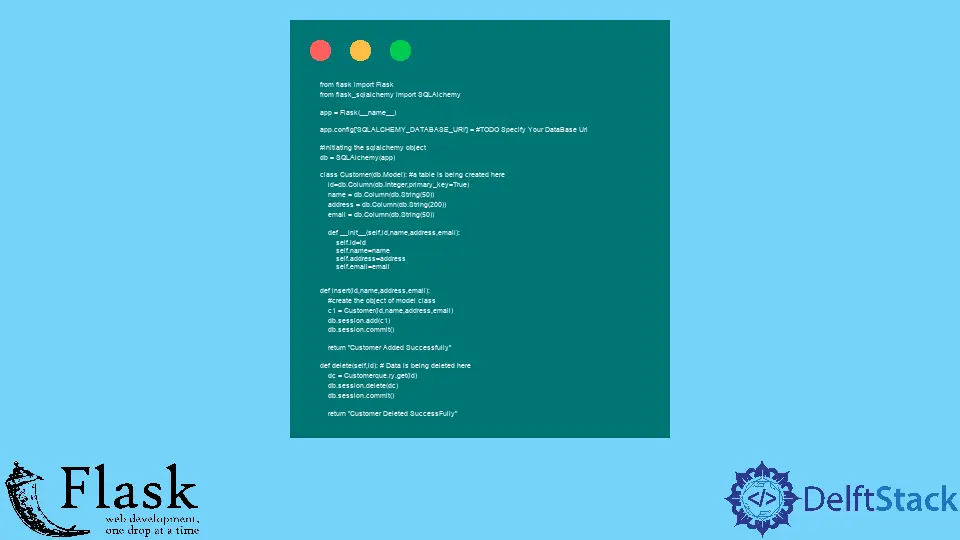
The config here is used to specify the database through the uri. We only have to add the uri of our database.
from flask import Flask
from flask_sqlalchemy import SQLAlchemy

app = Flask(__name__)

# TODO Specify Your DataBase Uri
# TODO Specify Your DataBase Uriapp.config['SQLALCHEMY_DATABASE_URI'] =

# initiating the sqlalchemy object
db = SQLAlchemy(app)


class Customer(db.Model):  # a table is being created here
    id = db.Column(db.Integer, primary_key=True)
    name = db.Column(db.String(50))
    address = db.Column(db.String(200))
    email = db.Column(db.String(50))

    def __init__(self, id, name, address, email):
        self.id = id
        self.name = name
        self.address = address
        self.email = email


def insert(id, name, address, email):
    # create the object of model class
    c1 = Customer(id, name, address, email)
    db.session.add(c1)
    db.session.commit()

    return "Customer Added Successfully"


def delete(self, id):  # Data is being deleted here
    dc = Customerque.ry.get(id)
    db.session.delete(dc)
    db.session.commit()

    return "Customer Deleted SuccessFully"
In this example, we would have to provide a database URI to perform these functions. After providing the URI, the Customer class will execute and create a table for us to work with.
After that, through the insert function, we can create as many objects as we desire, and the delete function will then delete the required object (if any).

Haider specializes in technical writing. He has a solid background in computer science that allows him to create engaging, original, and compelling technical tutorials. In his free time, he enjoys adding new skills to his repertoire and watching Netflix.
LinkedIn