How to Confirm Prompt in PowerShell
-
Use the
-ConfirmSwitch for Confirmation Prompt in PowerShell -
Use the
ifStatement for Confirmation Prompt in PowerShell -
Use the
PromptForChoice()Method for Confirmation Prompt in PowerShell - Use Function-Based Approaches for Confirmation Prompt in PowerShell
- Conclusion
The general idea behind the confirmation prompt is to create an option to switch between different actions. For example, when the user chooses Yes, the script should continue, and when the user selects No, the script should be exited.
PowerShell can automatically ask for confirmation from the user before performing any action using the -Confirm switch. This tutorial will introduce different methods to ask for confirmation from users for any action to proceed in PowerShell.
Use the -Confirm Switch for Confirmation Prompt in PowerShell
PowerShell has a set of preference variables that affect its operating environment and allow you to customize its behavior. $ConfirmPreference is one of the preference variables determining whether PowerShell automatically prompts you for confirmation before running a cmdlet or function.
It helps to prompt confirmation before running cmdlets or functions with a low, medium, or high risk. Since most cmdlets and functions are of medium risk, it does not ask for confirmation if the variable’s value is set to High.
$ConfirmPreference
Output:
High
You have to use the -Confirm switch to the command to prompt the user for confirmation. It forces the command to display the confirmation prompt in PowerShell.
A simpler way to use the -Confirm switch would be by using it in the Remove-Item cmdlet, which can produce a confirmation action in a simpler command. The following command shows an example of its usage.
Command:
Remove-Item test.txt -Confirm
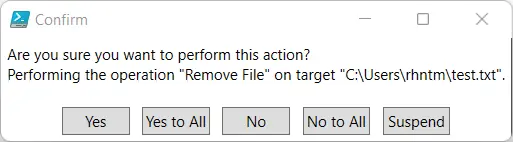
Output:
Confirm
Are you sure you want to perform this action?
Performing the operation "Remove File" on target "C:\Users\rhntm\test.txt".
[Y] Yes  [A] Yes to All  [N] No  [L] No to All  [S] Suspend  [?] Help (default is "Y"): N
In the output, the -Confirm switch forces PowerShell to display a confirmation prompt. This method is straightforward and ideal for scenarios where you want to prompt the user for a simple 'Yes' or 'No' confirmation.
In the GUI of PowerShell, it will look like this.
Use the if Statement for Confirmation Prompt in PowerShell
You can also use the if statement and provide the conditions to continue for users. For example, the following command asks the user for confirmation if they want to continue.
Command:
$confirmation = Read-Host "Do you want to continue?"
if ($confirmation -eq 'y') {
    Write-Host "Welcome to DelftStack."
}
Output:
Do you want to continue?: y
Welcome to DelftStack.
The Read-Host cmdlet is used to read the input from a user and store the input in the variable $confirmation. The if statement checks if the user’s input ($confirmation) is equal to 'y', and if true, it executes the specified action.
This approach provides extra options for customizing the message shown to the user and what happens when they make a choice.
Use the PromptForChoice() Method for Confirmation Prompt in PowerShell
In PowerShell, you can also prompt the users for confirmation using the PromptForChoice() method. It displays a dialog that lets the user select one option from a set of options and proceed with the action according to their choices.
The following command is an example that prompts for a Yes/No input to a user. We define the $title, $question, and $choices for the confirmation prompt.
Command:
$title = 'Confirm'
$question = 'Do you want to continue?'
$choices = '&Yes', '&No'

$decision = $Host.UI.PromptForChoice($title, $question, $choices, 1)
if ($decision -eq 0) {
    Write-Host 'Your choice is Yes.'
}
else {
    Write-Host 'Your choice is No.'
}
This line of code $decision = $Host.UI.PromptForChoice($title, $question, $choices, 1) presents a dialog box to the user using the PromptForChoice() method. In the if statement, It checks if the value stored in the $decision variable is equal to 0 (the index of the first choice in the $choices array).
1st Output:
Confirm
Do you want to continue?
[Y] Yes  [N] No  [?] Help (default is "N"): Yes
Your choice is Yes.
In the 1st output, the user selects "Yes". As a result, the output "Your choice is Yes." gets printed.
2nd Output:
Confirm
Do you want to continue?
[Y] Yes  [N] No  [?] Help (default is "N"): No
Your choice is No.
In the 2nd output, the user selects "No", and the second command inside the brackets will be executed. Hence, "Your choice is No." is printed.
This method offers a more interactive and customizable confirmation experience, making it suitable for complex scenarios.
If you run the above script in the GUI version of PowerShell, you can view the confirm dialog box.

Use Function-Based Approaches for Confirmation Prompt in PowerShell
You can create custom PowerShell functions that include confirmation logic. This allows you to encapsulate the confirmation logic within functions and reuse them throughout your scripts.
Command:
Function Confirm-Action {
    param (
        [string]$Message,
        [scriptblock]$Action
    )
    $confirmation = Read-Host $Message
    if ($confirmation -eq 'y') {
        & $Action
    }
}

Confirm-Action -Message "Do you want to continue?" -Action {
    Write-Host "Action executed."
}
The Function Confirm-Action { ... } line defines a PowerShell function named Confirm-Action. The function takes two parameters: $Message and $Action.
This line, $confirmation = Read-Host $Message, prompts the user for input using the Read-Host cmdlet and stores the input in the variable $confirmation. The $Message parameter specifies the message displayed to the user.
The if statement checks if the user’s input stored in $confirmation is equal to the character 'y'.
Output:
Do you want to continue?: y
Action executed.
When you run the command, it prompts the user for confirmation ("Do you want to continue?") and executes the action with the message "Action Executed" if the user chooses 'y'.
Conclusion
In PowerShell, confirmation prompts are essential for user control and safety. In this article, we explored four methods to implement confirmation prompts; the -Confirm switch simplifies basic 'Yes/No' prompts, the if statement with Read-Host allows customization, the PromptForChoice() method provides advanced interactive options, and using function-based approaches to create a custom function that includes confirmation logic, ensuring efficient and secure user interactions in scripts.
We hope this tutorial helps you understand how to prompt users for a 'Yes/No' confirmation in PowerShell.