How to Save PL/pgSQL Output From PostgreSQL to CSV
-
Use the
COPYCommand to Save Outputs in CSV in PostgreSQL -
the Console Rule of Using a
> -
PSQL2CVTool That Helps to Save Data Into aCSVFile From PostgreSQL

Before we begin working on the different solutions to this problem, let’s understand what a CSV file is and how outputs in PL/pgSQL work.
A PL/pgSQL output is the display of data after running a specific sort of query in PostgreSQL. Sometimes, as a result of running a query or larger queries, you may need to store the data displayed inside a spreadsheet and keep it simple at the same time for viewing or sharing later.
This is where CSV comes in. A CSV file is a COMMA SEPARATED VALUES text file.
Something that tends to have values separated by a comma, mostly found inside a spreadsheet. This is the simplest form of storing data that a user can use to read and write data into.
Now let’s look at how we can effectively store our outputs in a CSV file.
Use the COPY Command to Save Outputs in CSV in PostgreSQL
In the PostgreSQL documentation, the COPY command is listed as something that copies the data between a file and a table.
The COPY command uses the following syntax.
COPY table_name [ ( column_name [, ...] ) ]
    FROM { 'filename' | PROGRAM 'command' | STDIN }
    [ [ WITH ] ( option [, ...] ) ]
    [ WHERE condition ]

COPY { table_name [ ( column_name [, ...] ) ] | ( query ) }
    TO { 'filename' | PROGRAM 'command' | STDOUT }
    [ [ WITH ] ( option [, ...] ) ]
Here you can see how we can save data from a table to a file. We will look at a practical example for you to learn how to use it better.
There are two versions of the COPY keyword; COPY TO and COPY FROM.
COPY TO, as you would have known from the name, copies the data from a table to a file as specified. On the other hand, COPY FROM copies the data from a file to a table.
Each field in our file is inserted into this specific column if a column is specified. If not, the column will receive default values from the file provided.
In another scenario, instead of a file, you can even use the PROGRAM syntax, which will then read from the OUTPUT of that PROGRAM or WRITE to the INPUT of that program. In the case of STDIN or STDOUT, data is transmitted via the client-server interaction.
Let’s now go ahead and use the COPY TO command to save our output in a CSV. For example, today, we have already CREATED a table called CAT with the table as follows.
id      name
1	"Adam"
2	"Jake"
Now let’s go ahead and try to run the COPY TO query.
COPY (Select * from CAT) TO 'D:/test.csv'
We have used drive D: here as it tends to give the least permission errors. If you go ahead and access this file, you will see something as follows.
Output:
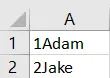
Wait that isn’t good. What happened?
Unfortunately, our query successfully worked when we tried to run the COPY TO operation. However, the results were not separated as they should have been with a COMMA delimiter.
They ended up being appended together. So how do we prevent this?
Looking carefully at our syntaxes, you will notice an OPTION setting in the COPY TO clause. You can add the COMMA delimiter in this OPTION to separate your results.
OPTION can be any of the following.
FORMAT format_name
    FREEZE [ boolean ]
    DELIMITER 'delimiter_character'
    NULL 'null_string'
    HEADER [ boolean ]
    QUOTE 'quote_character'
    ESCAPE 'escape_character'
    FORCE_QUOTE { ( column_name [, ...] ) | * }
    FORCE_NOT_NULL ( column_name [, ...] )
    FORCE_NULL ( column_name [, ...] )
    ENCODING 'encoding_name'
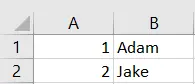
We will use the DELIMITER keyword here. So now, we can modify our query as follows.
copy (select * from cat) to 'D:/test.csv' with delimiter ','
And if you now run the query, the results will be neatly formatted as:
Output:
However, it’s missing one more thing: the header. The names of our columns should be up there with our data.
We can also use the HEADER option from the possible OPTION keywords. PostgreSQL lists the use of HEADER as follows.
Specifies that the file contains a header line with the names of each column in the file. The first line contains the column names from the table on output, and on input, the first line is ignored. This option is only allowed when using CSV format.
Do remember to only use HEADER in CSV formatting. You can now use a query as follows.
copy (select * from cat) to 'D:/test.csv' with delimiter ',' HEADER
But we get an error as follows.
Output:
ERROR:  COPY HEADER available only in CSV mode
SQL state: 0A000
This error occurs because our PostgreSQL session still doesn’t know whether our file is in CSV format. Using the .CSV extension in the filename works but is not read uniquely to determine if our file is a CSV.
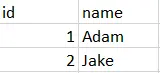
Hence, we can define our file mode in CSV by using a query like this:
copy (select * from cat) to 'D:/test.csv' with delimiter ',' HEADER CSV
Our query now returns the perfect results.
Output:
Client vs. Server-Side Data Saving in PostgreSQL
Let us imagine a PostgreSQL session; SES.1 running on COMPUTER 2 to which all the other computers are connected. The other computers, known in simple terms as clients, have a range of computers from COMPUTER 3 to COMPUTER 11; COMPUTER 2 is the server.
Now COMPUTER 4 wants to download data from SES.1. But on its computer, it sends the COPY TO query to SES.1 and waits for the download.
But, despite the file being downloaded, COMPUTER 4 can never find the file in its directory. Why?
When COMPUTER 4 runs the COPY TO query on SES.1, SES.1 doesn’t download the file. Instead, it throws a USAGE ACCESS error. Why?
Our COMPUTER 4 is not a SUPERUSER. It is merely another PC just connected for issuing simple SQL queries.
Our PostgreSQL DBMS makes sure there are underlying security protocols to not make this work.
The DBMS is responsible for ensuring that attacks on the main server are prevented. So many users are not granted SUPERUSER access, a condition for the COPY FROM operation to succeed from an insecure client attached to the server.
An abstract from the PostgreSQL documentation makes this issue come to light.

Another pretty important constraint that may tend to create problems for the user from accessing the server is the query PRIVILEGES (SELECT, INSERT) and the ROW-LEVEL security that may prevent the user from accessing the server to somehow read data from a table that does not allow a specific operation to succeed.
An EXECUTE QUERY TO FILE is another query that we can use to write the data exported to a file on the disk. In this scenario, you don’t have to use the COPY TO STDOUT query specifically to make it work.
the \COPY Command to Export Data
PSQL comes with a command known as \COPY. It may look similar to COPY TO, but it isn’t.
If you use \COPY to download a file, it will first call the COPY TO STDOUT function and then make sure to fetch this data into a file that is, most probably, something our client can access.
Thus, if you look at it, there is no need to have SUPERUSER access privileges to use the COPY TO or FROM command from the server. \COPY tends to solve many problems.
To use it for the same example that we elaborated on above, let’s go ahead and open PSQL and then write something as follows.
\copy (SELECT * from CAT) to D:\lopster.csv
It will return output as follows on success.
COPY 2
Hence, \COPY seems to be a better alternative to the traditional use of COPY TO and FROM in PostgreSQL.
In most cases, we may avoid connecting as ROOT to the SERVER or allocating SUPERUSER privileges to every user if they try to access the SERVER and issue the download command.
One thing that stands out from many of these is the SECURITY DEFINER clause, which tends to bypass the user PRIVILEGES issue and let a user make a function that they can use as a SUPERUSER in most cases.
It is specified in the PostgreSQL documentation as follows.
| { [ EXTERNAL ] SECURITY INVOKER | [ EXTERNAL ] SECURITY DEFINER }
SECURITY DEFINER is executed with the user’s privileges who created it. And on our server, the ROOT will always create the function.
Hence putting a DEFINER on it will let the other user call the function as the ROOT. This tends to stop two of the most common problems.
- Generalization of the
SUPERUSERprivileges. - Bulk privilege setting of users connected.
Of course, SECURITY DEFINER comes with the capability to safely grant the EXECUTE privilege to only a handful of clients or users that it can trust, mostly ADMINS. In that case, it will use the REVOKE or GRANT call to make sure such privileges are only granted to trustworthy users.
A simple amendment to the CREATE FUNCTION query that we will learn later is this:
GRANT EXECUTE ON FUNCTION test_func() TO admins;
Let’s now define this TEST_FUNC() and see how we can use it.
CREATE FUNCTION test_func()
	RETURNS VOID
	SECURITY DEFINER
	LANGUAGE SQL
	AS $BODY$
		copy (select * from cat) to 'D:/test.csv' with delimiter ',' HEADER  CSV;
	$BODY$;
Here, we have created a function that defines the security as the ROOT user to access it, and the BODY contains the COPY method now met with a different ROOT access privilege.
We must ensure a few things while creating a function that allows SUPERUSER access to a server to issue SQL queries.
- Passing an SQL string as a parameter to the function.
- Issuing the
EXECUTEprivilege to every user on theSYSTEM.
You can effectively make sure that the above doesn’t happen at all. For the first part, simply letting the FILENAME and the TABLENAME argument pass to the function will make it work.
In that case, users will be able to download data from a table that isn’t statically defined in our function. But using an SQL string, for example, allows users to issue a query where you can select from a table or define other conditions inside the table (dynamic) export, which may be more destructive.
A query like that would go as follows.
CREATE FUNCTION test_func(SQL_Query TEXT)
	RETURNS VOID
	SECURITY DEFINER
	LANGUAGE SQL
	AS $BODY$
		EXECUTE SQL_Query;
	$BODY$;
Now any SQL_Query passed to it will be executed as a SUPERUSER, and here comes the issue; what do we do if a STRING is passed that is a completely different query, such as; "SELECT * from pg_admin", some attack intended to open a back-door to the PostgreSQL DBMS.
Hence, in that scenario, the command will be executed as a SUPERUSER, and our connections will be left insecure.
For the second part, the privilege to access FUNCTIONS can also be limited to trustworthy users that can then go ahead and execute queries with the SUPERUSER privilege without creating any issues.
Some of these queries can be assigned to GROUP_ROLES, which are ADMINS at most or other groups trusted within the server and will not be a part of a security breach.
In this scenario, we can use IF and ELSE statements to prevent SQL injections by making sure invalid filenames are not allowed to be executed. The queries follow a specific type within our method.
In this case, only a handful of queries will be allowed to be executed. An example may go as follows.
CREATE FUNCTION test_func(file_s text, table_s text)
	RETURNS VOID
	LANGUAGE plpgsql
	SECURITY DEFINER
	AS $BODY$
	DECLARE
		file_path text := '/var/my_application/csv_output/';
		file_name_regex text := E'^[a-zA-Z0-9_-]+\\.csv$';
		table_name_regex text := '^temp_export_[a-z_]+$';
	BEGIN
		IF
			table_s !~ table_name_regex
		THEN
			raise exception 'Invalid';
		END IF;

		IF
			file_s !~ file_name_regex
		THEN
			raise exception 'File name Invalid!';
		END IF;

		EXECUTE '
			COPY
				' || quote_ident(table_name) || '
			TO
				' || quote_literal(file_path || file_name) || '
			WITH (
				FORMAT CSV, HEADER
			);
		';
	END;
$BODY$;

REVOKE ALL ON FUNCTION test_func(file_s text, table_s text)
	FROM PUBLIC;
GRANT EXECUTE ON FUNCTION test_func(file_s text, table_s text)
	TO [GROUP_NAME];
Here we use the REGEX to define a specific query syntax that can be executed. It may not have invalid characters and if our parameters passed are not equal to it, they are characterized as INVALID.
Rest is appending the PARAMETER names in the function to the EXECUTE query and then ENDING the function.
A REVOKE ALL will remove the user privileges from the PUBLIC group that may be all the users in the system. And once it is revoked and the public group cannot access our method anymore, we can then specify the GROUP_Name that can take on this role and EXECUTE our method.
the Console Rule of Using a >
You must have probably seen the use of the sign '>' in command lines. It specifies the output of a preceding argument to be put to the latter argument or name passed after the sign.
So a syntax may apply as follows.
[QUERY] > [FILE_NAME]
In PSQL, to export data from a file, we can do something as follows.
psql -U postgres -d postgres -t -A -F"," -c "select * from cat" > D:\test_2.csv
Not specifying the -U command tends to issue a connection as a normal user that may, in most cases, not work. The other arguments include the table passed after -C, which stands for Command and then OUTPUT to the FILENAME with the directory defined in the FILE_NAME argument.
Before that, you may notice the -T, the -A, and the -F keywords. What are they, and how can we use them?
The -T is a keyword that does not print COLUMN_NAMES in the output CSV file. If you were to remove the -T and then issue the command, the differences would be as follows, except COLUMN_NAMES and ROW_FOOTERS.
With -T:
Output:
1	Adam
2	Jake
Without -T:
Output:
id	name
1	Adam
2	Jake
(2 rows)
The -A prints the NON-EMPTY input lines to the standard output in our console. And the -F stands for SEPARATORS in PSQL, where we define the separator as a , which can work for our file.
And as you may have guessed, not using -F will lead to something like this:
Output:
id|name
1|Adam
2|Jake
(2 rows)
Now that we are clear on using the '>' command in PSQL, let’s look at some more ways to save PostgreSQL data into our file.
PSQL Query Modifications to Save Data From a Table or Expression in System
Another way to issue the PSQL command given above is to use something as follows.
postgres=# \f ','
Field separator is ",".
postgres=# \a
Output format is unaligned.
postgres=# \o 'D:/table_make.csv'
postgres=# select * from cat;
postgres=# \q
This can be used once you are connected to your PostgreSQL session. You define the field separators and the output format, after which you issue the \O command appended to the SELECT query.
So what you did in lines #6 and 7 can be written as:
\o 'D:/table_make.csv' select * from cat;
-O or \O puts all the query output into the filename defined. It has syntax as below.
--output=filename
Another good alternative to the \O command is the \G, which allows you to define options too with saving the data from the Postgres table. It is used as follows.
\g [ (option=value [...]) ] [ filename ]
\g [ (option=value [...]) ] [ |command ]
Basic Structure for Issuing Commands on Different Interfaces for Saving Data to CSV File in PostgreSQL
On something like SSH, the following would work.
$ ssh [PG_SERVER] 'psql -d postgres "COPY (select * from cat) TO STDOUT WITH CSV HEADER"' > output_make.csv
For Docker, we may use the following.
$ ssh [PG_SERVER] 'docker exec -tu postgres postgres psql -d postgres "COPY (select * from cat) TO STDOUT WITH CSV HEADER"' > output_make.csv
In a KUBERNETES CLUSTER that tends to be nodes running apps with packaged dependencies, we can use:
kubectl exec -t postgres-2592991581-ws2td 'psql -d postgres -c "COPY (select * from cat) TO STDOUT WITH CSV HEADER"' > output_make.csv
Another set of commands issued inside PSQL includes different variations of the FORMAT CSV option. Once again, to clarify, we provide different variations to allow our readers to have multiple options to run a command rather than just going forward with one, in case that doesn’t work, ending up in errors.
psql -U postgres -c "SELECT* FROM cat" --csv postgres
This tends to get the table in CSV format with commas and then output it to the console.
Output:
 id,name
1,Adam
2,Jake
Another implementation that may follow is:
psql -U postgres -c "SELECT * FROM cat" --csv -P csv_fieldsep="^" postgres
This will use the ^ rather than a , to separate values. However, if you tend to make the mistake of putting the FIELD_SEP value in single commas, it will return an error as:
psql: error: \pset: csv_fieldsep must be a single one-byte character
psql: fatal: could not set printing parameter "csv_fieldsep"
So make sure to enclose it in double commas to ensure that it is a BYTE string rather than a single CHAR. Running the above will output something as follows.
Output:
id^name
1^Adam
2^Jake
And from here, we can then use the PIPELINING to effectively output our data into the system.
psql -U postgres -c "SELECT* FROM cat" --csv postgres > D:\point_table.csv
In scenarios like these, we are better off using either the ' or the " notation to denote the FILE_NAMES or other important keywords. It is better to use them alternatively to get the best out of both and see which works perfectly.
Another similar syntax to the above includes:
psql -h [DB_LOC] -p [PORT] -U user -d [DB_NAME] -F $'\t' --no-align -c "SELECT * FROM CAT" > import-tab.csv
PSQL2CV Tool That Helps to Save Data Into a CSV File From PostgreSQL
To install PSQL2CSV on Homebrew, you can use something as follows.
$ brew install psql2csv
You may have to use CHMOD for manual installations to make a full installation with an executable file.
PSQL2CSV follows a syntax:
psql2csv [OPTIONS] < QUERY
psql2csv [OPTIONS] QUERY
To use the command, use the following commands.
psql2csv dbname "select * from cat" > data.csv
or
$ psql2csv --no-header --delimiter=$',' --encoding=latin1 [DB_NAME] <<sql
> SELECT *
> FROM cat
> LIMIT 1
> SQL
This will print just one line with no headers and the delimiter defined as ,.
We hope that you learned the different ways you can output data from a PostgreSQL database to a CSV file with plenty of different methods that we studied today. Follow proper coding notations and refer to us if you find a mistake in the code given.

Hello, I am Bilal, a research enthusiast who tends to break and make code from scratch. I dwell deep into the latest issues faced by the developer community and provide answers and different solutions. Apart from that, I am just another normal developer with a laptop, a mug of coffee, some biscuits and a thick spectacle!
GitHub