SQLite Database in JavaScript
- Install the Required Node.js Dependency in JavaScript
- Create the SQLite Database Inside the Node.js in JavaScript
- Insert Data Into the SQLite Database Using Node.js in JavaScript
- Access Data From the SQLite Database Using Node.js in JavaScript
- Delete Data From the SQLite Database Using Node.js in JavaScript

The browser provides various storage systems like local storage, session storage, and indexed DB. These storage systems can temporarily store data for a particular time inside the browser itself.
But sometimes, you might need to temporarily store the data inside some storage or database system for a more extended period. Then, in this case, using the local storage, session storage, or indexed DB may not be a good option.
We can use 3rd part database systems such as relational or NoSQL databases like SQLite, SQL, MongoDB, etc. And there is no shortage of these options.
SQLite is a lightweight relational database management system. This tutorial will perform various CRUD operations like Create, Read, Update, and Delete on this data using the JavaScript programming language.
Since we are implementing the backend (i.e., the database model), we will be using the JavaScript runtime called Node.js.
Install the Required Node.js Dependency in JavaScript
First, we must create a project using the npm init and then add an index.js file to that project.
To implement the SQLite database in Node.js, we have to install a package called the sqlite3 by running the following command using the node package manager (npm).
npm install sqlite3
After installing the dependency, you can import it inside the index.js file and store it inside a variable sqlite3 as shown below. You can give any name to this variable, but it’s also better to provide it with some appropriate name so that we can easily understand it.
var sqlite3 = require('sqlite3').verbose();
The verbose() function will set the execution mode to verbose to produce long stack traces.
Create the SQLite Database Inside the Node.js in JavaScript
To create a database, we have to create an object of the sqlite3. It has a method called Database(), which we must call by passing a parameter.
The parameter will tell the sqlite3 where it should store the data. For this example, we will be holding the database inside the system’s memory.
But, if you want to store the database inside a file (which you must do), then, in that case, you have to create a new file with a .db file extension and then pass the relative location of the file as a string value to the Database() method. Then we will store the database reference inside the variable db.
The database schema will have id and name columns. Inside the name column of the database, we will store the users’ names.
We will first create an array called users that will contain the array’s names.
var db = new sqlite3.Database(':memory:');

const users = ['Sara', 'Mike', 'James', 'David', 'Emily'];

db.serialize(function() {
  db.run('CREATE TABLE mytable (id, name)');
});

db.close();
We will use the serialize() method on the db, taking a callback function as a parameter. The serialize() method will run the code which we write inside this method one at a time.
This is crucial because we want to perform database operations stepwise. For example, we first have to create the database and then insert some value into it and not the other way around.
We will run a database query within the callback function using the run() method and create the database called mytable with two columns (id, name).
After performing our task on the database, we always have to close the database connection using the close() method.
We will be created separate methods for inserting the data, accessing the data, and deleting the data from the database. After making these functions, we will call these functions inside the callback function of the serialize() method.
Insert Data Into the SQLite Database Using Node.js in JavaScript
We have created a separate function called the insertData() to insert the data into the database. Since the db reference is available globally, we can access it inside the insertData() function.
We will write an insert query using the prepare() method to insert the data into the database. The query will insert two values (?,?) inside the mytable database, then we will store this query inside a variable insertQuery.
Now we can use the insertQuery variable that contains the database query for inserting the data into the database. We will add the users’ names from the users array.
We will be using a for loop and then take each name from the users array with its index inside the database. As we have already, to run a database query, we use the run() method.
After every insertion, we will print a message that the data is inserted successfully on the console.
function insertData() {
  var insertQuery = db.prepare('INSERT INTO mytable VALUES (?,?)');
  for (var i = 0; i < users.length; i++) {
    insertQuery.run(i, users[i]);
    console.log('Data inserted successfully...');
  }
  insertQuery.finalize();
}
Finally, after we have inserted all the data into the database, we will use the finalize() method to complete the insertion process.
Access Data From the SQLite Database Using Node.js in JavaScript
To access the data that we have inserted into the database, we have to use the SELECT query of the relational database. We have created another function called accessData().
Since we want to access all the database rows, we will use the each() method provided by the sqlite3 package.
The each() method takes two parameters, the first is the select query, and the second is the callback function that will throw either an error or provide us with every row of the database.
Suppose we encounter some error while retrieving some data from the database. We will throw an error message; if everything goes as expected, we will print the id and name present inside the database using the row object.
function accessData() {
  db.each('SELECT * FROM mytable', function(err, row) {
    if (error) return console.log(err.message);
    console.log(row.id + ': ' + row.name);
  });
}
Delete Data From the SQLite Database Using Node.js in JavaScript
To delete the database from the database, we will create a function called deleteData. This function will take a single parameter “name” (the name that must be deleted from the database).
Here also, to run the DELETE query of the database, we will use the run method on the database.
To this function, we will pass the DELETE query as the first parameter, which will delete a name from the database, and the name which needs to be deleted will be passed as a second parameter to the function.
function deleteData(name) {
  db.run('DELETE FROM mytable WHERE name=?', name, err => {
    if (err) return console.log(err.message);
    console.log(`${name} deleted successfully...`);
  });
}
The third parameter is the callback, which will throw an error if something goes wrong. But suppose the data is deleted successfully from the database.
As shown above, we will print a message that whatever name you want to delete is being deleted successfully.
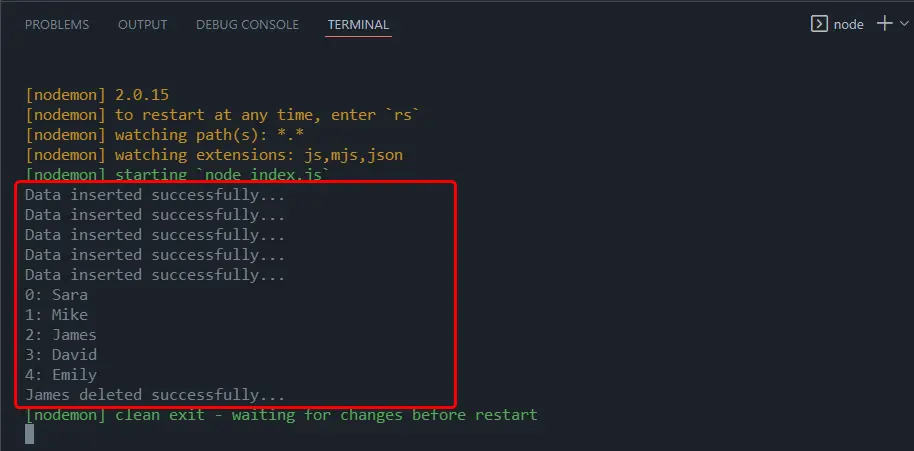
Finally, as shown below, we will call all of these three functions, which we have created inside the callback of the serialize() function. In the end, we will delete the name “James” from the database.
db.serialize(function() {
  db.run('CREATE TABLE mytable (id, name)');

  insertData();
  accessData();
  deleteData('James');
});

db.close();
At this stage, you run the database using the npm start command.
Output:
To verify that the name James has completely been deleted from the database, you can call the accessData() function again.
Output:
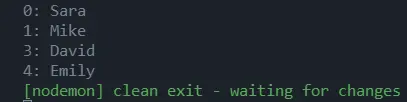
As you can see, the name James has been deleted from the database.

Sahil is a full-stack developer who loves to build software. He likes to share his knowledge by writing technical articles and helping clients by working with them as freelance software engineer and technical writer on Upwork.
LinkedIn