How to Create an Editable ComboBox in JavaScript

We use the input form field at many places, especially while working with HTML forms.
The input field only allows us to have a single function, and that is to enter the text inside the input field. And if you want to add other functionality like a dropdown list, you have to use another HTML element to implement that.
What if you want to implement both these functionalities inside the input field itself. Is it even possible?
Yes, this can be done with the help of a datalist. Using datalist, we can create an editable ComboBox that simultaneously achieves two functionalities (i.e., text input and dropdown list).
Create an Editable ComboBox in JavaScript
Below we have an HTML document that consists of a label tag and a script tag within the body tag. The label is just a text that will help the user provide information about the ComboBox.
And using the script tag, we have linked a JavaScript file inside which we will be writing our code.
<!DOCTYPE html>
<html lang="en">
<head>
    <meta charset="UTF-8">
    <meta http-equiv="X-UA-Compatible" content="IE=edge">
    <meta name="viewport" content="width=device-width, initial-scale=1.0">
    <title>Document</title>
</head>
<body>
    <label>List of Countries: </label>
	<script src="./index.js"></script>
</body>
</html>
Output:
List of Countries:
If you run the code, you will get the above output. To create an editable ComboBox in JavaScript, we have to follow the below steps.
Step 1: Creating a datalist in JavaScript
We aim to create a combination of an input field and a dropdown list.
First, we will create a datalist list, then create an input field. After that, we will add the datalist to the input field.
A datalist HTML element creates a list that contains a set of options that a user can choose from. The options inside the datalist are represented by the option HTML element.
Below we have created a function called createDataList(), which will create the datalist. Inside this function, we created an array of values where we have specified all the options shown on the datalist.
Depending on your requirements, you can add as many options as you want to the datalist. To create a datalist, we will use the document.createElement() function and pass datalist as the parameter and store the datalist inside the datalist variable.
Then we will set an id to this datalist using dataList.id. To add the options stored inside the values variable to the datalist, we defined inside the array; we will use a forEach loop to iterate over each array element.
Every array element will be stored inside the value variable by the forEach loop. Inside the forEach, we will create an option HTML element.
This option HTML element will be created for every option at every iteration.
function createDataList() {
  var values =
      ['Afghanistan', 'Åland Islands', 'Albania', 'Algeria', 'American Samoa'];

  var dataList = document.createElement('datalist');
  dataList.id = 'country_list';

  values.forEach(value => {
    var option = document.createElement('option');
    option.innerHTML = value;
    option.value = value;
    dataList.appendChild(option);
  })
  document.body.appendChild(dataList);
}

createDataList();
Using the option.innerHTML, we specify what data we will show after selecting a particular option from the list. The option.value specifies what data will be shown when the list is visible.
For example, if option.innerHTML = "IN" and option.value = "INDIA", when the list is visible, you will see INDIA as the option, but after selecting the option INDIA, inside the input field, you will get IN. In our example, we are setting both of these values the same.
After assigning a value to our option, we can then append that option to the datalist. Finally, after assigning all the options to the datalist, we can append the datalist to the body tag using the appendChild function.
In the end, we will call the createDataList() function, which will create the datalist. Don’t forget to call this function; otherwise, the datalist will not be created.
Step 2: Adding datalist to an Input Field
Now that we have created the datalist, we can add that list to the input field.
For this, we first have to create an input tag inside our HTML document. On this input tag, we have to specify some attributes such as:
type: The type of data the input field can take. In our case, we will be entering the country’s name, which is a text, to specify the type astext.id: Unique id to the input field.list: This is the most important attribute, and this attribute needs to be specified if you are using adatalist. Here, the value of this attribute will be theidof thedatalistelement, which we have specified while creating thedatalistelement.
<input type="text" id="country" list="country_list">
This was the entire process of creating an editable ComboBox in JavaScript. Now you run the code inside your browser to see the output.
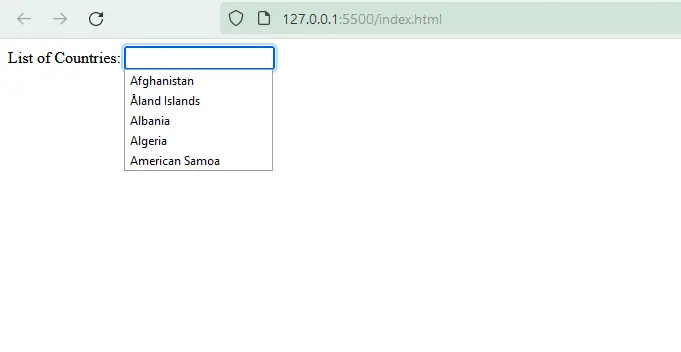
After the web page is loaded inside the browser, if you double click on the input field, it will show the entire list with the options we have defined inside the datalist as shown above.
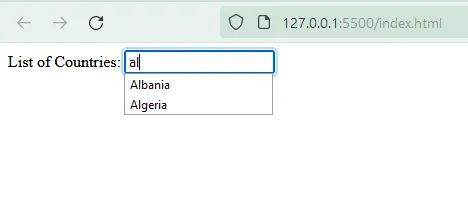
If you start typing the letters inside the input field, it will also show you the list. But the options shown in the list may vary depending upon what letters you type.
Above is how we can create and use an editable ComboBox with dual functionality of input field and dropdown list using JavaScript.

Sahil is a full-stack developer who loves to build software. He likes to share his knowledge by writing technical articles and helping clients by working with them as freelance software engineer and technical writer on Upwork.
LinkedIn