The Repaint() Method in Java
-
Introduction to
repaint()Method in Java -
Using
repaint()Method in Java -
Best Practices for Using
repaint()in Java - Conclusion
This tutorial introduces the repaint() method in Java.
Explore the diverse applications of the repaint() method in Java, from direct usage for immediate updates to targeted repainting of specific areas and scheduled repainting with TimerTask, uncovering essential techniques for crafting dynamic and responsive graphical user interfaces.
Introduction to repaint() Method in Java
In Java, the repaint() method is a crucial element in graphical user interface (GUI) programming. Belonging to the Component class that lies in the java.awt package, this method is used to request the repainting of a graphical component, triggering the graphical user interface to update and reflect changes in its appearance.
When invoked, repaint() signals the system that the associated component needs to be redrawn, ensuring that any modifications to its state or content are visually represented. This is particularly valuable in scenarios involving dynamic content, animations, or user interactions where real-time updates to the graphical interface are essential.
Essentially, the repaint() method plays a pivotal role in maintaining a responsive and visually up-to-date user interface in Java applications. Here are the different syntaxes for the repaint() method:
Basic Syntax
public void repaint()
This basic form of the repaint() method is used to request a repaint of the entire component.
Repainting a Specific Area
public void repaint(int x, int y, int width, int height)
This version of the repaint() method allows you to specify a rectangular region (defined by its x, y, width, and height) that needs to be repainted. Only the specified region will be redrawn.
Scheduling Repaint Using TimerTask
public void repaint(long time, int x, int y, int width, int height)
This variant of the repaint() method is used in conjunction with TimerTask for scheduling repainting after a certain delay (time) and for a specific rectangular region.
These are the primary syntaxes for the repaint() method. Depending on your requirements, you can use the basic form or specify a region to be repainted.
It’s important to note that the actual repainting may not happen immediately after calling repaint(). Instead, it schedules a repaint request, and the actual repainting is performed by the AWT event dispatching thread.
Using repaint() Method in Java
Direct Usage of the repaint() Method
The repaint() method in Java is crucial for immediate updates in graphical user interfaces. When used directly, it signals the system to refresh the entire component, ensuring real-time reflection of any state changes.
This method is vital for maintaining a responsive and dynamic user interface, allowing developers to seamlessly update visual elements in their Java applications.
Here, we have an example of AWT that draws ovals when the mouse is clicked. First, we override the paint() method and set some points for the oval; then, in mousePressed(), we called the repaint() method that will call the paint() method after calling the update() method.
Code Example:
import java.awt.*;
import java.awt.event.*;
import java.util.*;
import javax.swing.*;
public class SimpleTesting extends JPanel implements MouseListener {
  private Vector v;
  public SimpleTesting() {
    v = new Vector();
    setBackground(Color.white);
    addMouseListener(this);
  }
  public static void main(String args[]) {
    JFrame frame = new JFrame();
    frame.getContentPane().add(new SimpleTesting());
    frame.setTitle("Repaint Method");
    frame.setDefaultCloseOperation(JFrame.EXIT_ON_CLOSE);
    frame.setLocationRelativeTo(null);
    frame.setSize(375, 250);
    frame.setVisible(true);
  }
  public void paint(Graphics g) { // paint() method
    super.paint(g);
    g.setColor(Color.black);
    Enumeration enumeration = v.elements();
    while (enumeration.hasMoreElements()) {
      Point p = (Point) (enumeration.nextElement());
      g.drawOval(p.x - 20, p.y - 20, 40, 40);
    }
  }
  public void mousePressed(MouseEvent me) {
    v.add(me.getPoint());
    repaint(); // call repaint() method
  }
  // MouseListener method blank implementation
  public void mouseClicked(MouseEvent me) {}
  public void mouseEntered(MouseEvent me) {}
  public void mouseExited(MouseEvent me) {}
  public void mouseReleased(MouseEvent me) {}
}
The goal of this program is to create a simple drawing application where clicking on the panel results in the creation of circles centered around the clicked points.
The SimpleTesting class, extending JPanel and implementing the MouseListener interface, serves as the foundation for a straightforward drawing application in Java. Its constructor initializes a Vector to store points and sets the panel’s background color to white, while the main method establishes a JFrame and configures its properties, integrating an instance of SimpleTesting before making the frame visible.
The overridden paint method manages custom drawing, specifically circles centered around stored points. Mouse clicks, implemented through MouseListener, dynamically add points to the vector, triggering a repaint of the panel.
Additional methods from MouseListener are implemented but remain empty for this application’s scope.
Output:
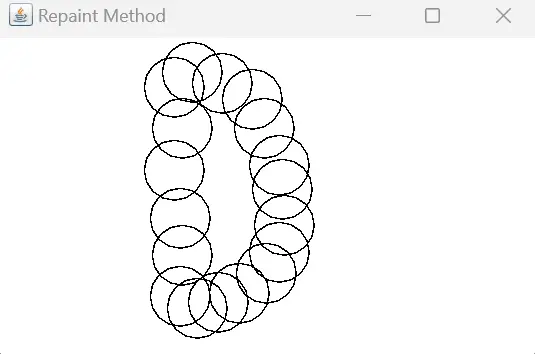
Upon running the application, a JFrame window titled Repaint Method will appear. The panel within the frame is initially white.
Clicking anywhere on the panel will create a black circle centered around the clicked point. Subsequent clicks will result in additional circles being drawn, illustrating the responsiveness of the repaint() method to update the GUI dynamically.
This program demonstrates the simplicity and effectiveness of using the repaint() method in a graphical application. It provides a practical example of how the method can be employed to create dynamic and interactive user interfaces in Java Swing.
Repainting a Specific Area
The repaint() method’s significance lies in its ability to selectively update specific areas of a graphical component. This targeted repainting enhances efficiency by refreshing only the necessary regions and optimizing performance in Java applications.
By isolating repaints to specific areas, developers can achieve responsive and visually polished user interfaces, minimizing unnecessary redraws and contributing to an overall improved user experience.
In this example, we will create a Swing application featuring a custom-drawn rectangle. Upon clicking a button, the color of this rectangle will change, showcasing the targeted repainting of a specific area.
import java.awt.*;
import java.awt.event.ActionEvent;
import java.awt.event.ActionListener;
import javax.swing.*;

public class SpecificRepaintExample extends JFrame {
  private Color rectangleColor = Color.BLUE;

  public SpecificRepaintExample() {
    // Set up the frame
    setTitle("Specific Repaint Example");
    setSize(300, 200);
    setDefaultCloseOperation(JFrame.EXIT_ON_CLOSE);

    // Create a JPanel for custom drawing
    JPanel drawingPanel = new JPanel() {
      @Override
      protected void paintComponent(Graphics g) {
        super.paintComponent(g);
        // Draw a rectangle with the current color
        g.setColor(rectangleColor);
        g.fillRect(50, 50, 100, 50);
      }
    };

    // Create a button to trigger repaint
    JButton repaintButton = new JButton("Change Color");

    repaintButton.addActionListener(new ActionListener() {
      @Override
      public void actionPerformed(ActionEvent e) {
        // Change the color and trigger a repaint of a specific area
        rectangleColor = Color.RED;
        drawingPanel.repaint(50, 50, 100, 50);
      }
    });

    // Add components to the frame
    setLayout(new BorderLayout());
    add(drawingPanel, BorderLayout.CENTER);
    add(repaintButton, BorderLayout.SOUTH);
  }

  public static void main(String[] args) {
    SwingUtilities.invokeLater(new Runnable() {
      @Override
      public void run() {
        new SpecificRepaintExample().setVisible(true);
      }
    });
  }
}
The application starts by creating a JFrame in the first step, configuring its title, size, and default close operation. Following this, a JPanel called drawingPanel is introduced for custom drawing, specifically overriding the paintComponent method to draw a rectangle.
Within this method, a rectangle is drawn at coordinates (50, 50) with a width of 100 and a height of 50, its color determined by the rectangleColor variable. The next step involves creating a JButton named repaintButton to change the rectangle’s color and trigger a repaint of the specified area.
An action listener is added to this button, ensuring that upon clicking, the rectangle’s color shifts to red, and repaint(50, 50, 100, 50) is called to target the defined area for repaint. Components are then organized in the frame using a BorderLayout, positioning the drawing panel in the center and the button at the bottom.
Lastly, the main method orchestrates the creation and modification of Swing components on the Event Dispatch Thread (EDT).
Output:
 |
 |
|---|
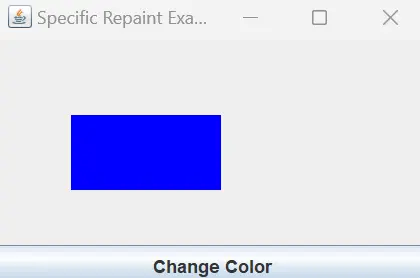
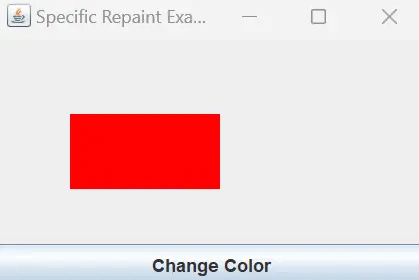
Upon running the application, a window will appear with a blue rectangle and a button below it. Clicking the Change Color button will turn the rectangle red, demonstrating the targeted repainting of the specified area.
This example showcases how the repaint() method can be used to refresh only a specific region of a component, providing developers with a powerful tool for optimizing GUI performance in Java applications.
Scheduled Repainting With TimerTask
The scheduled use of the repaint() method with TimerTask is crucial for orchestrating timely updates in Java GUIs. By employing scheduled repainting, developers can create animated effects and dynamic content, enhancing user interfaces.
This method ensures periodic, automated calls to repaint(), enabling the development of visually engaging applications with smooth transitions and real-time updates, contributing significantly to an immersive user experience.
Let’s delve into a comprehensive example where we’ll create a simple animation using Java Swing. In this scenario, we’ll use a TimerTask to periodically update the position of a graphical element and trigger a repaint, resulting in a smooth and animated effect.
import java.awt.*;
import java.util.Timer;
import java.util.TimerTask;
import javax.swing.*;

public class ScheduledRepaintExample extends JFrame {
  private int xPosition = 50;
  private int yPosition = 50;

  public ScheduledRepaintExample() {
    // Set up the frame
    setTitle("Scheduled Repaint Example");
    setSize(300, 200);
    setDefaultCloseOperation(JFrame.EXIT_ON_CLOSE);

    // Create a JPanel for custom drawing
    JPanel drawingPanel = new JPanel() {
      @Override
      protected void paintComponent(Graphics g) {
        super.paintComponent(g);
        // Draw a circle at the current position
        g.setColor(Color.BLUE);
        g.fillOval(xPosition, yPosition, 30, 30);
      }
    };

    // Schedule the TimerTask for animation
    Timer timer = new Timer();
    timer.scheduleAtFixedRate(
        new AnimationTask(), 0, 100); // Schedule a repaint every 100 milliseconds

    // Add the drawing panel to the frame
    add(drawingPanel);
  }

  // TimerTask for animation
  class AnimationTask extends TimerTask {
    @Override
    public void run() {
      // Update the position for animation
      xPosition += 5;
      yPosition += 2;

      // Trigger a repaint of the drawing panel
      repaint();
    }
  }

  public static void main(String[] args) {
    SwingUtilities.invokeLater(new Runnable() {
      @Override
      public void run() {
        new ScheduledRepaintExample().setVisible(true);
      }
    });
  }
}
The application commences by establishing a JFrame, configuring its title, size, and default close operation. Subsequently, a JPanel named drawingPanel is introduced to facilitate custom drawing, with the paintComponent method being overridden to depict a circle at the current position.
Within this method, a blue circle is initially drawn at coordinates (50, 50). To introduce animation, a nested class named AnimationTask is created, extending TimerTask and responsible for updating the circle’s position and triggering a repaint.
A Timer is instantiated to schedule the AnimationTask at fixed intervals, specifically every 100 milliseconds, resulting in a seamless animation effect. During the execution of the AnimationTask’s run method, the circle’s position is updated, and repaint() is invoked to trigger a repaint of the drawing panel.
Components are then added to the frame, initiating the animation automatically. Finally, the main method guarantees that Swing components are appropriately created and modified on the Event Dispatch Thread (EDT).
Output:
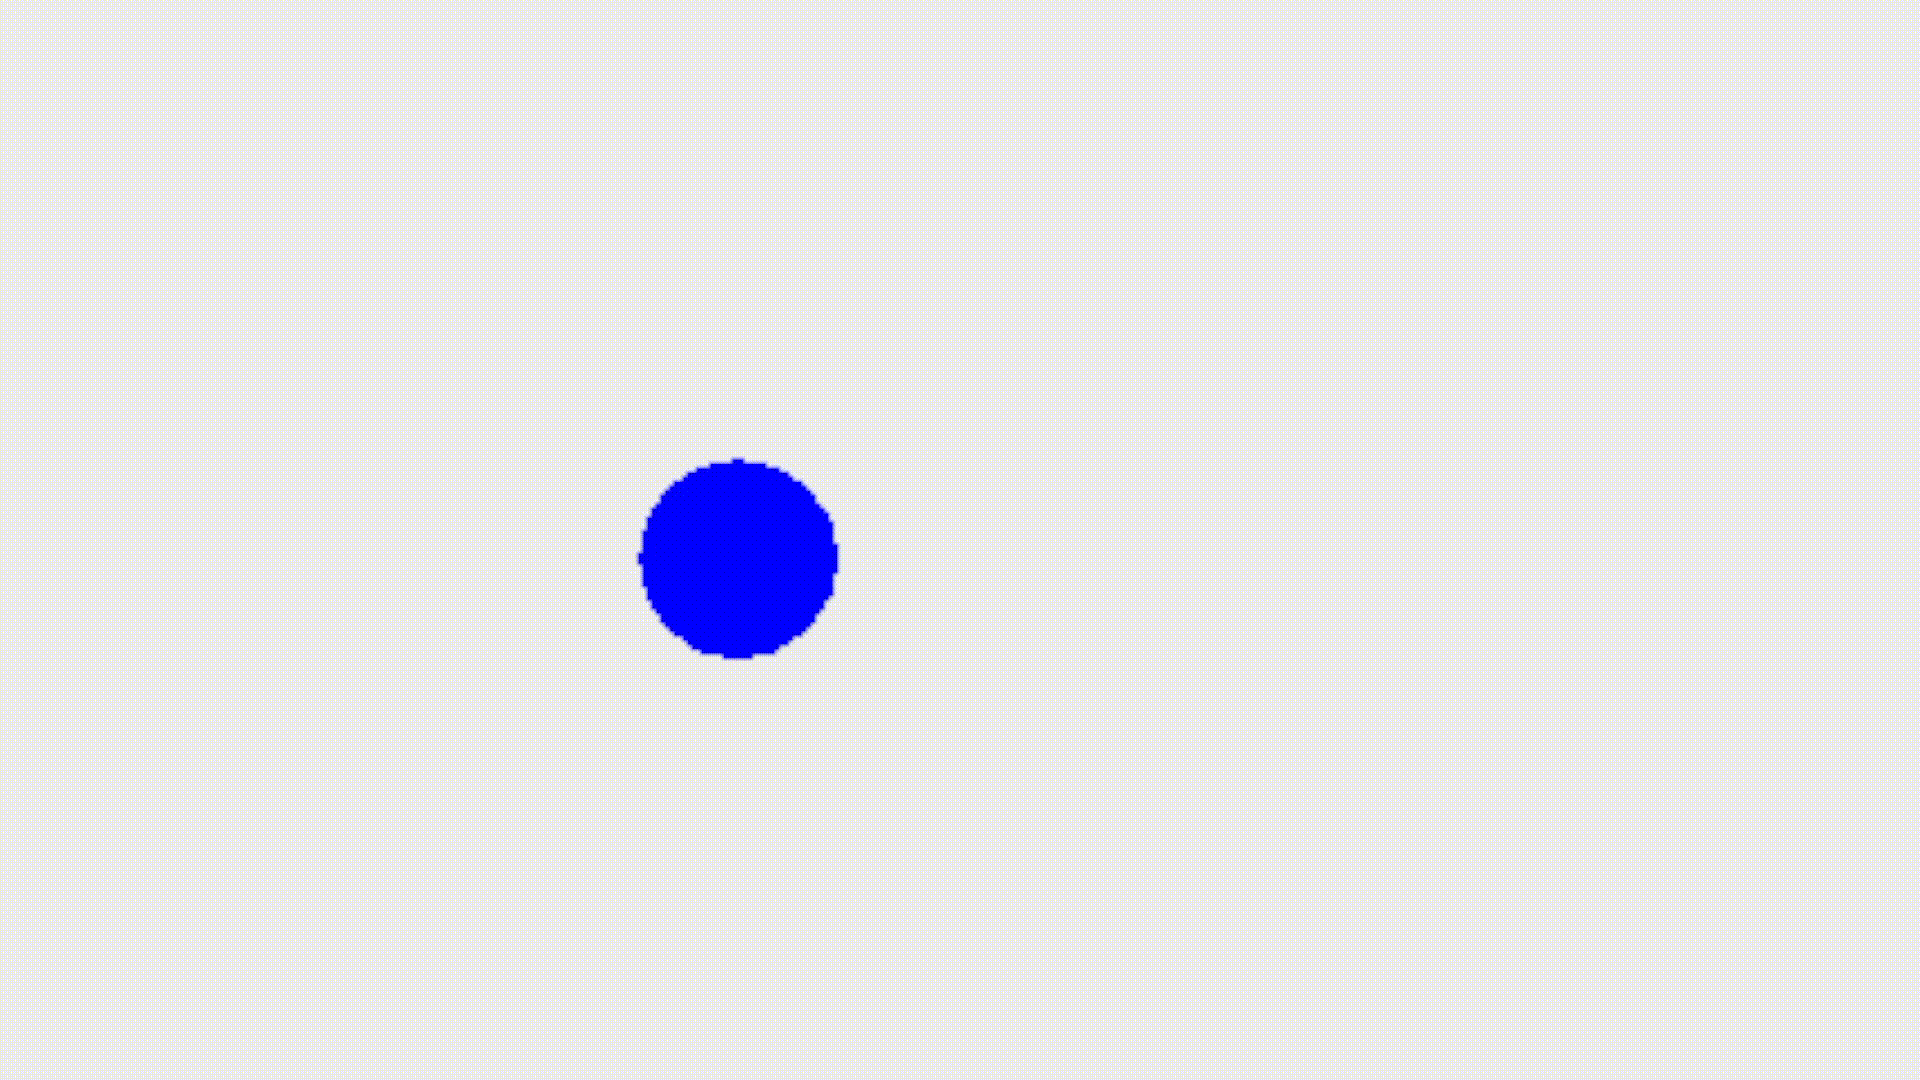
Upon running the application, a window will appear with a blue circle initially positioned at (50, 50). The circle will smoothly move to the right and downward, creating an animated effect.
This example illustrates how combining the repaint() method with TimerTask can lead to efficient and optimized animations in Java GUI programming. Developers can leverage this approach to enhance user interfaces with dynamic content and smooth transitions.
Best Practices for Using repaint() in Java
Invoke repaint() Judiciously
It’s essential to call repaint() selectively and judiciously, limiting its use to instances where an actual visual update is required. Frequent and unnecessary calls may lead to performance issues and unnecessary redraws.
Utilize Repaint Regions
When possible, specify repaint regions using the repaint(int x, int y, int width, int height) method. This allows for targeted updates, improving efficiency by focusing on the specific area that requires refreshing.
Combine repaint() With Double Buffering
Consider using double buffering in conjunction with repaint() to reduce flickering and enhance the overall visual experience. Double buffering involves drawing on an off-screen buffer before displaying the final image, minimizing visual artifacts.
Invoke repaint() on the Event Dispatch Thread (EDT)
To ensure thread safety and avoid potential issues, invoke repaint() on the Event Dispatch Thread (EDT). This helps maintain a consistent and reliable user interface, especially in multi-threaded applications.
Optimize Performance for Custom Painting
If implementing custom painting by overriding the paintComponent(Graphics g) method, optimize the rendering process. Only redraw the necessary components and use appropriate techniques, such as buffering, to enhance rendering performance.
Schedule Repaints for Animation
When dealing with animations, consider using timers or threads to schedule periodic calls to repaint(). This ensures smooth animation without overwhelming system resources with continuous repaint requests.
Handle Repaint Events Appropriately
Implement event handlers for repaint events cautiously. Respond to repaint events by updating the component’s state and triggering a repaint if necessary, ensuring a seamless and responsive user interface.
Document Repaint Triggers
Document the triggers that lead to repaint() calls in the code. Clearly articulate the conditions under which repaint is invoked, making it easier for developers to understand and maintain the codebase.
Avoid Blocking the EDT
Be cautious about time-consuming operations within the EDT, as this can lead to unresponsiveness in the user interface. Offload computationally intensive tasks to worker threads to maintain a responsive application during repaints.
Conclusion
The usage of the repaint() method in Java offers versatile solutions for maintaining dynamic and visually appealing graphical user interfaces. Whether applied directly, targeting specific areas, or scheduled with TimerTask for animations, the method empowers developers to create responsive applications.
By adhering to best practices such as judicious invocation, utilization of repaint regions, and combining with double buffering or worker threads, Java GUIs can achieve optimal performance. Understanding and applying these techniques not only enhances the user experience but also contributes to the efficient and effective development of Java applications.