The setBounds() Method and Its Uses in Java

We aim to learn about the setBounds() method and its uses in Java Graphical User Interface (GUI). We’ll briefly learn the setBounds(), why to use it, and how to use it in the code.
the setBounds() Method and Its Uses in Java
setBounds() is a method in Java used to set the size and position of a graphical component, such as those in GUI (Graphical User Interface) programming. It is commonly employed with classes like java.awt.Component or javax.swing.JComponent.
However, it is not always recommended when using layout managers, as they dynamically handle component arrangements.
setBounds(int x - coordinate, int y - coordinate, int width, int height)
The method takes four parameters: x-coordinate, y-coordinate, width, and height. It allows developers to explicitly define the dimensions and location of a component on the screen, offering precise control in scenarios where specific sizing and positioning are required.
Using setBounds() With java.awt.Component
The setBounds() method is a part of the java.awt.Component class, which serves as the base class for all AWT components. It enables developers to set the bounds of a component, specifying its position (x, y coordinates) and size (width and height) within its container.
This level of control is particularly valuable when designing custom layouts or implementing specialized graphical elements.
Let’s explore a complete example demonstrating the usage of setBounds() with java.awt.Component:
import java.awt.Button;
import java.awt.Frame;

public class SetBoundsAWTExample {
  public static void main(String[] args) {
    // Create a frame
    Frame frame = new Frame("setBounds() Example");

    // Create a button
    Button button = new Button("Click Me");

    // Set bounds for the button
    button.setBounds(50, 50, 100, 30);

    // Add the button to the frame
    frame.add(button);

    // Set frame properties
    frame.setSize(300, 200);
    frame.setLayout(null); // Disable layout manager for manual positioning
    frame.setVisible(true);
  }
}
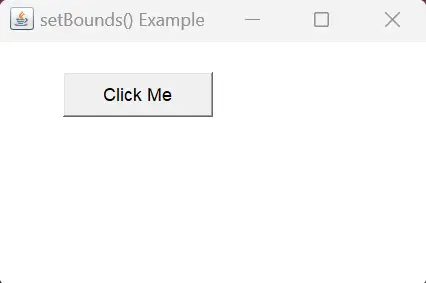
In this code example, we begin by importing necessary classes from the java.awt package. We then proceed to create a Frame object named frame, which serves as the main window of our application.
Next, we create a Button object named button with the label Click Me. To specify its position and size within the frame, we invoke the setBounds() method on the button, passing the x-coordinate, y-coordinate, width, and height as arguments.
Subsequently, we add the button to the frame using the add() method, which places it within the frame according to the specified bounds. To ensure the frame is displayed correctly, we set its size to 300x200 pixels and disable the layout manager (setLayout(null)) to allow manual positioning of components.
Upon running the code, a frame titled setBounds() Example will appear, containing a button labeled Click Me positioned at coordinates (50, 50) with a width of 100 pixels and a height of 30 pixels. This output demonstrates the effectiveness of using setBounds() to achieve custom component layout in Java GUI programming.
Through this example, we’ve illustrated how the setBounds() method can be effectively utilized with java.awt.Component to precisely position and size graphical elements within a container. By providing developers with granular control over layout, setBounds() empowers them to create visually appealing and well-structured GUI applications.
Using setBounds() With javax.swing.JComponent
javax.swing.JComponent serves as the base class for all Swing components, offering a plethora of features and functionalities to facilitate GUI development. The setBounds() method, inherited from the java.awt.Component class, allows developers to define the bounds of a component within its container, specifying its position and size.
This level of control is invaluable when crafting visually appealing and user-friendly interfaces, making setBounds() a fundamental tool in the arsenal of Java GUI programmers.
Let’s delve into a simple Java Swing application that utilizes the setBounds() method to position a button on a JFrame.
import javax.swing.JButton;
import javax.swing.JFrame;

public class SetBoundsExample {
  public static void main(String[] args) {
    JFrame frame = new JFrame("setBounds() Example");

    // Create a JButton
    JButton myButton = new JButton("Click Me");

    // Set the position (x, y) and dimensions (width, height) using setBounds()
    myButton.setBounds(50, 50, 150, 30);

    // Add the button to the frame
    frame.add(myButton);

    // Set frame properties
    frame.setSize(300, 200);
    frame.setLayout(null); // Disabling layout manager for demonstration purposes
    frame.setDefaultCloseOperation(JFrame.EXIT_ON_CLOSE);
    frame.setVisible(true);
  }
}
In this example, we’ve crafted a straightforward Swing application featuring a JFrame and a JButton, illustrating the use of the setBounds() method for precise layout control. Beginning with the creation of a JFrame named frame as our main window, we then initialize a JButton named myButton with the label Click Me.
The setBounds() method is subsequently employed on myButton, defining its position (50, 50) and dimensions (150, 30) within the JFrame. Following this, the button is added to the frame via the add() method.
To complete the setup, we configure frame properties, specifying its size as 300x200 pixels, disabling the layout manager with setLayout(null), and ensuring frame visibility. This concise breakdown outlines the sequential steps involved in utilizing setBounds() to establish a well-defined layout for graphical components.
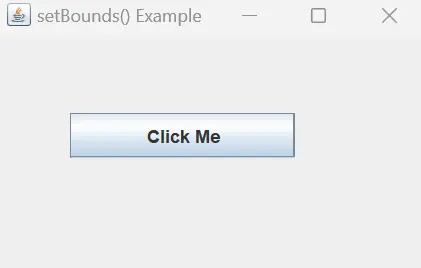
Upon running this code, a JFrame window titled setBounds() Example will appear. Inside the window, a button labeled Click Me will be positioned at coordinates (50, 50) with dimensions 150x30, showcasing the effectiveness of the setBounds() method in graphical layout control.
By using setBounds(), we gain precise control over the placement and size of GUI components. Such control becomes invaluable when designing interfaces that require specific layouts.
Using setBounds() With a Layout Manager
Layout managers in Java, such as FlowLayout, BorderLayout, and GridLayout, play a significant role in dynamically arranging components within containers. However, there are instances where developers may need to override the default behavior of layout managers and precisely position components.
This is where the setBounds() method proves invaluable, enabling developers to define the size and position of components explicitly, thereby complementing the functionality of layout managers.
Let’s delve into a complete example illustrating the usage of setBounds() with a layout manager:
import java.awt.FlowLayout;
import javax.swing.JButton;
import javax.swing.JFrame;

public class SetBoundsWithLayoutManagerExample {
  public static void main(String[] args) {
    // Create a JFrame
    JFrame frame = new JFrame("setBounds() with Layout Manager Example");

    // Set layout manager to FlowLayout
    frame.setLayout(new FlowLayout());

    // Create a JButton
    JButton button = new JButton("Click Me");

    // Set bounds for the button
    button.setBounds(50, 50, 100, 30);

    // Add the button to the frame
    frame.add(button);

    // Set frame properties
    frame.setSize(300, 200);
    frame.setDefaultCloseOperation(JFrame.EXIT_ON_CLOSE);
    frame.setVisible(true);
  }
}
In this example, we start by importing necessary classes from the javax.swing package, including JFrame and JButton, essential for creating GUI components.
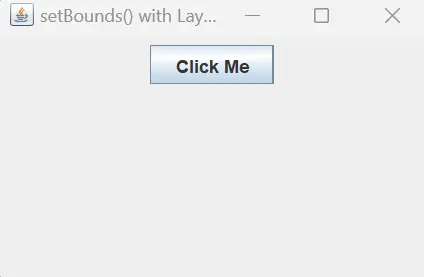
Next, we instantiate a JFrame object named frame and set its title to setBounds() with Layout Manager Example. We then set the layout manager of the frame to FlowLayout using the setLayout() method.
The FlowLayout manager arranges components in a row or column, depending on the container’s size and orientation.
Subsequently, we create a JButton object named button with the label Click Me. Despite the use of a layout manager, we invoke the setBounds() method on the button to specify its size and position explicitly.
This ensures that the button is positioned at coordinates (50, 50) with a width of 100 pixels and a height of 30 pixels.
Finally, we add the button to the frame using the add() method. We also set additional frame properties such as size and default close operation before making the frame visible.
Upon execution, the code will display a JFrame window titled setBounds() with Layout Manager Example containing a JButton labeled Click Me. Despite the use of a layout manager, the button will be positioned at coordinates (50, 50) with a width of 100 pixels and a height of 30 pixels, showcasing the effectiveness of setBounds() in achieving custom component layout.
Through this example, we’ve demonstrated how the setBounds() method can be effectively used with layout managers to achieve precise control over component layout in Java GUI programming. Despite the dynamic nature of layout managers, setBounds() offers developers the flexibility to override default layout behavior and tailor component positioning according to specific requirements.
Conclusion
The setBounds() method in Java is a valuable tool in GUI programming, specifically for components in AWT and Swing libraries. This method allows developers to precisely set the position and dimensions of graphical elements.
Through a straightforward example, we demonstrated how setBounds() provides explicit control over layout, ensuring components are positioned and sized as needed. Its significance lies in offering developers the ability to fine-tune the visual aspects of their applications, enhancing the overall user interface.
