How to Create REST Client in Java
- Steps to Create a Java Rest Client Using Spring Boot
- Create a Java REST Client Using OkHttp
- Conclusion

REST is a set of rules and stipulations created for web programs to interact easily with each other without requiring lots of processing.
A client-side application is required to access the REST services these web programs use, known as a REST client.
This article will look at different tools to create a REST client. The first example demonstrates the steps to create a simple REST client using Spring Boot and OkHttp.
Steps to Create a Java Rest Client Using Spring Boot
To create a REST client, the IDE needs a framework to work. A framework is an environment that includes all the essential library packages and runtime-related components.
Spring Boot is an open-source Java framework used to create microservices. We need the following resources to create a REST client with Java and Spring Boot.
- Eclipse IDE or Spring Tool Suite
- JDK 1.8 or later
- Maven 3.2+
We will create a REST client step-by-step in the following subsections with all the above tools.
Create an Empty Project
The first step is creating an empty project. This can be done in two ways.
-
Create an empty project and add all the dependencies manually.
- Open Spring Tool Suite, Go to
File>New>Other>Web>Dynamic Web Project, and click Next. - Give a project name, select a runtime server, choose the module version for Dynamic Web, and click Next.
- The last section shows the library tree. Any changes to the overall file path tree can be made here.
- Open Spring Tool Suite, Go to
-
Use Spring Initializr to fetch a pre-initialized project.
Spring Initializr downloads a pre-initialized project configured as per the programmer’s need of the dependencies, and it can be created from https://start.spring.io/.
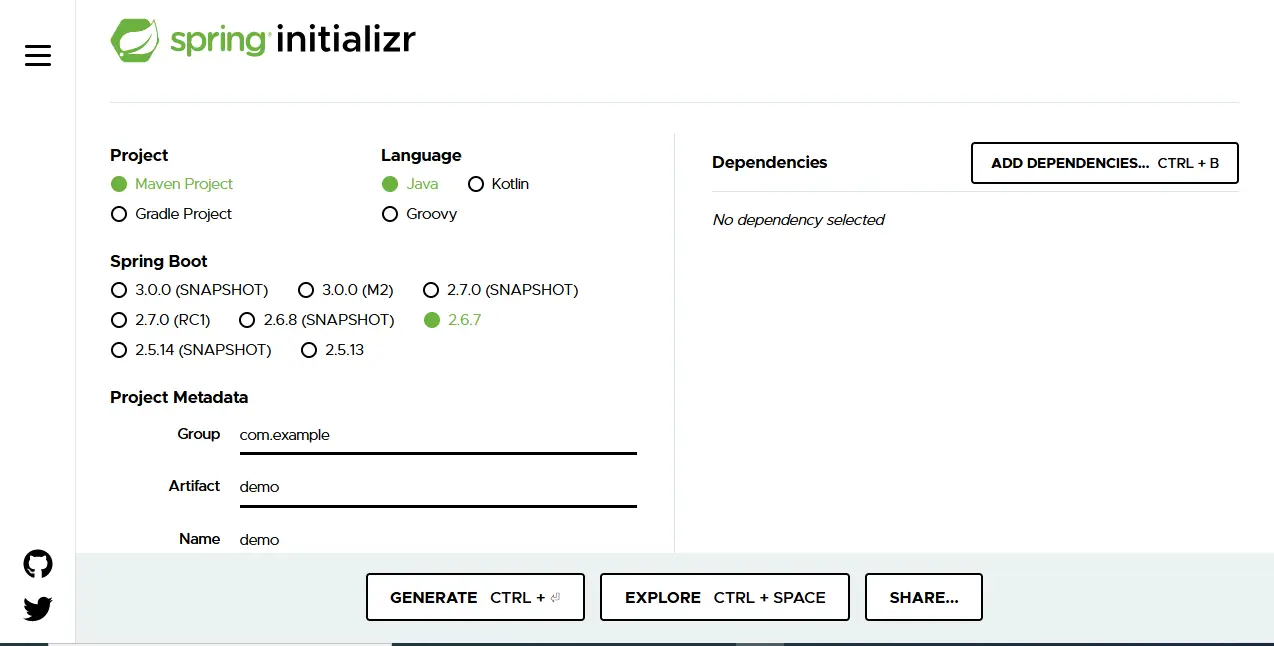
This web service creates a maven or a Gradle project with all the chosen dependencies. Once Generate is clicked, the browser downloads a .zip file containing all the necessary files and libraries required for the web project.
The example project used here uses a REST API service to extract quotes from an URL and returns the result when the client sends a GET request.
The project is given a name - org.clientforquotes, and only one dependency is required here, so only spring web is selected.
Create a REST Service
A REST service takes commands such as GET and POST and returns a response.
To create an application that runs a REST service, create a Java class, and give it a name. In this example, the class is given a name - mainapplication.java, which is made inside the src/main/java folder.
This class contains the main method. When created through the initializer, this class can be found already present there.
There are three main components in this class:
- To view the output, a
loggermethod is added. - The data received from the domain is processed through the JSON library. It is done using the
RestTemplatemethod. - The application extracts a quote at startup. This process occurs when the Rest Template is executed using
CommandLineRunner.
Following is the source code for creating the REST service. The file is named MainApplication.java.
package com.example.clientforquotes;

import org.slf4j.Logger;
import org.slf4j.LoggerFactory;
import org.springframework.boot.CommandLineRunner;
import org.springframework.boot.SpringApplication;
import org.springframework.boot.autoconfigure.SpringBootApplication;
import org.springframework.boot.web.client.RestTemplateBuilder;
import org.springframework.context.annotation.Bean;
import org.springframework.web.client.RestTemplate;

@SpringBootApplication
public class MainApplication {
  private static final Logger log = LoggerFactory.getLogger(MainApplication.class);

  public static void main(String[] args) {
    SpringApplication.run(MainApplication.class, args);
  }

  @Bean
  public RestTemplate restTemplate(RestTemplateBuilder builder) {
    return builder.build();
  }

  @Bean
  public CommandLineRunner run(RestTemplate restTemplate) throws Exception {
    return args -> {
      Quote qt =
          restTemplate.getForObject("https://quoters.apps.pcfone.io/api/random", Quote.class);
      log.info(qt.toString());
    };
  }
}
Create a Class That Stores the Data From the Domain
Create two other .java files - pullquote.java and basevalues.java to add the getter-setter method, constructors, and To_String functions.
The pullquote class stores the quoted value retrieved from the URL domain and displays it when the class is called. The following is the source code of the file pullquote.java.
package com.example.clientforquotes;

import com.fasterxml.jackson.annotation.JsonIgnoreProperties;

@JsonIgnoreProperties(ignoreUnknown = true)
public class Pullquote {
  private String object_type;
  private Basevalue qt_value;

  public Pullquote() {}

  public String getType() {
    return object_type;
  }

  public void setType(String type) {
    this.object_type = type;
  }

  public Basevalue getValue() {
    return qt_value;
  }

  public void setValue(Basevalue value) {
    this.qt_value = value;
  }

  @Override
  public String toString() {
    return "The quote for you = {"
        + "type='" + object_type + '\'' + ", value=" + qt_value + '}';
  }
}
We will also create a class Basevalue in the file basevalue.java to store the inner quotation.
package com.example.clientforquotes;

import com.fasterxml.jackson.annotation.JsonIgnoreProperties;

@JsonIgnoreProperties(ignoreUnknown = true)
public class Basevalue {
  private Long sr_no;
  private String qt;

  public Basevalue() {}

  public Long getId() {
    return this.sr_no;
  }

  public String getQuote() {
    return this.qt;
  }

  public void setId(Long id) {
    this.sr_no = id;
  }

  public void setQuote(String quote) {
    this.qt = quote;
  }

  @Override
  public String toString() {
    return "Value{"
        + "id=" + sr_no + ", quote='" + qt + '\'' + '}';
  }
}
Add Any New Dependencies to pom.xml
Every Web project has a pom.xml file that stores the dependencies which the project requires. If a new library is imported inside the project, its dependency must be added to its pom.xml.
The following is the pom.xml file for our project.
<?xml version="1.0" encoding="UTF-8"?>
<project xmlns="http://maven.apache.org/POM/4.0.0" xmlns:xsi="https://www.w3.org/2001/XMLSchema-instance"
    xsi:schemaLocation="http://maven.apache.org/POM/4.0.0 https://maven.apache.org/xsd/maven-4.0.0.xsd">
    <modelVersion>4.0.0</modelVersion>
    <parent>
        <groupId>org.springframework.boot</groupId>
        <artifactId>spring-boot-starter-parent</artifactId>
        <version>2.5.2</version>
        <relativePath/> <!-- lookup parent from repository -->
    </parent>
    <groupId>com.example</groupId>
    <artifactId>client-for-quotes</artifactId>
    <version>0.0.1-SNAPSHOT</version>
    <name>client-for-quotes</name>
    <description>Project for fetching quotes</description>

    <properties>
        <java.version>1.8</java.version>
    </properties>

    <dependencies>
        <dependency>
            <groupId>org.springframework.boot</groupId>
            <artifactId>spring-boot-starter-web</artifactId>
        </dependency>

        <dependency>
            <groupId>org.springframework.boot</groupId>
            <artifactId>spring-boot-starter-test</artifactId>
            <scope>test</scope>
        </dependency>
    </dependencies>

    <build>
        <plugins>
            <plugin>
                <groupId>org.springframework.boot</groupId>
                <artifactId>spring-boot-maven-plugin</artifactId>
            </plugin>
        </plugins>
    </build>

</project>
Run the Application
There are many ways to run the application.
- Run it directly on the Spring Boot App.
- Create an executable
.jarfile of the project. - Run it through the command line.
You can run the REST client that we created using any above methods. Let us now discuss creating a Java REST client using other frameworks.
Create a Java REST Client Using OkHttp
It is a lightweight and efficient client for Java applications. Web programs using it supposedly can load faster.
The program posts a JSON call to a service when a request is made. The URL is written inside the .url parameter, while the request type is inside the .post parameter.
The .build() function creates an OkHttp request. The following is the source code for creating a Java REST client using the OkHttp framework.
public static final MediaType JSON = MediaType.parse("application/json; charset=utf-8");

OkHttpClient obj = new OkHttpClient();

String post(String domain, String call) throws IOException {
  RequestBody req_body = RequestBody.create(JSON, call);
  Request quest = new Requests.Builder().url(domain).post(req_body).build();
  Response resp = obj.newCall(quest).execute();
  return resp.req_body().string();
}
Conclusion
We have explained creating a Java REST Client in a detailed yet straightforward manner. After going through this article, the reader can make a Java REST client using some popular frameworks like Spring Boot and OkHttp.