How to Create JAR Files in Java
-
Importance of Creating
.jarFiles in Java -
Use Eclipse IDE to Create
.jarFiles in Java -
Use Windows Command Prompt to Create
.jarFiles in Java

This tutorial will show you how to create multiple .jar files using your favorite IDE and Windows commands. In addition, it will also give you a live demonstration of using .jar files between various Java projects.
We will cover the exporting and importing of .jar files and the significance of using them for your production. The first section shows creating .jar files using IDE, and the second with Windows Command Prompt.
Importance of Creating .jar Files in Java
For example, you have more than one Java project, a .jar file, in that case, can be used to access classes that represent specific code blocks.
Also, it reduces the repetition of code and enhances reusability. Meanwhile, we can also email our .jar files to team members working on the same project for real-time production.
That said, Java has its way of dealing with its files, just like other programming languages. For example, we create a .shell file for Bash programming and .exe files for .NET.
Similarly, Oracle has Java archive files (.jar).
.jar file using Maven.Read more about it here: Guide to installing 3rd party JARs
Use Eclipse IDE to Create .jar Files in Java
Though we use Eclipse to create our first .jar file, most IDEs can do the same. It is simply a matter of your choice.
First, we will create two projects.
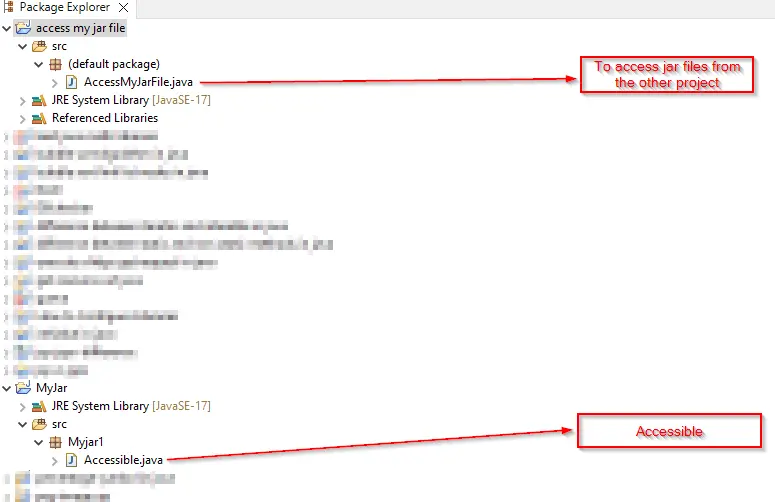
Check out the Accessible class from the MyJar project.
package Myjar1; // it is a best practice to use classes under specific packages

public class Accessible { // we will export it as a jar and then import it in our other projects

  public int add(int a, int b) { // a demo (you can customize it, create more functions, etc. The
                                 // objective is to use a class as a jar file)
    System.out.println("Access me!");
    return a + b;
  }
}
Now check the AccessMyJarFile class from the access my jar file project.
import Myjar1.Accessible; //we are importing it now
public class AccessMyJarFile {
  public static void main(String[] args) { // do not forget to use main functions

    Accessible a = new Accessible(); // constructor
    System.out.println(a.add(100, 200));
  }
}
Output:
Access me!
300
We showed you the output of the second code block that successfully accesses the first using import Myjar1.Accessible;, let’s understand how to export and import .jar files.
In this way, you can create multiple classes and use them as .jar files.
.jar files, all your projects must use their respective packages and main functions.If you’re still confused, the following two bullet points indicate how to export and import a .jar file from one project to another.
-
Export a
.jarfile:For eclipse users, click right on the project and then export.
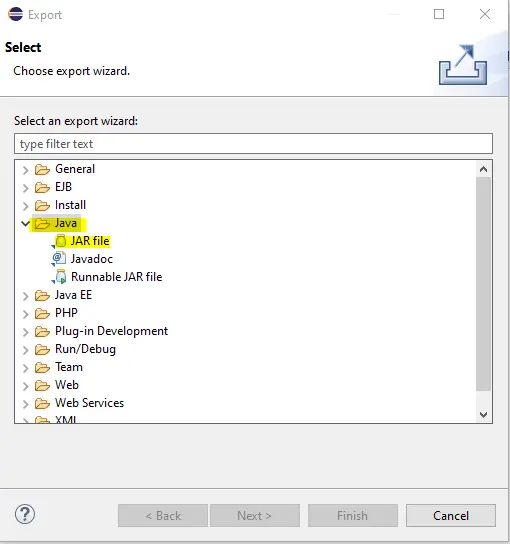
Choose the highlighted sections, click
Next, name your.jarfile and save it. That is it! -
Import a
.jarfile:This might be the simplest part of this whole process. It is the same as importing other reusable
.jarfiles every day.
Nevertheless, we have highlighted this part, especially for those of you who are beginners.

Use Windows Command Prompt to Create .jar Files in Java
It is no doubt that IDEs make it easy when it is about development.
But, we highly recommend you practice creating your .jar files using commands, especially if you want to learn more.
It is pretty easy to do. Let us break it down into steps not to miss the essentials.
-
First, create a
Manifest.txtfile.
This example shows a single class,
NewJar. We can also define multiple classes inside it. -
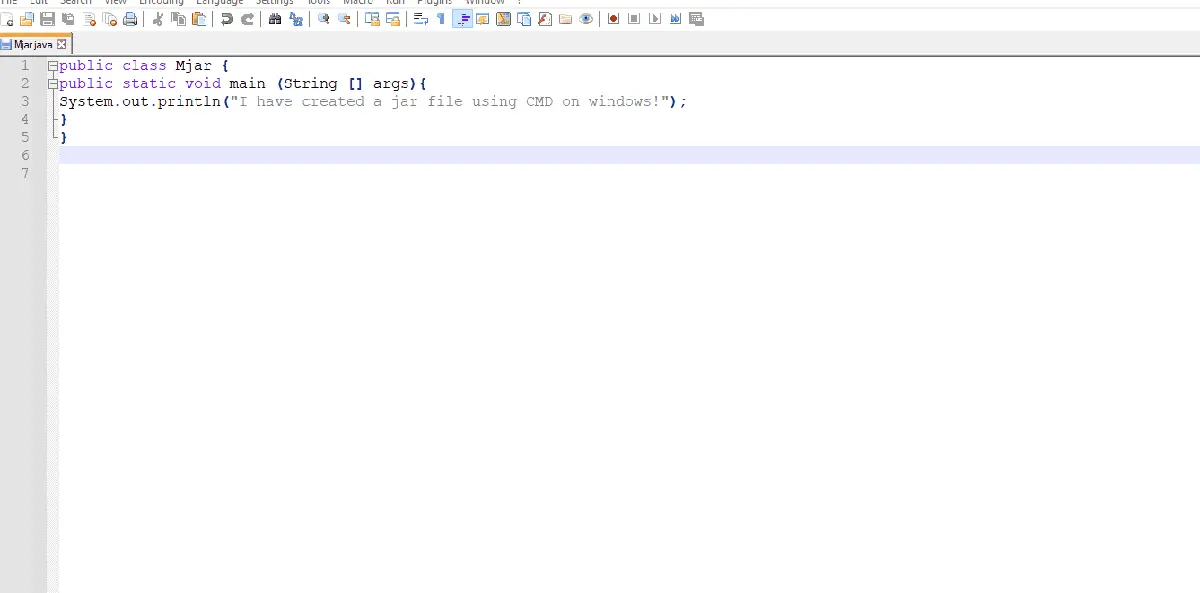
Second, you must have a class with a Java file extension basic demo.
public class Myjar {
  public static void main(String[] args) {
    System.out.println("I create a jar file!");
  }
}
<!--
test:
  command: java
  expected_output: 'I create a jar file!

    '
-->
-
Compile it:
Command:
javac Myjar.java- it will create a classMyjar.classfile. -
Create a
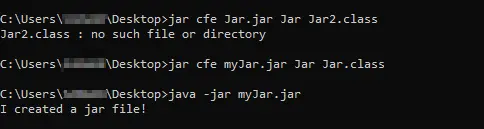
.jarfile usingManifest.txt.Command:
jar cfe Jar.jar Manifest.txt Jar.classOutput:
e to declare the entry point, just like Manifest.txt does.Command: jar cfe myJar.jar Jar Jar.class
c: Temporarily changes the directory.f: Generally, it indicates the JAR file name as a second argument.e: It is the entry point.
After cfe, myJar.jar represents the JAR file that will be created, and Jar is the main class name followed by the compiled Jar.class.
Output:

Sarwan Soomro is a freelance software engineer and an expert technical writer who loves writing and coding. He has 5 years of web development and 3 years of professional writing experience, and an MSs in computer science. In addition, he has numerous professional qualifications in the cloud, database, desktop, and online technologies. And has developed multi-technology programming guides for beginners and published many tech articles.
LinkedIn