Git Stash vs Shelve in IntelliJ IDEA
This article will differentiate between git stash and git shelve while working with the IntelliJ IDEA. The two come in clutch when we want to switch between several tasks while working and return to them later.
The IntelliJ IDEA allows us to work on different features without losing our progress. We can either stash or shelve.
The two have a lot in common. The big difference comes when generating and applying patches.
When we stash, Git generates the patch, and we can use the IntelliJ IDEA or another IDE to apply the patch. On the other hand, when we shelve, the patches are generated and applied within the IntelliJ IDEA.
A stash will store all uncommitted changes, while shelving allows us to choose what to shelve.
Shelve Changes in Git
When shelving changes, we temporarily store uncommitted changes to work on them later if we need to switch to a different task. The IntelliJ IDEA allows us to shelve separate files or all changes.
You can apply the patch generated as many times as you need. Here is the typical workflow.
-
On the IDE, we will navigate to the commit tool. Once there, we can right-click the change list or files we want to shelve and select
Shelve Changes.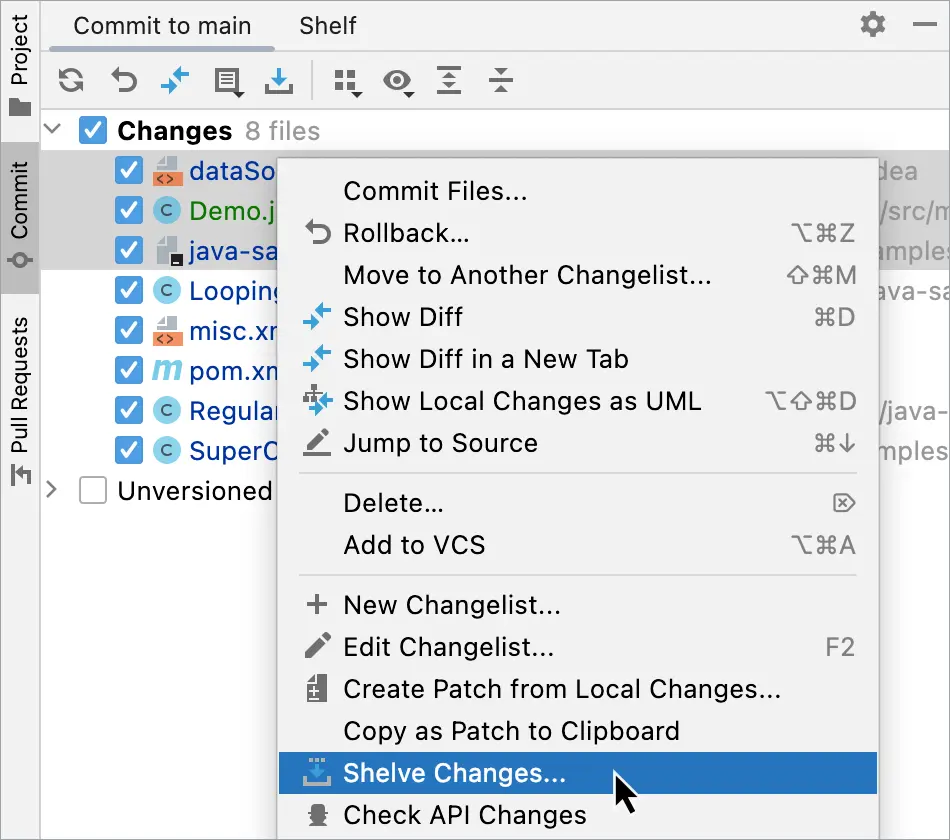
-
Next, we will review our list, give our shelf a name in the
Commit Message, and save the shelf by clickingShelve Changes.
An alternative is using the Silent option. The IDE has a Shelve Silently option that allows us to shelve without displaying the dialog.
Unshelve Changes in Git
To unshelve changes, follow these steps.
-
Navigate to the
Shelftab on the IDE and choose the files or change the list you need to unshelve. -
Tap
Unshelvefrom the menu and select the list to which you want to restore the shelved changes. You can also create a new list if you do not want to restore them to an existing change list.Remember to mark the new list
Active.
- You can alternatively use the
Unshelve Silentlyicon and move the changes to the active change list.
Stash Changes in Git
A stash is simply a record of the difference between the current working directory and the HEAD commit. You can apply a branch patch as often as you need.
Keep in mind that:
- You may face conflicts while applying a stash.
- You cannot apply a stash to a working copy containing uncommitted changes.
Follow these steps to stash changes with the IntelliJ IDEA.
- Navigate to
Git>Uncommitted Changes>Stash Changes. - Select the correct directory and switch to the correct branch.
- It is always good to briefly describe the stash in the
Messagefield. - Click
Create Stash.
Apply a Stash in Git
To apply a stash, follow these steps.
-
Navigate to
Git>Uncommitted Changes>Unstash Changes. -
Select the correct directory and switch to the correct branch.
-
Choose the stash, click
Viewto see what files will change after the patch is applied, and selectPop Stashto discard the patch after it is applied. -
You can create a new branch and apply the patch by keying in the name of the branch in the
As new branchfield.

John is a Git and PowerShell geek. He uses his expertise in the version control system to help businesses manage their source code. According to him, Shell scripting is the number one choice for automating the management of systems.
LinkedIn