How to Add a Row in DataGridView Using C#
In this article, we’ll learn about DataGridView in C#. Let’s first take some idea about DataGridView and why we need to store data in the table, i.e., in rows and columns.
Next, we will discuss various ways to add rows to the grid.
In the past, most developers stored their data in files. Whenever they needed it, they had to search through all the files sequentially, which was time-consuming.
The tables were invented to overcome this problem.
In the table, data is stored in rows and columns sequentially in a well-organized manner. Tables provide fast and efficient readability across rows and columns without being time-consuming.
Grid is also the form of the table in the form of cells, i.e., rows and columns.
DataGridView in C#
Visual Studio 2008 has the DataGridView control available in Windows Forms controls. This control has added extensive power to manage data compared to previous versions.
Besides strength, this control provides flexibility to display data in the row-column form.
We can use the DataGridView control to show read-only views for a small amount of data. You can also use it for large data sets to show editable views.
Besides small and large data sets, you can also display master details using this control.
The DataGridView control is available for a variety of different data sources for the view as well as for editing. This control has a simple and intuitive way of binding data to this control.
To bind multiple tables in a data source, set it as a string in the property of DataMember.
The DataGridView control will bind to any class instance that implements the following interfaces:
IListinterface also includes one-dimensional arrays.IListSourceinterface. The examples are theDataSetclasses andDataTable.IBindingListinterface, likeBindingList<(Of <(T>)>)class.IBindingListViewinterface, like theBindingSourceclass.
The DataGridView control can bind data to the public attributes of the objects described by the above interfaces. The DataGridView control mainly attaches a BindingSource, whereas the BindingSource is bound to another reference data source or with the business object.
This control also supports data binding to the properties collection returned by an ICustomTypeDescriptor interface.
The DataGridView in C# displays data in a customizable grid, i.e., in tabular form with Windows Form. It is part of the System.Windows.Forms namespace.
The syntax of using a grid is given below.
[System.ComponentModel.ComplexBindingProperties("DataSource", "DataMember")]
[System.Windows.Forms.Docking(System.Windows.Forms.DockingBehavior.Ask)]
public class DataGridView : System.Windows.Forms.Control, System.ComponentModel.ISupportInitialize
You can customize the cells, rows, columns, and borders through the DataGridView class. The DataGridView control displays data with or without a data source.
If you still need to provide a Data source, you can add rows and columns in DataGridView by rows and columns properties. You can also access rows and column collections using DataGridView rows and cols objects.
In this article, our primary focus is adding rows in the data grid view, so let’s find some methods.
Add Rows in DataGridView in C#
We will discuss multiple ways to add rows in DataGridView. We will present coding details with each method.
Manual Addition of Rows
The easiest way to add rows in DataGridView can be done manually using the Rows.Add() method in the data grid view. In the following example, in the MyForm.cs class, the add_Data button function is written, which will display rows.
You can create a form design in WPF FormDesign using a grid and a button that displays the grid.
using System;
using System.Data;
using System.Drawing;
using System.Linq;
using System.Text;
using System.Windows.Forms;
namespace Manual_Addition_of_Rows_Datagrid {
  public partial class MyForm : FormDesign {
    public MyForm() {
      IntializeComponent();
    }
    private void add_Data(object sender, EventArgs e) {
      dataGridView1.ColumnCount = 3;
      dataGridView1.Columns[0].Name = "ID";
      dataGridView1.Columns[1].Name = "Course Name";
      dataGridView1.Columns[2].Name = "Marks";

      string[] row = new string[] { "1", "OOP", "75" };
      dataGridView1.Rows.Add(row);
      row = new string[] { "2", "DSA", "86" };
      dataGridView1.Rows.Add(row);
      row = new string[] { "3", "AOA", "67" };
      dataGridView1.Rows.Add(row);
    }
  }
}
You can also access the DataGridView control’s columns using the Columns collection and the DataGridView control’s rows using the Rows collection.
If DataGridView is not bound to any data table or data set, we can add new rows with the help of the following code.
var index = dataGridView1.Rows.Add();
dataGridView1.Rows[index].Cells["Column1"].Value = "Column1 value";
dataGridView1.Rows[index].Cells["Column2"].Value = 9.5;
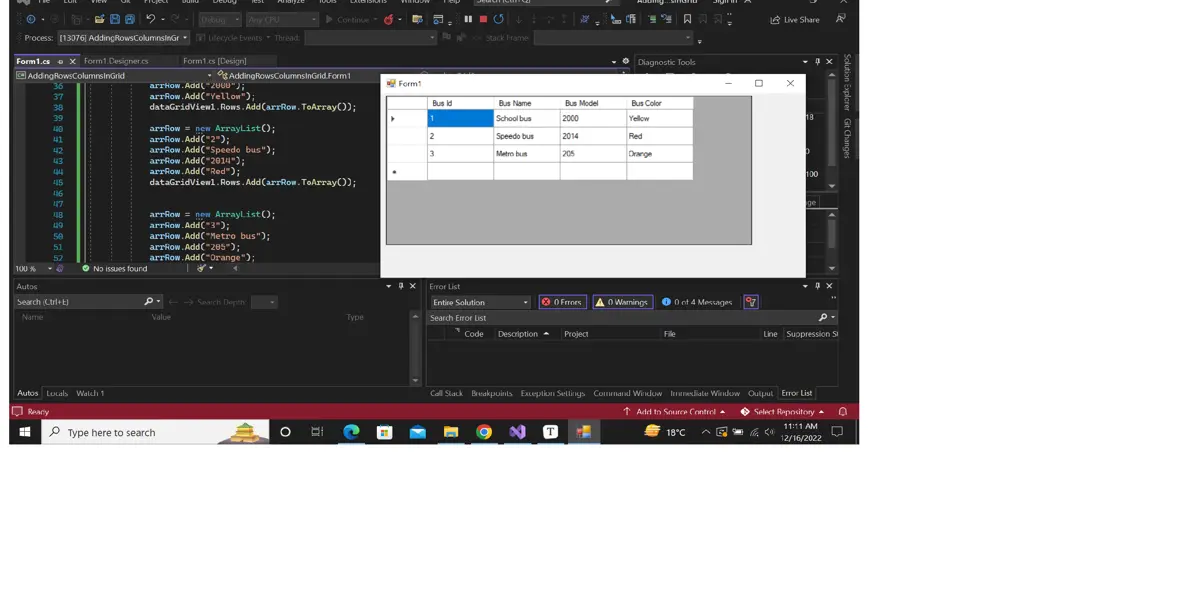
Adding a New Row Dynamically
The following example shows how you can dynamically add columns and rows in the grid in the Windows application form Form1. After creating the project, add the dataGridView from the toolbox to your Form1.cs[Design] and click on the dock for the container option from the top right button of the grid.
Now go to the Form1.cs file and do some changes to the Form. First, add the namespaces, as given below.
using System;
using System.Collections;
using System.Collections.Generic;
using System.ComponentModel;
using System.Data;
using System.Drawing;
using System.Linq;
using System.Text;
using System.Threading.Tasks;
using System.Windows.Forms;

namespace AddingRowsColumnsInGrid {
  public partial class Form1 : Form {
    public Form1() {
      InitializeComponent();
    }
    public void updateGrid() {
      // Update the data grid view here dynamically
      // Add columns
      dataGridView1.ColumnCount = 4;
      dataGridView1.Columns[0].Name = "Bus Id";
      dataGridView1.Columns[1].Name = "Bus Name";
      dataGridView1.Columns[2].Name = "Bus Model";
      dataGridView1.Columns[3].Name = "Bus Color";

      // Now adding rows
      ArrayList arrRow = new ArrayList();
      arrRow.Add("1");
      arrRow.Add("School bus");
      arrRow.Add("2000");
      arrRow.Add("Yellow");
      dataGridView1.Rows.Add(arrRow.ToArray());

      arrRow = new ArrayList();
      arrRow.Add("2");
      arrRow.Add("Speedo bus");
      arrRow.Add("2014");
      arrRow.Add("Red");
      dataGridView1.Rows.Add(arrRow.ToArray());

      arrRow = new ArrayList();
      arrRow.Add("3");
      arrRow.Add("Metro bus");
      arrRow.Add("205");
      arrRow.Add("Orange");
      dataGridView1.Rows.Add(arrRow.ToArray());
    }
    private void Form1_Load_1(object sender, EventArgs e) {
      updateGrid();
    }
  }
}
In the above code, you can see that initialize the form component and then create a Form1_Load_1 function to handle objects and events that occurred on the grid and pass the updateGrid() where to add columns and rows. Rows in the grid have been added to the ArrayList object as it can store objects in the group and can manipulate them.
The output of the above code is given below.
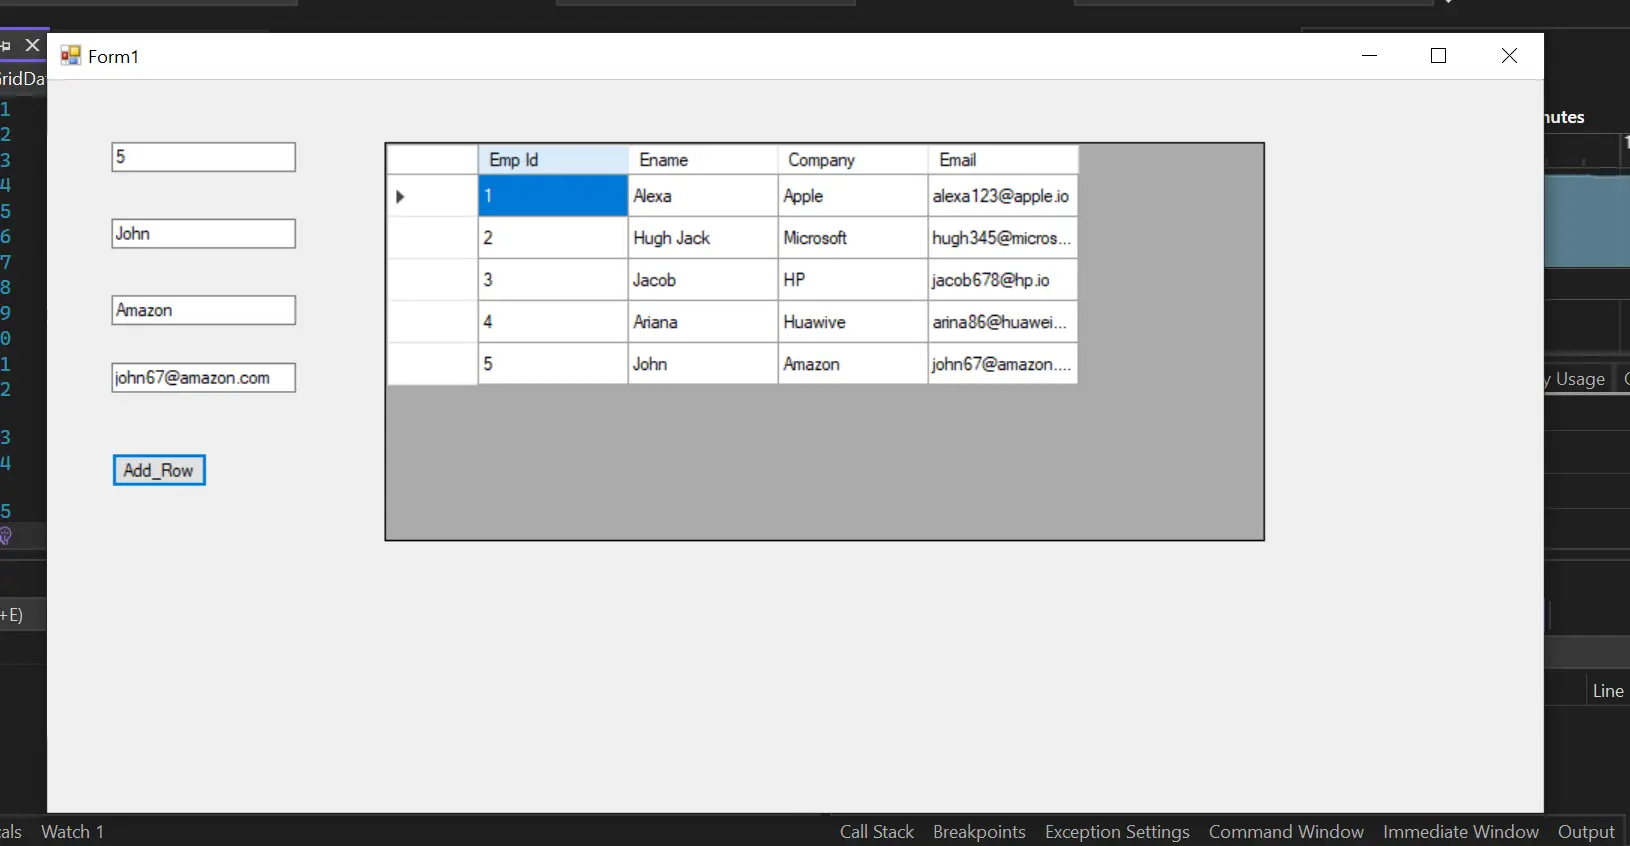
Adding Rows in Grid Through the Data Table
In the C# WinForm, multiple ways exist to add data to the grid. Simply put, the data table can be defined as an object mainly used in databases.
It is like a database table having rows and columns. If you want to read more about the data table, you can visit the article by Microsoft.
In the below example, you can see that first, we created the data table object and added columns and rows in the grid using the built-in properties of the data table. The data source is also the property of the data table, mainly used to get or set the data for the DataGridView.
When the Add_Row is pressed after filling data in textboxes, the data source will populate the data to the grid.
using System;
using System.Collections.Generic;
using System.ComponentModel;
using System.Data;
using System.Drawing;
using System.Linq;
using System.Text;
using System.Threading.Tasks;
using System.Windows.Forms;

namespace SampleGridData {
  public partial class Form1 : Form {
    public Form1() {
      InitializeComponent();
    }
    DataTable dt = new DataTable();
    private void Form1_Load(object sender, EventArgs e) {
      dt.Columns.Add("Emp Id", typeof(int));
      dt.Columns.Add("Ename", typeof(string));
      dt.Columns.Add("Company", typeof(string));
      dt.Columns.Add("Email", typeof(string));

      dt.Rows.Add(1, "Alexa", "Apple", "alexa123@apple.io");
      dt.Rows.Add(2, "Hugh Jack", "Microsoft", "hugh345@microsoft.com");
      dt.Rows.Add(3, "Jacob", "HP", "jacob678@hp.io");
      dt.Rows.Add(4, "Ariana", "Huawive", "arina86@huaweiv.com");

      dataGridView1.DataSource = dt;
    }
    private void button1_Click(object sender, EventArgs e) {
      dt.Rows.Add(textBox1.Text, textBox2.Text, textBox3.Text, textBox4.Text);
      dataGridView1.DataSource = dt;
    }
  }
}
The output of the above code is:
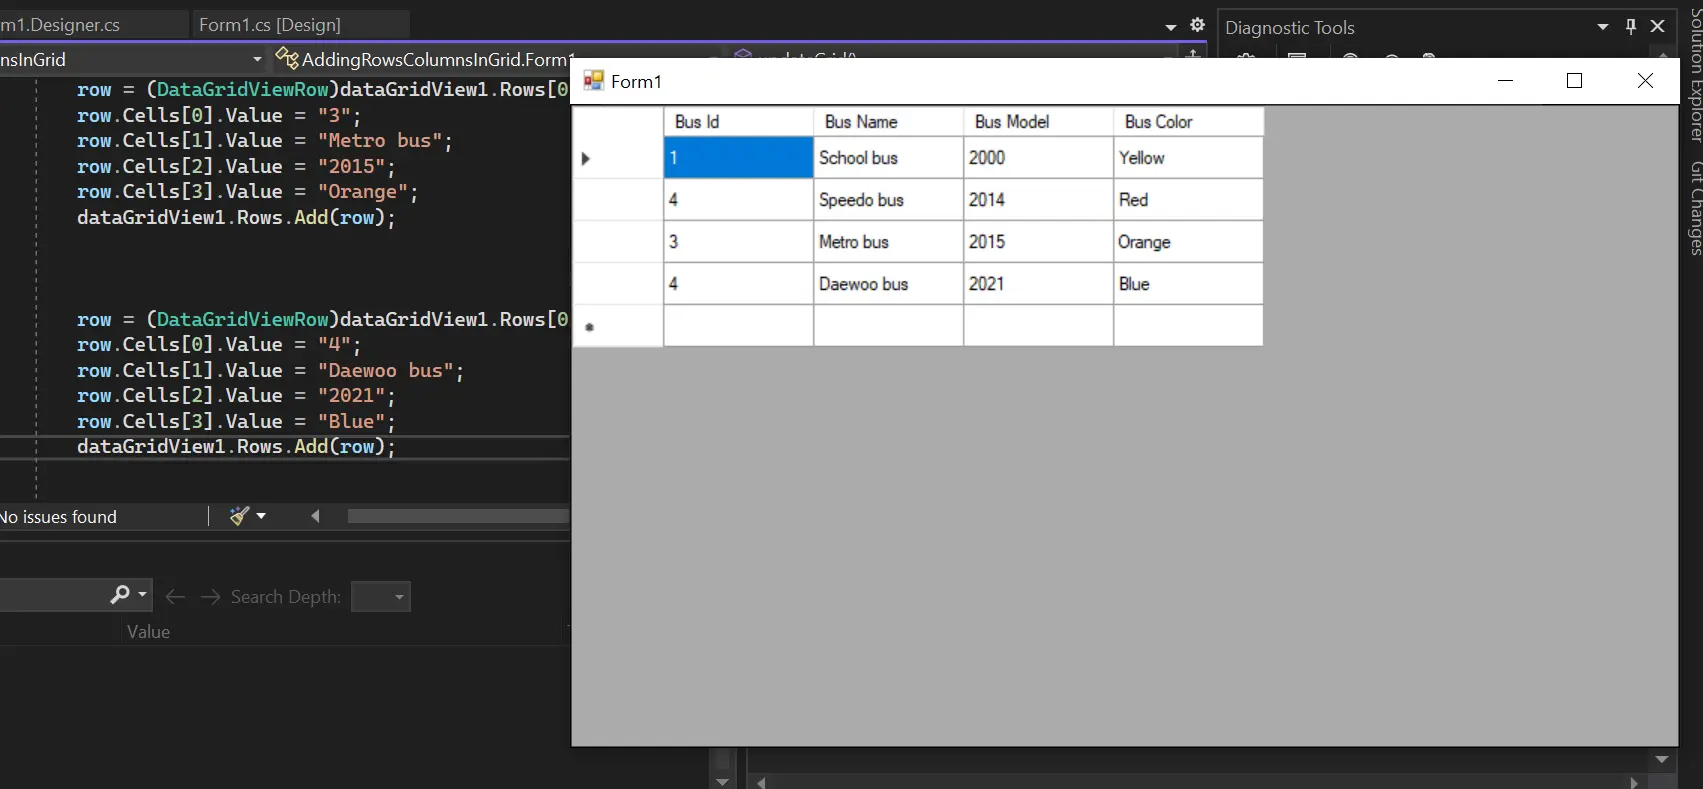
Adding Rows Through Clone Method
In C#, you can add rows in the grid using the clone method. Clone means copying the data from one DataGridView to another for adding rows and columns in a grid.
Although its primary purpose is to copy the data from one grid to another, you can add rows. For example:
DataGridViewRow myRow = (DataGridViewRow)myGrid.Rows[0].Clone();
myRow.Cells[2].Value = "My first Grid";
myRow.Cells[4].Value = 23.5;
myGrid.Rows.Add(myRow);
The above code represents the one-row value to be added to the grid. However, you can also create a row template, as it provides better arrangements of rows in a cell.
For example:
DataGridViewRow r1 = (DataGridViewRow)myGrid1.RowTemplate.Clone();
r1.CreateCells(myGrid1, "col1", "col2", "col3");
myGrid1.Rows.Add(row);
Although there are different methods to add rows in the data grid view dynamically, here are a few examples:
using System;
using System.Collections;
using System.Collections.Generic;
using System.ComponentModel;
using System.Data;
using System.Drawing;
using System.Linq;
using System.Text;
using System.Threading.Tasks;
using System.Windows.Forms;

namespace AddingRowsColumnsInGrid {
  public partial class Form1 : Form {
    public Form1() {
      InitializeComponent();
    }
    public void updateGrid() {
      dataGridView1.ColumnCount = 4;
      dataGridView1.Columns[0].Name = "Bus Id";
      dataGridView1.Columns[1].Name = "Bus Name";
      dataGridView1.Columns[2].Name = "Bus Model";
      dataGridView1.Columns[3].Name = "Bus Color";

      dataGridView1.AllowUserToAddRows = true;
      DataGridViewRow row = (DataGridViewRow)dataGridView1.Rows[0].Clone();
      row.Cells[0].Value = "1";
      row.Cells[1].Value = "School bus";
      row.Cells[2].Value = "2000";
      row.Cells[3].Value = "Yellow";
      dataGridView1.Rows.Add(row);

      row = (DataGridViewRow)dataGridView1.Rows[0].Clone();
      row.Cells[0].Value = "4";
      row.Cells[1].Value = "Speedo bus";
      row.Cells[2].Value = "2014";
      row.Cells[3].Value = "Red";
      dataGridView1.Rows.Add(row);

      row = (DataGridViewRow)dataGridView1.Rows[0].Clone();
      row.Cells[0].Value = "3";
      row.Cells[1].Value = "Metro bus";
      row.Cells[2].Value = "2015";
      row.Cells[3].Value = "Orange";
      dataGridView1.Rows.Add(row);

      row = (DataGridViewRow)dataGridView1.Rows[0].Clone();
      row.Cells[0].Value = "4";
      row.Cells[1].Value = "Daewoo bus";
      row.Cells[2].Value = "2021";
      row.Cells[3].Value = "Blue";
      dataGridView1.Rows.Add(row);
    }
    private void Form1_Load_1(object sender, EventArgs e) {
      updateGrid();
    }
  }
}
We have just used the above code for this example as it is easy to understand. In DataGridView, the clone property is used to copy the rows and their properties and populate the row copy with the original one.
In the above code, we have used the clone method to copy the rows. To read more about the clone method, you can visit this page.
The output of the above code is:
You can visit this page to read about adding rows in the data grid view. If you still have ambiguity in adding rows in the grid, you can also read this article.
We have discussed DataGridView in detail. We have discussed multiple ways to bind data to DataGridView.
We hope you have a good idea about the data grid view and its functionalities and that you are comfortable adding rows through different grid methods and setting its property.