How to Change Label Text in C#
- Use a Button Click Event to Change Label Text in C#
- Use Direct Assignment to Change Label Text in C#
- Use a Timer to Change Label Text in C#
- Conclusion
Labels are essential components in GUI (Graphical User Interface) applications, often used to display information or provide context to users. In C#, there are several methods to dynamically change the text of a label.
In this tutorial, we will explore various techniques to change label text in C#, along with detailed examples.
Use a Button Click Event to Change Label Text in C#
This method allows you to change the label text in response to a user action, such as clicking a button. This method is useful for creating interactive applications.
Button Click Event
A button click event occurs when a user clicks a button on the GUI. In C#, we can handle this event by associating a method with the button’s Click event.
Label Control
A label control is used to display text on a form. It has properties, including Text, which can be manipulated to change the displayed content.
Step-by-Step Guide
-
Creating a Windows Forms Application
Start by creating a new Windows Forms Application project in Visual Studio. This will provide you with a blank form on which you can add a button and a label.
-
Adding a Button and a Label
Drag and drop a button and a label from the toolbox onto the form. You can position and resize them as needed.
-
Naming Controls
It’s essential to give meaningful names to your controls. In the
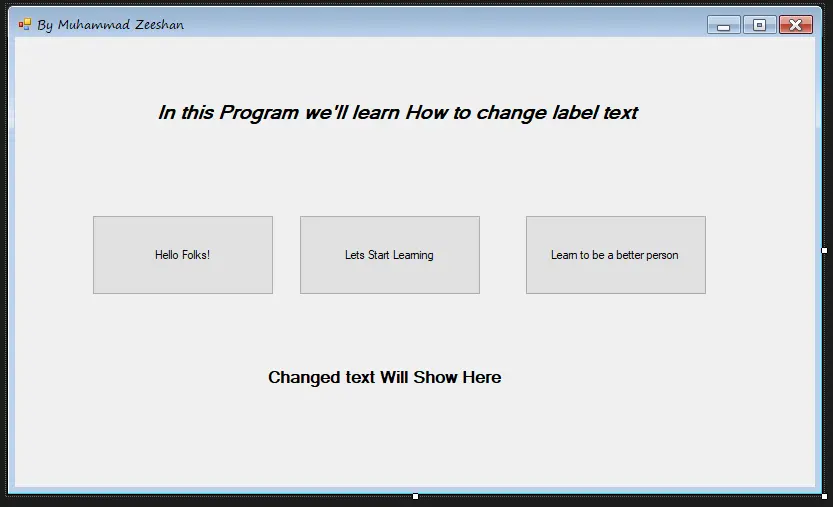
Propertieswindow, find theNameproperty and provide a descriptive name.In this case, we add 3 buttons from the left list view named
Toolboxand name the buttonsHelloFolksbtn,startlearningbtn, andbetterpersonbtn, respectively.Now, write a text on the button that you want to show on the label; for example, see the image below.
-
Writing the Button Click Event Handler
Double-click on the
Hello Folks!button to generate a click event handler. This will automatically create a method in your code-behind file and write code in this event like this.private void HelloFolksbtn_Click(object sender, EventArgs e) { changetext.Text = "Hi Folks!"; }The label’s name where the text will appear is
changetext.Generate the
startlearningbtn_Clickevent by double-clicking on theLets Start Learningbutton and write the following line of code.private void startlearningbtn_Click(object sender, EventArgs e) { changetext.Text = "Lets Start Learning"; }At last, create the
betterpersonbtn_Clickevent by double-clicking on theLearn to be a better personbutton and writing this code.private void betterpersonbtn_Click(object sender, EventArgs e) { changetext.Text = "Learn to be a better person"; } -
Adding the Libraries Needed
Add the following libraries that we need on the topmost part of the code.
using System;
using System.Collections.Generic;
using System.ComponentModel;
using System.Data;
using System.Drawing;
using System.Linq;
using System.Text;
using System.Threading.Tasks;
using System.Windows.Forms;
Full source code:
using System;
using System.Collections.Generic;
using System.ComponentModel;
using System.Data;
using System.Drawing;
using System.Linq;
using System.Text;
using System.Threading.Tasks;
using System.Windows.Forms;

namespace change_label_text {
  public partial class Form1 : Form {
    public Form1() {
      InitializeComponent();
    }

    private void HelloFolksbtn_Click(object sender, EventArgs e) {
      changetext.Text = "Hi Folks!";
    }

    private void startlearningbtn_Click(object sender, EventArgs e) {
      changetext.Text = "Lets Start Learning";
    }

    private void betterpersonbtn_Click(object sender, EventArgs e) {
      changetext.Text = "Learn to be a better person";
    }
  }
}
After clicking on the
Hello Folks!button, the label text will change at runtime, and you will have the following output.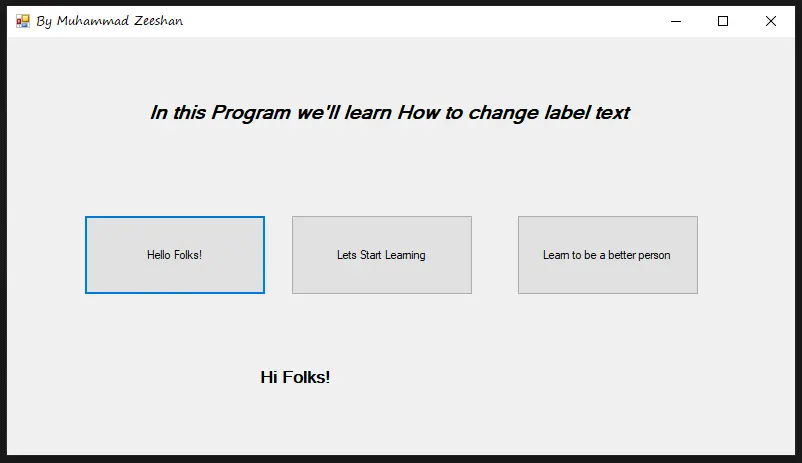
Use Direct Assignment to Change Label Text in C#
The simplest way to change the text of a label is by directly assigning a new value to its Text property. This method is straightforward and works well for static changes.
Text Property
The Text property of a label is responsible for displaying the text content. By modifying this property, you can change the displayed text.
Step-by-Step Guide
-
Creating a Windows Forms Application
Begin by creating a new Windows Forms Application project in Visual Studio. This will provide you with a blank form where you can add a label.
-
Adding a Label
Drag and drop a label from the toolbox onto the form. Position and resize it as needed.
-
Naming the Label
Give a meaningful name to your label. In the
Propertieswindow, locate theNameproperty and provide a descriptive name (e.g.,lblDisplay). -
Writing the Direct Assignment Code
The direct assignment involves directly setting the
Textproperty of the label.lblDisplay.Text = "New Label Text";In this code, the
lblDisplayis the name of the label control. TheTextis the property responsible for displaying text in the label, and the"New Label Text"is the new text you want to display. -
Testing the Application
Build and run the application. You should observe the label text changing to
"New Label Text"immediately.
Error Handling
Always ensure that the label is not null before attempting to change its text. You can use the if statement to check if the label is null.
if (lblDisplay != null) {
  lblDisplay.Text = "New Label Text";
}
Use a Timer to Change Label Text in C#
A timer can be used to periodically change the label text. In C#, timers are part of the System.Windows.Forms namespace and can be found in the System.Windows.Forms.Timer class.
They provide a mechanism for executing code at specified intervals. The Timer class fires an event (Tick) at regular intervals, allowing you to perform tasks at those intervals.
Adding a Timer to your Form
Before we can use a timer, we need to add it to our form. Here’s how you do it:
-
Open your Form in Design View
In Visual Studio, double-click the form file (
Form1.cs) to open it in the designer. -
Locate the
ToolboxThe
Toolboxis usually on the left-hand side of the Visual Studio window. If it’s not visible, you can find it in theViewmenu. -
Find the
TimerControlScroll through the
Toolboxuntil you find theTimercontrol. It looks like a clock. -
Drag and Drop the Timer
Click and drag the
Timercontrol onto your form. You’ll see it appear in the tray at the bottom of the form designer. -
Configure the Timer
Select the timer and go to the
Propertieswindow. Here, you can set properties likeInterval(the time between ticks) andEnabled(whether the timer starts ticking immediately).
Writing Code to Change Label Text
Now that we have a timer on our form let’s write the code to dynamically change label text.
private void Form1_Load(object sender, EventArgs e) {
// Start the timer when the form loads
timer1.Start();
}
private void timer1_Tick(object sender, EventArgs e) {
// Code to execute on each tick
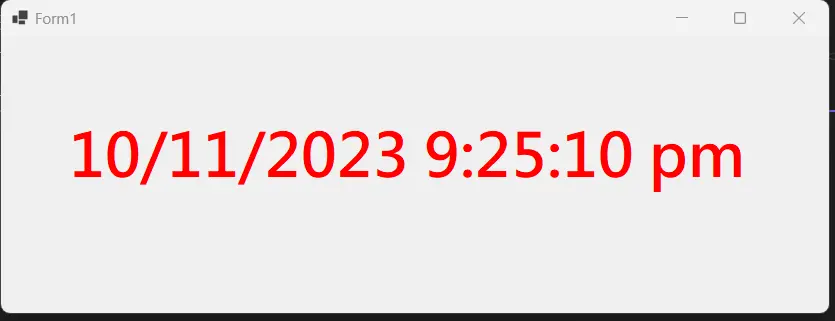
label1.Text = DateTime.Now.ToString(); // Example: Updating label with the current time
}
In the Form1_Load event, we start the timer using timer1.Start(). This ensures that the timer begins ticking as soon as the form loads.
The timer1_Tick event is where the magic happens. This event is triggered every time the timer ticks (according to the interval you’ve set).
In this example, we’re updating label1.Text with the current date and time.
Configuring the Timer
To configure the timer, select it in the designer and go to the Properties window:
Interval: Set the time between ticks in milliseconds. For instance, if you want the timer to tick every second, set it to1000.Enabled: Determines whether the timer starts ticking immediately when the form loads.
Running the Application
Hit F5 or click the "Start Debugging" button to run your application. You’ll see the label text updating dynamically according to the interval you’ve set for the timer.
Conclusion
In conclusion, this tutorial has provided a detailed exploration of different methods to dynamically change label text in C#. From utilizing button click events to direct assignments and even employing timers, each approach offers unique advantages depending on the specific requirements of your application.
By following the step-by-step instructions and code examples provided, you now have a solid foundation for implementing these techniques in your own Windows Forms applications. Whether you prefer immediate updates triggered by user actions or periodic changes facilitated by timers, these methods empower you to create interactive and responsive user interfaces with ease.

I have been working as a Flutter app developer for a year now. Firebase and SQLite have been crucial in the development of my android apps. I have experience with C#, Windows Form Based C#, C, Java, PHP on WampServer, and HTML/CSS on MYSQL, and I have authored articles on their theory and issue solving. I'm a senior in an undergraduate program for a bachelor's degree in Information Technology.
LinkedIn