How to Read PPM File in C++

In this tutorial, we will learn about PPM files and reading them using C++.
We will first discuss and understand the PPM file format. Later, we will learn the step-by-step procedure to read a PPM file in C++.
PPM File
Every image file has a header/metadata attached to the image data. The header contains different information about the image and file.
At the start of every image file, there exists an identification of file format. For example, BM is written at the beginning of every BMP file.
The rest of the header contains information like width, height, number of colors, type of image (binary, grayscale, 16 colors, 256 colors, 24-bit colors), compression, offset, etc.
The Portable Pixel Map (PPM) format is a colored image with a relatively simple format. There are two variants of PPM: one is P3, and the other is P6.
P3 is ASCII format, whereas P6 is a binary format; the ASCII format typically takes more space than the binary format. Most images have a lot of data; therefore, the space is crucial.
For example, a small image of 100x100 has 10000 pixels. In the case of a 24-bit colored image, each pixel takes 3 bytes; hence, 30000 bytes will be required to store the image.
In this tutorial, we will discuss the P6 format. It is relatively easier to read and understand P3; however, it will become easier for you after learning the P6 format.
P6 is a 24-bit colored image. The header of P6 is relatively more straightforward; you can compare it with the BMP format.
The PPM file format has three header lines, which take 15 bytes of space. The first line has an identifier/signature of the PPM (either P3 or P6).
The second line has the image’s width & space (separated by space) information, and the third line has maximum color value information (e.g., 15 or 255).
For example, look at the following image:

Let’s look at the meta information of the house image (you may not believe that data belongs to this image).
P6
111 132
255
U`6Xe8Xk8Ul9Tg:Ve<Wd7Wd5Td5N_0MY/NZ3P^5Ub5Wc4T`2R`4T`4[d6Yd7NY1CM,@J-FQ/O\2Vg8Ra5FW.?O+@M,BQ/:F-0:**5)*1(6@-CQ5=H1;H-
As discussed earlier, the first three lines have header information. P6 in the first line identifies the type of image.
The programmers may check the identifier and read the image according to the format.
The second line describes the width as 111 and the height as 132. The third line states 255 as the value of maximum color.
From the fourth line, we have the image data stored in binary format (presented on screen in the form of characters, some of them recognizable but not all).
Read PPM File in C++
To read a PPM file, first of all, we must read its header to get information about width & height. This is important as we must declare dynamic memory accordingly and read the data of the image.
P6 is a binary format; therefore, we have to open the image in binary format and do reading accordingly:
FILE *read;
read = fopen("west_1.ppm", "rb");
In the first line, the FILE pointer is declared to store a handler of the file in the second line. Note the second parameter in the fopen function is rb, where r is for reading, and b is for binary (i.e., binary read mode for the file).
If you are not comfortable with binary storage, read this article on binary files. Once you have opened the file, you must read the file’s header.
Here is the code for that:
unsigned char header[15];
fread(header, 15, 1, read);
More about fread can be found here.
Once the header is read successfully, the next thing is to extract the width & height information to proceed further. As this information is stored in character form, we may read character information one by one and convert it into an integer value by using the following code (you may use the atoi function alternatively):
int x = 0;
for (pos = 3; header[pos] != '\n' && header[pos] != ' '; pos++)
  x = x * 10 + (header[pos] - '0');
As discussed earlier, the first two bytes of the header contain a P6 value, and the third is the separator for the next line. Therefore, we will start from the 4th element, which begins from index 3.
We read character by character to complete an integer value (separated by a space character or line feed character). For each character, we have to subtract the ASCII value of 0 because the ASCII value of digits starts from 48 or 32 hex (ASCII value of 0).
For example, the ASCII value of 6 is 54 in decimal; therefore, if we subtract 48 from 54, we will get 6. Using this fact, we can get an integer value from a character array.
See a small example to convert a character array 135 to an integer equivalent.
integer x = 0                             // initial integer value
    x = x* 10 + 1 = 1 x = x* 10 + 3 = 13  // find out 10s by
    x = x* 10 + 5 = 135  // find out 100s and x will have final integer value
After getting the width and height information, we will declare a dynamic array of size width x height x 3 as there are width x height pixels in the image, and each image has 3 bytes (red, green & blue, known as RGB).
unsigned char *image;
image = new unsigned char[width * height * 3];
We are using unsigned char instead of char because, in simple char type, the first bit is used for sign (0 for a positive number and 1 for a negative number).
In the case of char, the maximum range of positive values is 0 to 127, whereas we have to read information from 0 to 255. Therefore, we need an unsigned char.
The final step is to read the image, which is pretty simple. Just call the fread function as:
fread(image, size, 1, file); // where size is width x height x 3
Again, the first parameter is a char array to store image data, and the size is already well explained.
The variable image has all pixels - red, green, and blue values. We may declare three separate arrays of size width x height, or we may handle operations by remembering that the first value is red, the second is green, and the third is blue.
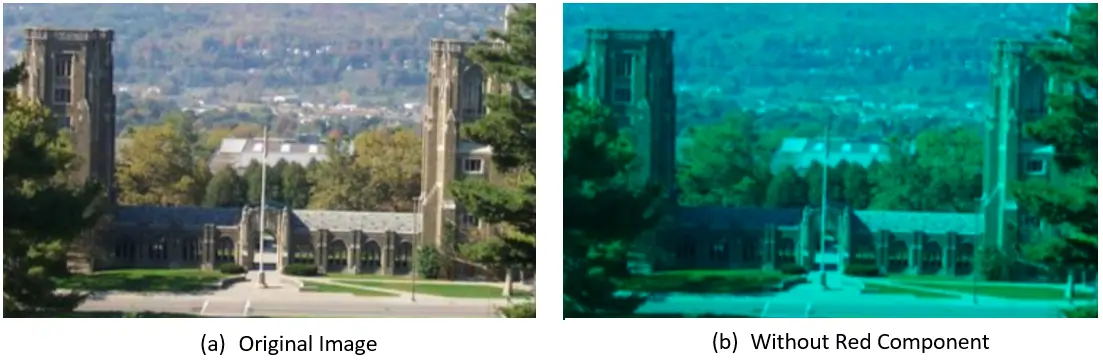
For example, if we want to remove the red component from the image, we must assign 0 in the first index of all the pixels.
We can do that as follows:
for (i = 0; i < size; i = i + 3) {
  image[i] = 0;
Please note the increment step in the for loop, where we have increased i with 3 instead of 1. It is because the second and third values are for green and blue, and we do not want to change the green and blue values.
See the example image below to see the difference after removing a red component from the image. We have the original image on the left, and the modified image without the red component is on the right.
We hope you got the whole idea about reading PPM files. In the end, let us look at a complete C++ program to read, modify, and write a PPM file:
#include <cstdio>
#include <iostream>

using namespace std;

void readPPMHeader(FILE *file, unsigned char *header) {
  fread(header, 15, 1, file);
}
void readPPMImage(FILE *file, unsigned char *image, int size) {
  fread(image, size, 1, file);
}
void writePPM(FILE *file, unsigned char *header, unsigned char *image,
              int size) {
  fwrite(header, 15, 1, file);   // writing header information
  fwrite(image, size, 1, file);  // writing image information
}
void removeRed(unsigned char *image, unsigned char *withoutredimage, int size) {
  int i;
  for (i = 0; i < size; i = i + 3) {
    withoutredimage[i] = 0;  // red component is set to 0
    withoutredimage[i + 1] = image[i + 1];
    withoutredimage[i + 2] = image[i + 2];
  }
}
void removeGreen(unsigned char *image, unsigned char *withoutgreenimage,
                 int size) {
  int i;
  for (i = 0; i < size; i = i + 3) {
    withoutgreenimage[i] = image[i];
    withoutgreenimage[i + 1] = 0;  // green component is set to 0
    withoutgreenimage[i + 2] = image[i + 2];
  }
}
void removeBlue(unsigned char *image, unsigned char *withoutblueimage,
                int size) {
  int i;
  for (i = 0; i < size; i = i + 3) {
    withoutblueimage[i] = image[i];
    withoutblueimage[i + 1] = image[i + 1];
    withoutblueimage[i + 2] = 0;  // blue component is set to 0
  }
}
// To extract width & height from header
int getDimension(unsigned char *header, int &pos) {
  int dim = 0;
  for (; header[pos] != '\n' && header[pos] != ' '; pos++)
    dim = dim * 10 + (header[pos] - '0');
  return dim;
}
int main() {
  FILE *read, *write1, *write2, *write3;
  read = fopen("west_1.ppm", "rb");
  unsigned char header[15], *image;
  readPPMHeader(read, header);
  if (header[0] != 'P' || header[1] != '6') {
    cout << "Wrong file format\n";
    return 0;
  }
  write1 = fopen("west_1_without_red.ppm", "wb");
  write2 = fopen("west_1_without_green.ppm", "wb");
  write3 = fopen("west_1_without_blue.ppm", "wb");
  int width, height, clrs, pos = 3;
  width = getDimension(header, pos);
  pos++;
  height = getDimension(header, pos);
  cout << "Width:" << width << "\tHeight:" << height << '\n';
  image = new unsigned char[width * height * 3];
  unsigned char *withoutredimage, *withoutgreenimage, *withoutblueimage;
  withoutredimage = new unsigned char[width * height * 3];
  withoutgreenimage = new unsigned char[width * height * 3];
  withoutblueimage = new unsigned char[width * height * 3];
  readPPMImage(read, image, width * height * 3);
  removeRed(image, withoutredimage, width * height * 3);
  writePPM(write1, header, withoutredimage, width * height * 3);
  removeGreen(image, withoutgreenimage, width * height * 3);
  writePPM(write2, header, withoutgreenimage, width * height * 3);
  removeBlue(image, withoutblueimage, width * height * 3);
  writePPM(write3, header, withoutblueimage, width * height * 3);
  fclose(read);
  fclose(write1);
  fclose(write2);
  fclose(write3);
  return 0;
}
In this program, we read one PPM file and wrote three PPM files after modification.
Let’s look at the output images:
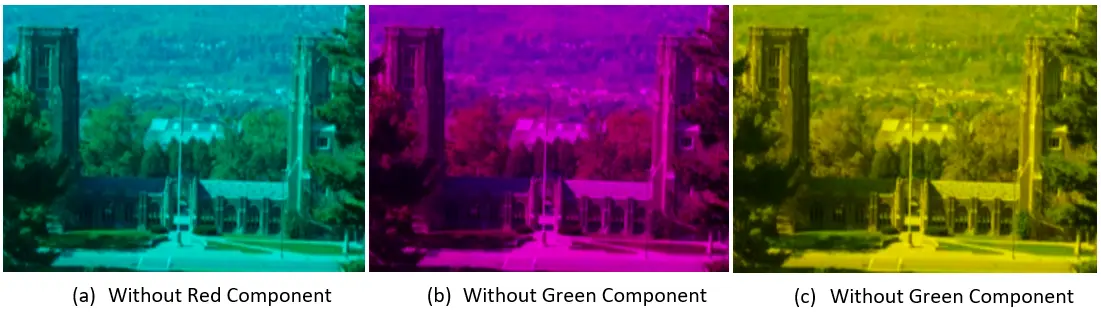
The red color is removed in the leftmost picture. The middle one is without green, and the third one has no blue component.