How to Create a Table in C++
-
How to Make a Table in C++ Using
setw()From the<iomanip>Library - How to Make a Table in C++ Using Tabs
-
How to Make a Table in C++ Using
printf() - How to Make a Table in C++ Using a Third-Party Library
- How to Make a Table in C++ With Proper Alignment
- Conclusion

Tables play a pivotal role in presenting data in a structured and visually comprehensible format. In C++ programming, creating tables is a common task, and understanding the methods to achieve this ensures effective communication of information.
Whether you’re displaying statistical data, organizing records, or presenting a document with any form of tabular information, mastering the art of making tables in C++ is a valuable skill. In this article, we’ll explore various methods, from standard C++ features to third-party libraries, to make tables that are not only well-organized but also visually appealing.
How to Make a Table in C++ Using setw() From the <iomanip> Library
The setw() function from the <iomanip> library allows us to set the width of the output field, ensuring that the columns maintain uniformity. This not only aids in readability but also provides a professional and organized appearance to the output.
The syntax of the setw() function is:
#include <iomanip>

std::setw(int n);
Here, n is an integer parameter representing the width to be set for the next value to be printed. It specifies the minimum number of characters that should be used to display the next value.
Let’s consider a practical example where we create a simple table displaying days of the week using the setw() method.
#include <iomanip>
#include <iostream>
int main() {
// Set the width of each column using setw()
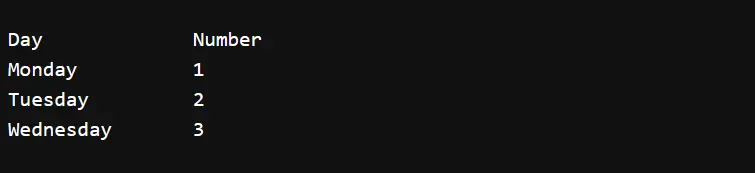
std::cout << "Monday" << std::setw(10) << "Tuesday" << std::setw(10)
<< "Wednesday" << std::endl;
// Populate the table with data
std::cout << 1 << std::setw(10) << 2 << std::setw(10) << 3 << std::endl;
return 0;
}
Steps to Make a Table in C++ Using setw() From the <iomanip> Library
Let’s break down the code step by step to understand the application of setw():
-
Include necessary headers.
#include <iomanip>
#include <iostream>
These headers are essential for input and output operations, as well as for utilizing the setw() function.
-
Set column widths.
std::cout << "Monday" << std::setw(10) << "Tuesday" << std::setw(10)
          << "Wednesday" << std::endl;
Here, we use std::setw(10) before each string to set the width equal to 10 characters in each column. This ensures that the output is aligned and organized.
-
Populate the table.
std::cout << 1 << std::setw(10) << 2 << std::setw(10) << 3 << std::endl;
We populate the table with numeric data. The setw(10) is used consistently to maintain the specified column width.
Code Output:

The output demonstrates a well-structured table with each column having a width of 10 characters. This ensures a neat and organized presentation of the data.
As we have seen in the example above, the setw() function allows us to set the width of the field in which the next value will be printed. Concurrently, the setfill() function enables us to set the fill character for the empty spaces within that field.
This dynamic duo is particularly valuable when constructing tables with columns of consistent width, ensuring a neat and aligned presentation of data. By understanding these functions, developers can significantly enhance the visual appeal of their program outputs.
Consider a scenario where we want to create a table of months along with their respective days. Let’s dive into a practical example:
#include <iomanip>
#include <iostream>
#include <string>

int main() {
  // Array containing month names
  std::string months[3] = {"January", "February", "March"};

  // Array containing the corresponding number of days
  int days[3] = {31, 28, 31};

  // Print table header
  std::cout << std::setw(15) << std::left << "Month" << std::setw(10)
            << std::right << "Days" << std::endl;

  // Print table rows
  for (int i = 0; i < 3; ++i) {
    std::cout << std::setw(15) << std::left << std::setfill('.') << months[i]
              << std::setw(10) << std::right << std::setfill('.') << days[i]
              << std::endl;
  }

  return 0;
}
Here, we utilize setw(), std::left, and std::right to format the month names and days. Then, setfill('.') sets the fill character to '.' for empty spaces.
Code Output:
Month                Days
January................31
February...............28
March..................31
How to Make a Table in C++ Using Tabs
Tabs offer a simple and quick way to align content in a table-like structure. Unlike fixed-width approaches, tabs dynamically adjust spacing based on the length of the content.
This flexibility is particularly useful when dealing with variable-length data, and it simplifies the code required for formatting. The tab method is especially handy for creating basic tables in scenarios where precise alignment is not critical.
Consider a practical example where we create a table of days of the week using the tabs:
#include <iostream>
int main() {
// Print table header
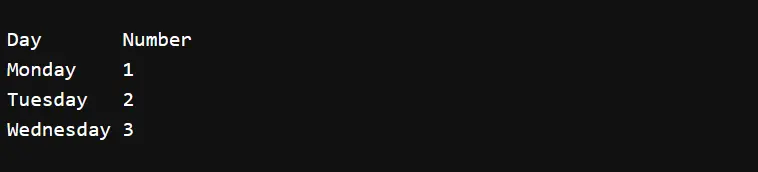
std::cout << "Day\t\tNumber\n";
// Populate the table with data
std::cout << "Monday\t\t1\n";
std::cout << "Tuesday\t\t2\n";
std::cout << "Wednesday\t3\n";
return 0;
}
Steps to Make a Table in C++ Using Tabs
Let’s delve into the program to understand how the tab method is applied to create a table:
-
Include the necessary headers.
#include <iostream>
The <iostream> header is necessary for input and output operations.
-
Print table header.
std::cout << "Day\t\tNumber\n";
Here, we use \t to insert tabs between Day and Number, creating a header for our table. The \t\t ensures there is enough spacing for variable-length day names.
-
Populate the table.
std::cout << "Monday\t\t1\n";
std::cout << "Tuesday\t\t2\n";
std::cout << "Wednesday\t3\n";
Tabs are used to separate the day names and their corresponding numbers. The dynamic nature of tabs ensures that the content is aligned neatly, even if the day names have varying lengths.
Code Output:
The output showcases a well-formatted table where the day names and numbers are aligned using tabs. The flexibility of tabs ensures that the row spacing adjusts based on the content length, providing a clean and organized appearance.
How to Make a Table in C++ Using printf()
The printf() function in C++ is known for its flexibility and precision in formatting output. It allows developers to define the structure of the program output with precise control over spacing, alignment, and other formatting aspects.
When it comes to creating tables, printf() empowers programmers to achieve pixel-perfect layouts with ease by default, making it a preferred choice for sophisticated and customized table formatting.
Let’s dive into a complete example code where we use printf() to create a table displaying the days of the week along with their respective numbers:
#include <cstdio>

int main() {
  printf("%-10s%-10s\n", "Day", "Number");

  printf("%-10s%-10d\n", "Monday", 1);
  printf("%-10s%-10d\n", "Tuesday", 2);
  printf("%-10s%-10d\n", "Wednesday", 3);

  return 0;
}
Steps to Make a Table in C++ Using printf()
Let’s dissect the example to understand how printf() is employed to construct a well-formatted table:
-
Include necessary header.
#include <cstdio>
The <cstdio> header is included for using the printf() function.
-
Print table header.
printf("%-10s%-10s\n", "Day", "Number");
In this line, we use format specifiers within printf() to define the structure of the table header. %s is used for strings, and -10 ensures a left-aligned width of 10 characters.
-
Populate the table with data.
printf("%-10s%-10d\n", "Monday", 1);
printf("%-10s%-10d\n", "Tuesday", 2);
printf("%-10s%-10d\n", "Wednesday", 3);
Similar to the header, we use format specifiers to align the day names and numbers. %s is used for strings, and %d is used for integers. The -10 specifier ensures a left-aligned width of 10 characters for the strings.
Code Output:
The output showcases a neatly formatted table where day names and numbers are aligned with precision. The use of printf() allows for explicit control over column widths and alignment, resulting in a visually appealing and organized presentation.
How to Make a Table in C++ Using a Third-Party Library
Third-party libraries can extend the capabilities of C++ by providing specialized functions for specific tasks. To create tables, using a third-party library can offer advanced formatting options, better customization, and ease of use.
It allows developers to focus on the logic of their application while leveraging the pre-built features of the library for sophisticated table layouts.
Let’s consider an example using the Boost Format library, a third-party library that enhances string formatting capabilities in C++. Below is an example demonstrating how to create a table using this library:
#include <boost/format.hpp>
#include <iostream>

int main() {
  std::cout << boost::format("%-10s%-10s\n") % "Day" % "Number";

  std::cout << boost::format("%-10s%-10d\n") % "Monday" % 1;
  std::cout << boost::format("%-10s%-10d\n") % "Tuesday" % 2;
  std::cout << boost::format("%-10s%-10d\n") % "Wednesday" % 3;

  return 0;
}
Steps to Make a Table in C++ Using a Third-Party Library
Let’s break down the example code to understand how the Boost Format library is used to create a table:
-
Include necessary headers.
#include <boost/format.hpp>
#include <iostream>
Include the required headers, including the Boost Format library.
-
Print table header.
std::cout << boost::format("%-10s%-10s\n") % "Day" % "Number";
Utilize the Boost Format library to format the table header. %s is used for strings, and %10 ensures a left-aligned width of 10 characters.
-
Populate the table with data.
std::cout << boost::format("%-10s%-10d\n") % "Monday" % 1;
std::cout << boost::format("%-10s%-10d\n") % "Tuesday" % 2;
std::cout << boost::format("%-10s%-10d\n") % "Wednesday" % 3;
Apply the Boost Format library to format the strings and numbers in the table. %s is used for strings, and %d is used for integers.
Code Output:
Day       Number
Monday    1
Tuesday   2
Wednesday 3
The output demonstrates a well-formatted table created using the Boost Format library. The library simplifies the formatting process, allowing for concise and expressive code.
How to Make a Table in C++ With Proper Alignment
Proper alignment in tables ensures that data is presented in a clear and organized fashion. Well-aligned tables enhance readability, making it easier for developers, end-users, or anyone interacting with the output to interpret the information.
Achieving proper alignment is not only aesthetically pleasing but also contributes to the effectiveness of the communication of data.
Consider a scenario where we want to create a table with student information, including their names, ages, birth dates, and birth years. Let’s delve into a complete working example to demonstrate the value and importance of proper alignment:
#include <iomanip>
#include <iostream>
#include <string>

class Student {
 public:
  std::string name;
  int age;
  int birthDay;
  std::string birthMonth;
  std::string birthYear;

  Student(const std::string& n, int a, int bDay, const std::string& bMonth,
          const std::string& bYear)
      : name(n), age(a), birthDay(bDay), birthMonth(bMonth), birthYear(bYear) {}
};

int main() {
  Student students[5] = {{"Alice", 20, 13, "January", "1999"},
                         {"Bob", 23, 4, "May", "1996"},
                         {"Charlie", 19, 29, "December", "2000"},
                         {"David", 25, 19, "March", "1998"},
                         {"Eve", 20, 29, "April", "1989"}};

  std::cout << std::left << std::setw(15) << "Name" << std::setw(5) << "Age"
            << std::setw(8) << "Day" << std::setw(10) << "Month" << std::setw(6)
            << "Year" << std::endl;

  for (const auto& student : students) {
    std::cout << std::left << std::setw(15) << student.name << std::setw(5)
              << student.age << std::setw(8) << student.birthDay
              << std::setw(10) << student.birthMonth << std::setw(6)
              << student.birthYear << std::endl;
  }

  return 0;
}
Steps to Make a Table in C++ With Proper Alignment
Let’s break down the example code to understand how proper alignment is achieved:
-
Include necessary headers.
#include <iomanip>
#include <iostream>
#include <string>
Include the required headers for input/output operations, formatting, and string handling.
-
Define a
Studentclass.class Student { public: // Student class with attributes: name, age, birthDay, birthMonth, birthYear // Constructor initializes the attributes for each student };
-
Create an array of students.
Student students[5] = {/*...*/};
Define an array of Student objects, each representing a student with their respective information.
-
Print table header row.
std::cout << std::left << std::setw(15) << "Name" << std::setw(5) << "Age"
          << std::setw(8) << "Day" << std::setw(10) << "Month" << std::setw(6)
          << "Year" << std::endl;
Set the width of each column using setw() to ensure proper alignment. The left manipulator ensures left alignment.
-
Print the student information.
for (const auto& student : students) {
  std::cout << std::left << std::setw(15) << student.name << std::setw(5)
            << student.age << std::setw(8) << student.birthDay << std::setw(10)
            << student.birthMonth << std::setw(6) << student.birthYear
            << std::endl;
}
Iterate through the array of students and print their information with proper alignment.
Code Output:
Name           Age  Day     Month     Year
Alice          20   13      January   1999
Bob            23   4       May       1996
Charlie        19   29      December  2000
David          25   19      March     1998
Eve            20   29      April     1989
The output showcases a well-organized table with proper alignment for all columns. The use of the setw() function ensures that each piece of information is appropriately spaced, contributing to an aesthetically pleasing and readable table.
Conclusion
The ability to make tables in C++ is a fundamental skill for developers seeking to present information in a clear and organized manner. From leveraging functions like setw() from the (iomanip) library to exploring the flexibility of third-party libraries, the methods discussed in this article cater to a range of needs, allowing developers to choose the approach that best fits their requirements.
Whether you are a novice programmer or an experienced developer, mastering the art of creating tables will undoubtedly enhance the professionalism and clarity of your C++ applications. As you delve into the intricacies of table creation, remember that a well-structured table is not just a display of data but a powerful tool for effective communication in the world of programming languages.

Aditya Raj is a highly skilled technical professional with a background in IT and business, holding an Integrated B.Tech (IT) and MBA (IT) from the Indian Institute of Information Technology Allahabad. With a solid foundation in data analytics, programming languages (C, Java, Python), and software environments, Aditya has excelled in various roles. He has significant experience as a Technical Content Writer for Python on multiple platforms and has interned in data analytics at Apollo Clinics. His projects demonstrate a keen interest in cutting-edge technology and problem-solving, showcasing his proficiency in areas like data mining and software development. Aditya's achievements include securing a top position in a project demonstration competition and gaining certifications in Python, SQL, and digital marketing fundamentals.
GitHub