How to Show and Hide in Angular

We will introduce examples of showing and hiding components or elements in Angular.
Show and Hide in Angular
When developing a commercial application, we need to hide some data based on user roles or conditions. We have to display the same data according to the conditions in that application.
In this tutorial, I am going to show you a simple way by using which we can show and hide data based on conditions.
Let’s create a new application by using the following command.
# angular
ng new my-app
After creating our new application in Angular, we will go to our application directory using this command.
# angular
cd my-app
Now, let’s run our app to check if all dependencies are installed correctly.
# angular
ng serve --open
Suppose we have a template or a block of code that we want to display only if the condition is true and hide it when false. We can show and hide it using this example.
First, we will create a demo content in app.component.html that will include a heading, paragraph, and an input field, and we will wrap it in a div.
# Angular
<div>
  <hello name="{{ name }}"></hello>
  <p>Enter your name:</p>
  <input type="text" id="element"/>
</div>
Now, in app.component.ts, we create a new variable element and set it as false.
# Angular
element = false;
We will use *ngIf to display and hide our div based on the condition.
# Angular
<div *ngIf="element == true">
  <hello name="{{ name }}"></hello>
  <p>Enter your name:</p>
  <input type="text" id="element"/>
</div>
As you can see in the above example, we have set a condition if the element is true, the div will be displayed, and if the condition is false, it will not display.
So, the div will be hidden because we have set the element as false. Now, Let’s change the value of the element to true and check how it works.
Output:
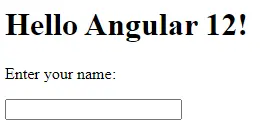
You can now see that when we changed the value of the element, the condition we set on div changed, and it started to show the div with all the elements inside it.
Imagine if we want to display and hide data whenever certain buttons are clicked. We can create this simple example using the same *ngIf.
Now, let’s create two buttons having two functions showData() and hideData(). We need to create these two buttons outside the div, so they don’t get hidden when the condition is changed to false.
So, our code in app.component.html will look like below.
# Angular
<div *ngIf="element == true">
  <hello name="{{ name }}"></hello>
  <p>Enter your name:</p>
  <input type="text" id="element" />
</div>
<button (click)="showData()">Display Data</button>
<button (click)="hideData()">Hide Data</button>
Now, let’s create these two functions in app.component.ts. showData() will change the value of element to true and hideData() will change the value of the element to false.
So, the code will look like below.
# Angular
showData() {
    return (this.element = true);
  }
  hideData() {
    return (this.element = false);
  }
We will now add some CSS code to make our buttons look good.
# Angular
button{
  margin-top: 10px;
  padding: 10px;
  background-color: aquamarine;
  border: none;
  margin-right: 10px;
}
Let’s check how it works.
Output:
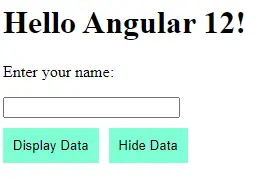
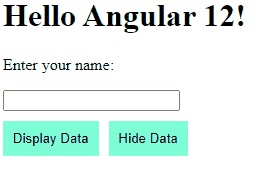
As you can see in the above example, we can easily hide and display content using *ngIf and button (click) methods.
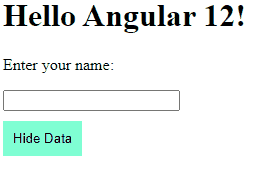
If we want to hide the Display Data button when the content displays the Hide Data button when the data is hidden, we can also use the same concept on buttons.
So let’s create a *ngIf condition if the element is true, the hide data button will be displayed only, and when the element is false, the display data button will be displayed.
# Angular
<div *ngIf="element == true">
  <hello name="{{ name }}"></hello>
  <p>Enter your name:</p>
  <input type="text" id="element" />
</div>
<button *ngIf="element == false" (click)="showData()">Display Data</button>
<button *ngIf="element == true" (click)="hideData()">Hide Data</button>
We don’t need to write any line of code in the app.component.ts file because the functions we created and the *ngIf function will help us accomplish the same on buttons. So, let’s check the result how it works now.
Output:
So, in this tutorial, we learned how to hide and display content based on the conditions using *ngIf, and we also learned how to use the (click) method of buttons to help us hide and display data on the button click.

Rana is a computer science graduate passionate about helping people to build and diagnose scalable web application problems and problems developers face across the full-stack.
LinkedIn