How to Create A Search Bar With AngularJS Autocomplete
- Implement AngularJS Autocomplete Using REST API and Bootstrap
-
Implement AngularJS Autocomplete Using the
ng-autocompleteModule - Implement AngularJS Autocomplete Using Angular Material
- Conclusion

The autocomplete function is one function that makes life easier for several reasons. It makes it easy and faster to write out texts because as letters are typed in the input bar, suggestions and predictions of words we are trying to make are displayed.
Also, if we wish to check that a particular name is among a list of names, the autocomplete function will suggest the names as we type, making it faster to comb through the list, like a pseudo Ctrl+F.
In the Angular framework, there are different ways to bring the autocomplete function into use.
Implement AngularJS Autocomplete Using REST API and Bootstrap
To create the autocomplete function in this method, we will get the structure and styling from Bootstrap. Then we will get the data we will search through using the REST API.
For starters, we will create a new file by using ng new autocomplete, then we need to create a service file. This is the file where we will put codes that will fetch data using the REST API.
Next, we head to getbootstrap.com, click Get Started, and then under the CSS heading, we copy the link and paste it inside the head tag of the index.html file, as seen below:
Code Snippet- index.html:
<!doctype html>
<html lang="en">

<head>
  <meta charset="utf-8">
  <title>NgAutoComplete</title>
  <base href="/">
  <meta name="viewport" content="width=device-width, initial-scale=1">
  <link rel="icon" type="image/x-icon" href="favicon.ico">
  <link href="https://cdn.jsdelivr.net/npm/bootstrap@5.1.3/dist/css/bootstrap.min.css" rel="stylesheet"
    integrity="sha384-1BmE4kWBq78iYhFldvKuhfTAU6auU8tT94WrHftjDbrCEXSU1oBoqyl2QvZ6jIW3" crossorigin="anonymous">

</head>

<body>
  <app-root></app-root>
</body>

</html>
Then we navigate to the app.component.html file to create the page structure with Bootstrap. On the Bootstrap page, search for autocomplete, copy the code snippet under Datalists, and paste it.
Then we will adjust the code snippet to accommodate the data we will search for like below:
Code Snippet- app.component.html:
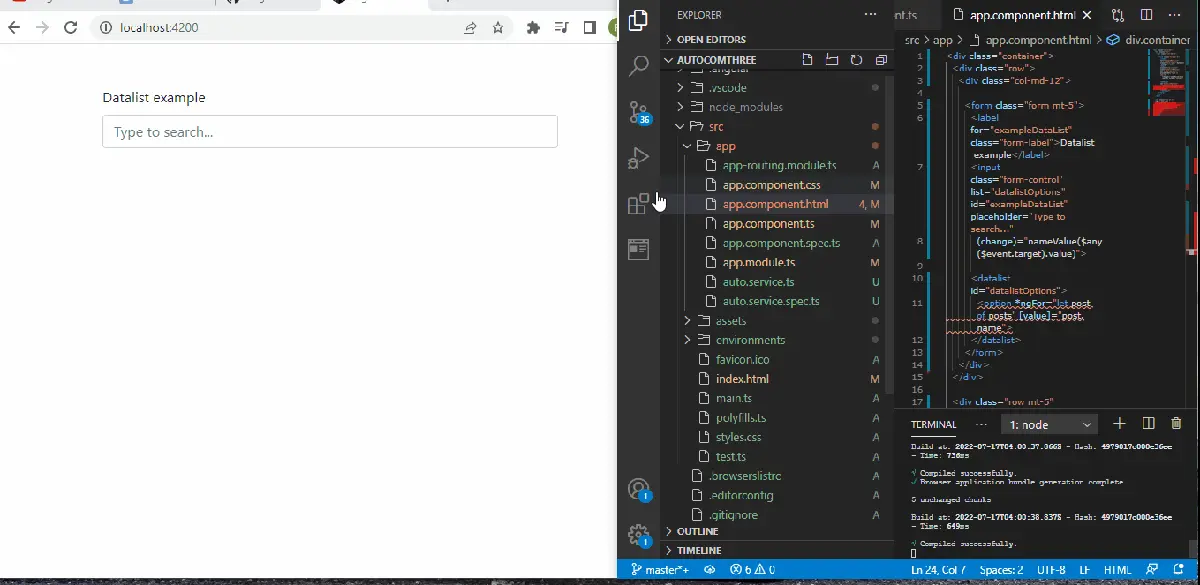
<div class="container">
  <div class="row">
    <div class="col-md-12">
      <form class="form mt-5">
        <label for="exampleDataList" class="form-label">Datalist example</label>
        <input class="form-control" list="datalistOptions" id="exampleDataList" placeholder="Type to search..."
          (change)="nameValue($any($event.target).value)">
        <datalist id="datalistOptions">
          <option *ngFor="let post of posts" [value]="post.name">
        </datalist>
      </form>
    </div>
  </div>
  <div class="row mt-5" *ngIf="username">
    <div class="col-sm-4">
      <div class="card purple">
        <h3 class="title">{{username}}</h3>
      </div>
    </div>
  </div>
</div>
We will use the ngFor function to render the web page with the different names we select from our list. Then we build the code in the app.component.ts to get the data that we generate from the auto.service.ts file; at the end, it should be like this:
Code Snippet- app.component.ts:
import { Component, OnInit } from '@angular/core';
import { AutoService } from './auto.service';

@Component({
  selector: 'app-root',
  templateUrl: './app.component.html',
  styleUrls: ['./app.component.css'],
})
export class AppComponent implements OnInit {
  title = 'autocomthree';
  posts!: any;
  username: any;
  constructor(private service: AutoService) { }
  ngOnInit() {
    this.getAllData();
  }
  getAllData() {
    this.service.getData().subscribe((res: any) => {
      this.posts = res;
      console.log(this.posts);
    });
  }
  nameValue(name: any) {
    this.username = name;
    console.log(this.username);
  }
}
The app.module.ts is where we import the dependencies/modules that we need to get our app to work, so our app.module.ts should look like this:
Code Snippet- app.module.ts:
import { NgModule } from '@angular/core';
import { BrowserModule } from '@angular/platform-browser';
import { FormsModule, ReactiveFormsModule } from '@angular/forms';
import { HttpClientModule } from '@angular/common/http';
import { AppComponent } from './app.component';

@NgModule({
  declarations: [AppComponent],
  imports: [BrowserModule, HttpClientModule, ReactiveFormsModule, FormsModule],
  providers: [],
  bootstrap: [AppComponent],
})
export class AppModule {}
We now need to generate the data we want to use in the autocomplete app. From the terminal, inside the project folder, we install the service file with ng g s auto.
The file should be among the component files inside the src » app folder. We navigate into the file and put these codes:
Code Snippet- auto.service.ts:
import { HttpClient } from '@angular/common/http';
import { Injectable } from '@angular/core';

@Injectable({
  providedIn: 'root',
})
export class AutoService {
  private baseURL = 'https://jsonplaceholder.typicode.com/users';

  constructor(private http: HttpClient) { }

  getData() {
    return this.http.get(this.baseURL);
  }
}
Inside the service file, we declare the URL to get the data from, and we use the getData() function to fetch the data.
To make the web page beautiful, we can add the styling below to the app.component.ts file, like so:
Code Snippet- app.component.css:
.card {
    width: 100%;
    display: inline-block;
  box-sizing: border-box;
  background: #fff;
  padding: 20px;
  margin-bottom: 30px;
  }
  .title {
      margin-top: 0px;
  }
  .purple, .blue, .red, .orange, .green {
    color: #fff;
  }
  .purple {
    background: #5133AB;
  }
Output:
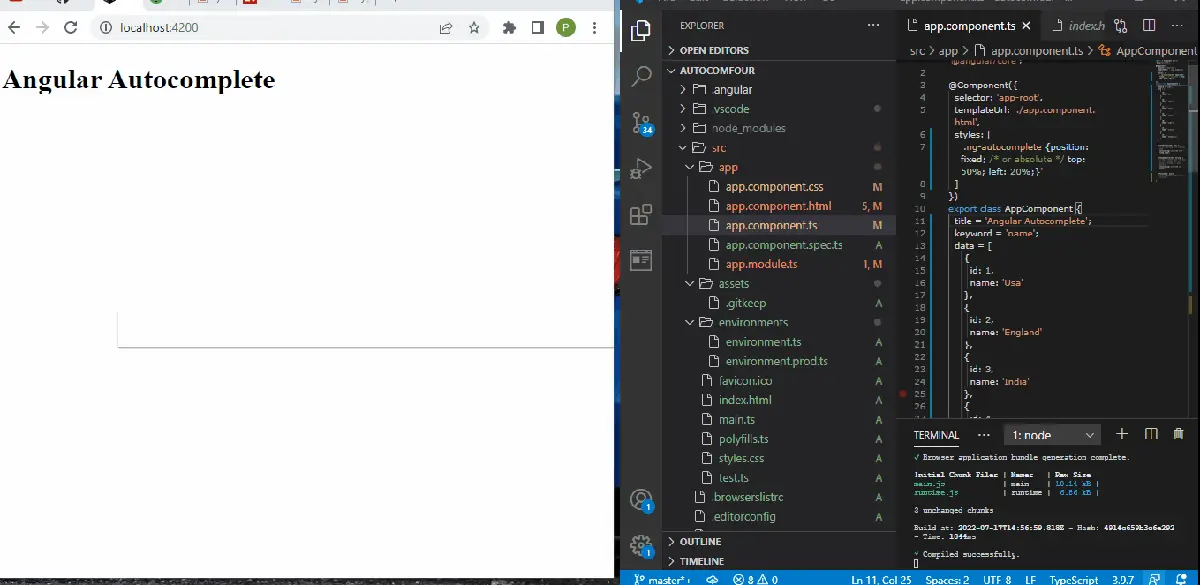
Implement AngularJS Autocomplete Using the ng-autocomplete Module
Using this method, we will install the Angular autocomplete module. After creating a new project folder, we will install a new Angular module with npm install angular-ng-autocomplete.
Then we head to npmjs.com/package/angular-ng-autocomplete and copy the usage sample into the app.component.html file, like below:
Code Snippet- app.component.html:
<h1>{{title}}</h1>
<div class="ng-autocomplete">
  <ng-autocomplete
    [data]="data"
    [searchKeyword]="keyword"
    (selected)='selectEvent($event)'
    (inputChanged)='onChangeSearch($event)'
    (inputFocused)='onFocused($event)'
    [itemTemplate]="itemTemplate"
    [notFoundTemplate]="notFoundTemplate">
  </ng-autocomplete>
  <ng-template #itemTemplate let-item>
  <a [innerHTML]="item.name"></a>
  </ng-template>
  <ng-template #notFoundTemplate let-notFound>
  <div [innerHTML]="notFound"></div>
  </ng-template>
  </div>
Then inside the app.component.ts file, we will create the list of names we want to use inside the autocomplete web app in the form of an array, as seen below:
Code Snippet- app.component.ts:
import { Component } from '@angular/core';

@Component({
  selector: 'app-root',
  templateUrl: './app.component.html',
  styles: [
    '.ng-autocomplete {position: fixed; /* or absolute */ top: 50%; left: 20%;}'
  ]
})
export class AppComponent {
  title = 'Angular Autocomplete';
  keyword = 'name';
  data = [
     {
       id: 1,
       name: 'Usa'
     },
     {
       id: 2,
       name: 'England'
     },
     {
       id: 3,
       name: 'India'
     },
     {
       id: 4,
       name: 'africa'
     },
     {
       id: 5,
       name: 'nigeria'
     },
     {
       id: 6,
       name: 'albania'
     },
     {
       id: 7,
       name: 'madagascar'
     }
  ];
  selectEvent(item: any) {
    console.log('selected item '+item.name);
  }
  onChangeSearch(val: string) {
    console.log('selected val '+val);
  }
  onFocused(e: any){
  }
}
The onFocused event handler becomes active once we click on the search bar, then the selectEvent function displays the item we have selected from the list.
Then inside the app.module.ts, we import the modules we installed earlier, as seen below:
Code Snippet- app.module.ts:
import { NgModule } from '@angular/core';
import { BrowserModule } from '@angular/platform-browser';
import { AppComponent } from './app.component';
import {AutocompleteLibModule} from 'angular-ng-autocomplete';

@NgModule({
  declarations: [
    AppComponent
  ],
  imports: [
    BrowserModule,
    AutocompleteLibModule
  ],
  providers: [],
  bootstrap: [AppComponent]
})
export class AppModule { }
Output:
Implement AngularJS Autocomplete Using Angular Material
The Angular material provides us with ready-to-use Angular components for web applications, and in this example, we will use the autocomplete module.
After we have created a new project folder, we navigate to the project folder and install the Angular material with ng add @angular/material. Then we visit material.angular.io, click Get Started, Components, and select Autocomplete.
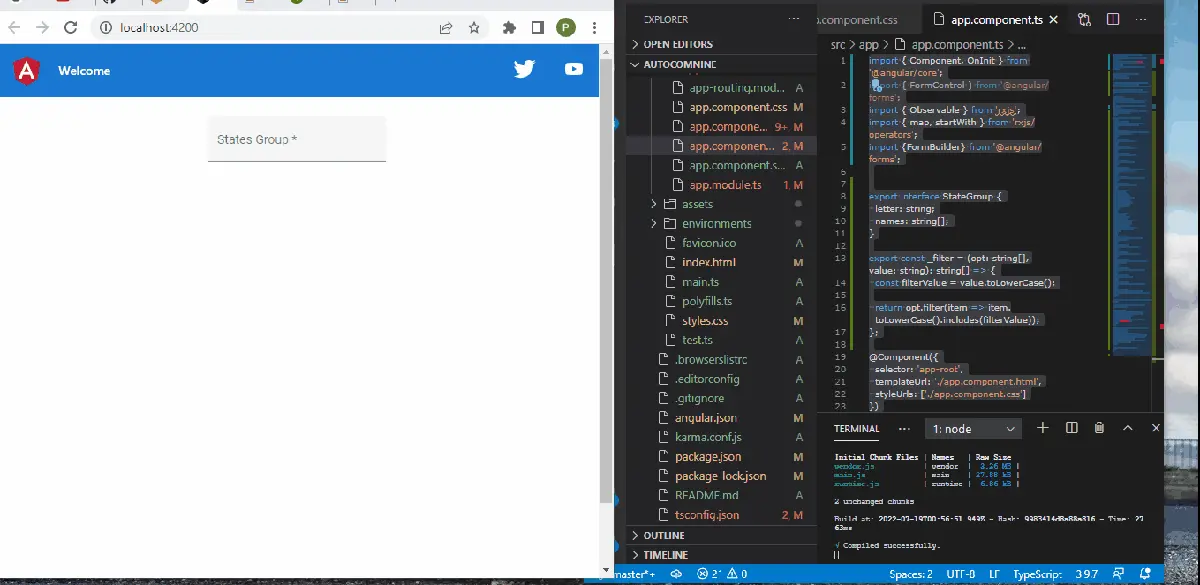
In the examples tab, we are using the one for States, so we copy the HTML code snippets to our app.component.html, like below:
Code Snippet- app.component.html:
<form [formGroup]="stateForm">
  <mat-form-field appearance="fill">
    <mat-label>States Group</mat-label>
    <input type="text"
           matInput
           formControlName="stateGroup"
           required
           [matAutocomplete]="autoGroup">
      <mat-autocomplete #autoGroup="matAutocomplete">
        <mat-optgroup *ngFor="let group of stateGroupOptions | async" [label]="group.letter">
          <mat-option *ngFor="let name of group.names" [value]="name">
            {{name}}
          </mat-option>
      </mat-optgroup>
    </mat-autocomplete>
  </mat-form-field>
</form>
This makes our page’s structure, to be precise, the States search bar.
Then inside the app.module.ts, we import the modules for our autocomplete components, the form field for the list of States as the input module. The file will look as seen below:
Code Snippet- app.module.ts:
import { NgModule } from '@angular/core';
import { BrowserModule } from '@angular/platform-browser';
import { AppRoutingModule } from './app-routing.module';
import { AppComponent } from './app.component';
import { MatAutocompleteModule } from '@angular/material/autocomplete';
import { BrowserAnimationsModule } from '@angular/platform-browser/animations';
import { MatInputModule } from '@angular/material/input';
import { MatFormFieldModule } from '@angular/material/form-field';
import { ReactiveFormsModule } from '@angular/forms';

@NgModule({
  declarations: [
    AppComponent
  ],
  imports: [
    BrowserModule,
    AppRoutingModule,
    MatAutocompleteModule,
    BrowserAnimationsModule,
    MatInputModule,
    MatFormFieldModule,
    ReactiveFormsModule
  ],
  providers: [],
  bootstrap: [AppComponent]
})
export class AppModule { }
The app.component.ts file will hold the main code for our application. Still, on the Angular website, we copy the TS code snippets of the States example and put them inside the export class of the AppComponent.
Before that, we copy the first part of the TS code snippet, the export interface StateGroup, just after the imports. The app.component.ts file should have codes, as shown below:
Code Snippet- app.component.ts:
import { Component, OnInit } from '@angular/core';
import { FormControl } from '@angular/forms';
import { Observable } from 'rxjs';
import { map, startWith } from 'rxjs/operators';
import {FormBuilder} from '@angular/forms';

export interface StateGroup {
  letter: string;
  names: string[];
}
export const _filter = (opt: string[], value: string): string[] => {
  const filterValue = value.toLowerCase();

  return opt.filter(item => item.toLowerCase().includes(filterValue));
};

@Component({
  selector: 'app-root',
  templateUrl: './app.component.html',
  styleUrls: ['./app.component.css']
})
export class AppComponent implements OnInit {
  title = 'autocomnine';
  stateForm = this._formBuilder.group({
    stateGroup: '',
  });

  stateGroups: StateGroup[] = [
    {
      letter: 'A',
      names: ['Alabama', 'Alaska', 'Arizona', 'Arkansas'],
    },
    {
      letter: 'C',
      names: ['California', 'Colorado', 'Connecticut'],
    },
    {
      letter: 'D',
      names: ['Delaware'],
    },
    {
      letter: 'F',
      names: ['Florida'],
    },
    {
      letter: 'G',
      names: ['Georgia'],
    },
    {
      letter: 'H',
      names: ['Hawaii'],
    },
    {
      letter: 'I',
      names: ['Idaho', 'Illinois', 'Indiana', 'Iowa'],
    },
    {
      letter: 'K',
      names: ['Kansas', 'Kentucky'],
    },
    {
      letter: 'L',
      names: ['Louisiana'],
    },
    {
      letter: 'M',
      names: [
        'Maine',
        'Maryland',
        'Massachusetts',
        'Michigan',
        'Minnesota',
        'Mississippi',
        'Missouri',
        'Montana',
      ],
    },
    {
      letter: 'N',
      names: [
        'Nebraska',
        'Nevada',
        'New Hampshire',
        'New Jersey',
        'New Mexico',
        'New York',
        'North Carolina',
        'North Dakota',
      ],
    },
    {
      letter: 'O',
      names: ['Ohio', 'Oklahoma', 'Oregon'],
    },
    {
      letter: 'P',
      names: ['Pennsylvania'],
    },
    {
      letter: 'R',
      names: ['Rhode Island'],
    },
    {
      letter: 'S',
      names: ['South Carolina', 'South Dakota'],
    },
    {
      letter: 'T',
      names: ['Tennessee', 'Texas'],
    },
    {
      letter: 'U',
      names: ['Utah'],
    },
    {
      letter: 'V',
      names: ['Vermont', 'Virginia'],
    },
    {
      letter: 'W',
      names: ['Washington', 'West Virginia', 'Wisconsin', 'Wyoming'],
    },
  ];
  stateGroupOptions: Observable<StateGroup[]>;
  constructor(private _formBuilder: FormBuilder) {}

  ngOnInit() {
    this.stateGroupOptions = this.stateForm.get('stateGroup')!.valueChanges.pipe(
      startWith(''),
      map(value => this._filterGroup(value || '')),
    );
  }
  private _filterGroup(value: string): StateGroup[] {
    if (value) {
      return this.stateGroups
        .map(group => ({letter: group.letter, names: _filter(group.names, value)}))
        .filter(group => group.names.length > 0);
    }
    return this.stateGroups;
  }
}
Output:
Here, we list the names of States, and then we use ngOnInit() to bring alive the lists once we focus on the search bar. Then, the _filterGroup function suggests the nearest State with each letter we punch in the search bar.
Conclusion
We can apply the autocomplete function differently using the methods we have discussed. Furthermore, we can apply the autocomplete function for many situations, especially when dealing with large data.

Fisayo is a tech expert and enthusiast who loves to solve problems, seek new challenges and aim to spread the knowledge of what she has learned across the globe.
LinkedIn