AngularJS オートコンプリート
- REST API と Bootstrap を使用して AngularJS Autocomplete を実装する
-
ng-autocompleteモジュールを使用して AngularJS Autocomplete を実装する - Angular Material を使用して AngularJS Autocomplete を実装する
- まとめ

オートコンプリート機能は、いくつかの理由で生活を楽にする 1つの機能です。 入力バーに文字を入力すると、作成しようとしている単語の提案と予測が表示されるため、テキストを簡単かつ迅速に書き出すことができます。
また、特定の名前が名前のリストに含まれていることを確認したい場合、入力時にオートコンプリート機能が名前を提案してくれるので、疑似 Ctrl+F.
Angular フレームワークでは、オートコンプリート機能を使用するさまざまな方法があります。
REST API と Bootstrap を使用して AngularJS Autocomplete を実装する
このメソッドでオートコンプリート関数を作成するには、Bootstrap から構造とスタイルを取得します。 次に、REST API を使用して検索するデータを取得します。
まず、ng new autocomplete を使用して新しいファイルを作成します。次に、サービス ファイルを作成する必要があります。 これは、REST API を使用してデータをフェッチするコードを配置するファイルです。
次に、getbootstrap.com に移動し、Get Started をクリックします。次に、CSS 見出しの下でリンクをコピーし、以下に示すように、index.html ファイルの head タグ内に貼り付けます。
コード スニペット - index.html:
<!doctype html>
<html lang="en">

<head>
  <meta charset="utf-8">
  <title>NgAutoComplete</title>
  <base href="/">
  <meta name="viewport" content="width=device-width, initial-scale=1">
  <link rel="icon" type="image/x-icon" href="favicon.ico">
  <link href="https://cdn.jsdelivr.net/npm/bootstrap@5.1.3/dist/css/bootstrap.min.css" rel="stylesheet"
    integrity="sha384-1BmE4kWBq78iYhFldvKuhfTAU6auU8tT94WrHftjDbrCEXSU1oBoqyl2QvZ6jIW3" crossorigin="anonymous">

</head>

<body>
  <app-root></app-root>
</body>

</html>
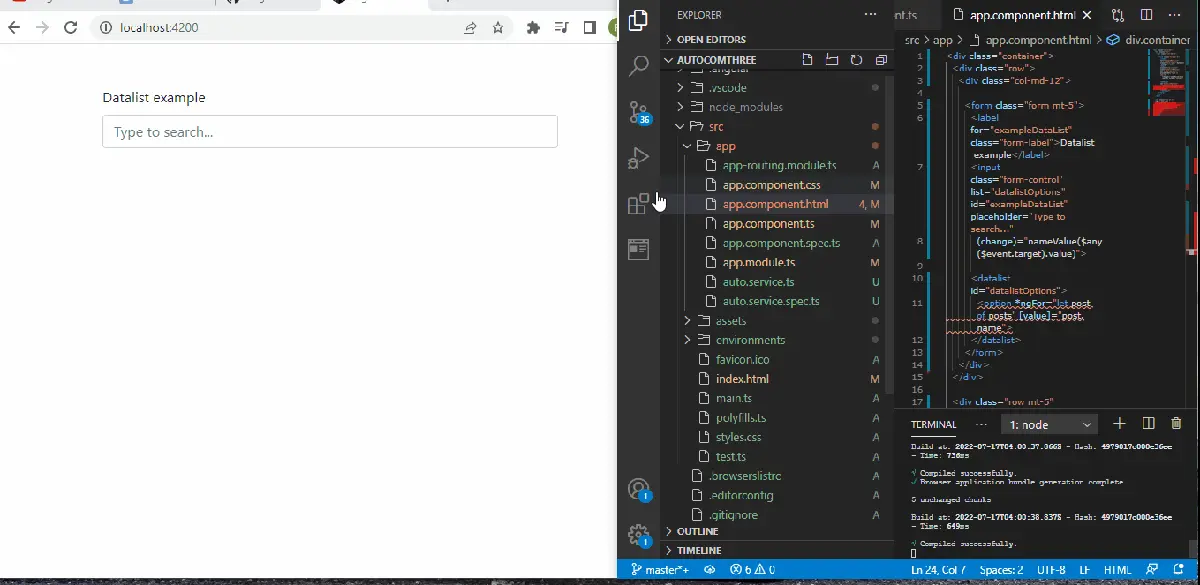
次に、app.component.html ファイルに移動して、Bootstrap でページ構造を作成します。 Bootstrap ページで autocomplete を検索し、Datalists の下にあるコード スニペットをコピーして貼り付けます。
次に、以下のように、検索するデータに対応するようにコード スニペットを調整します。
コード スニペット - app.component.html:
<div class="container">
  <div class="row">
    <div class="col-md-12">
      <form class="form mt-5">
        <label for="exampleDataList" class="form-label">Datalist example</label>
        <input class="form-control" list="datalistOptions" id="exampleDataList" placeholder="Type to search..."
          (change)="nameValue($any($event.target).value)">
        <datalist id="datalistOptions">
          <option *ngFor="let post of posts" [value]="post.name">
        </datalist>
      </form>
    </div>
  </div>
  <div class="row mt-5" *ngIf="username">
    <div class="col-sm-4">
      <div class="card purple">
        <h3 class="title">{{username}}</h3>
      </div>
    </div>
  </div>
</div>
ngFor 関数を使用して、リストから選択したさまざまな名前で Web ページをレンダリングします。 次に、app.component.ts でコードをビルドして、auto.service.ts ファイルから生成したデータを取得します。 最後に、次のようになります。
コード スニペット - app.component.ts:
import { Component, OnInit } from '@angular/core';
import { AutoService } from './auto.service';

@Component({
  selector: 'app-root',
  templateUrl: './app.component.html',
  styleUrls: ['./app.component.css'],
})
export class AppComponent implements OnInit {
  title = 'autocomthree';
  posts!: any;
  username: any;
  constructor(private service: AutoService) { }
  ngOnInit() {
    this.getAllData();
  }
  getAllData() {
    this.service.getData().subscribe((res: any) => {
      this.posts = res;
      console.log(this.posts);
    });
  }
  nameValue(name: any) {
    this.username = name;
    console.log(this.username);
  }
}
app.module.ts は、アプリを動作させるために必要な依存関係/モジュールをインポートする場所なので、app.module.ts は次のようになります。
コード スニペット - app.module.ts:
import { NgModule } from '@angular/core';
import { BrowserModule } from '@angular/platform-browser';
import { FormsModule, ReactiveFormsModule } from '@angular/forms';
import { HttpClientModule } from '@angular/common/http';
import { AppComponent } from './app.component';

@NgModule({
  declarations: [AppComponent],
  imports: [BrowserModule, HttpClientModule, ReactiveFormsModule, FormsModule],
  providers: [],
  bootstrap: [AppComponent],
})
export class AppModule {}
次に、オートコンプリート アプリで使用するデータを生成する必要があります。 ターミナルから、project フォルダー内に service ファイルを ng g s auto でインストールします。
このファイルは、src » app フォルダー内のコンポーネント ファイルの中にある必要があります。 ファイルに移動して、次のコードを入力します。
コード スニペット - auto.service.ts:
import { HttpClient } from '@angular/common/http';
import { Injectable } from '@angular/core';

@Injectable({
  providedIn: 'root',
})
export class AutoService {
  private baseURL = 'https://jsonplaceholder.typicode.com/users';

  constructor(private http: HttpClient) { }

  getData() {
    return this.http.get(this.baseURL);
  }
}
service ファイル内で、データを取得する URL を宣言し、getData() 関数を使用してデータをフェッチします。
Web ページを美しくするために、次のように app.component.ts ファイルに次のスタイルを追加できます。
コード スニペット - app.component.css:
.card {
    width: 100%;
    display: inline-block;
  box-sizing: border-box;
  background: #fff;
  padding: 20px;
  margin-bottom: 30px;
  }
  .title {
      margin-top: 0px;
  }
  .purple, .blue, .red, .orange, .green {
    color: #fff;
  }
  .purple {
    background: #5133AB;
  }
出力:
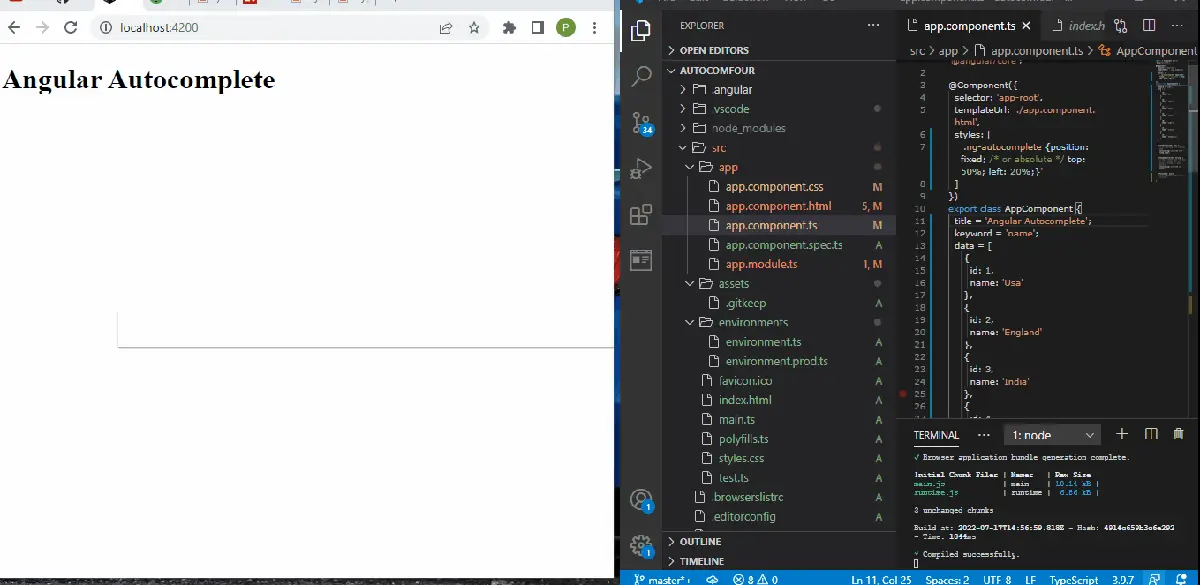
ng-autocomplete モジュールを使用して AngularJS Autocomplete を実装する
この方法を使用して、Angular autocomplete モジュールをインストールします。 新しいプロジェクト フォルダーを作成したら、npm install angular-ng-autocomplete で新しい Angular モジュールをインストールします。
次に、npmjs.com/package/angular-ng-autocomplete に移動し、以下のように使用例を app.component.html ファイルにコピーします。
コード スニペット - app.component.html:
<h1>{{title}}</h1>
<div class="ng-autocomplete">
  <ng-autocomplete
    [data]="data"
    [searchKeyword]="keyword"
    (selected)='selectEvent($event)'
    (inputChanged)='onChangeSearch($event)'
    (inputFocused)='onFocused($event)'
    [itemTemplate]="itemTemplate"
    [notFoundTemplate]="notFoundTemplate">
  </ng-autocomplete>
  <ng-template #itemTemplate let-item>
  <a [innerHTML]="item.name"></a>
  </ng-template>
  <ng-template #notFoundTemplate let-notFound>
  <div [innerHTML]="notFound"></div>
  </ng-template>
  </div>
次に、app.component.ts ファイル内で、以下に示すように、オートコンプリート Web アプリ内で使用する名前のリストを配列の形式で作成します。
コード スニペット - app.component.ts:
import { Component } from '@angular/core';

@Component({
  selector: 'app-root',
  templateUrl: './app.component.html',
  styles: [
    '.ng-autocomplete {position: fixed; /* or absolute */ top: 50%; left: 20%;}'
  ]
})
export class AppComponent {
  title = 'Angular Autocomplete';
  keyword = 'name';
  data = [
     {
       id: 1,
       name: 'Usa'
     },
     {
       id: 2,
       name: 'England'
     },
     {
       id: 3,
       name: 'India'
     },
     {
       id: 4,
       name: 'africa'
     },
     {
       id: 5,
       name: 'nigeria'
     },
     {
       id: 6,
       name: 'albania'
     },
     {
       id: 7,
       name: 'madagascar'
     }
  ];
  selectEvent(item: any) {
    console.log('selected item '+item.name);
  }
  onChangeSearch(val: string) {
    console.log('selected val '+val);
  }
  onFocused(e: any){
  }
}
検索バーをクリックすると onFocused イベント ハンドラーがアクティブになり、selectEvent 関数がリストから選択した項目を表示します。
次に、app.module.ts 内で、以下に示すように、以前にインストールしたモジュールをインポートします。
コード スニペット - app.module.ts:
import { NgModule } from '@angular/core';
import { BrowserModule } from '@angular/platform-browser';
import { AppComponent } from './app.component';
import {AutocompleteLibModule} from 'angular-ng-autocomplete';

@NgModule({
  declarations: [
    AppComponent
  ],
  imports: [
    BrowserModule,
    AutocompleteLibModule
  ],
  providers: [],
  bootstrap: [AppComponent]
})
export class AppModule { }
出力:
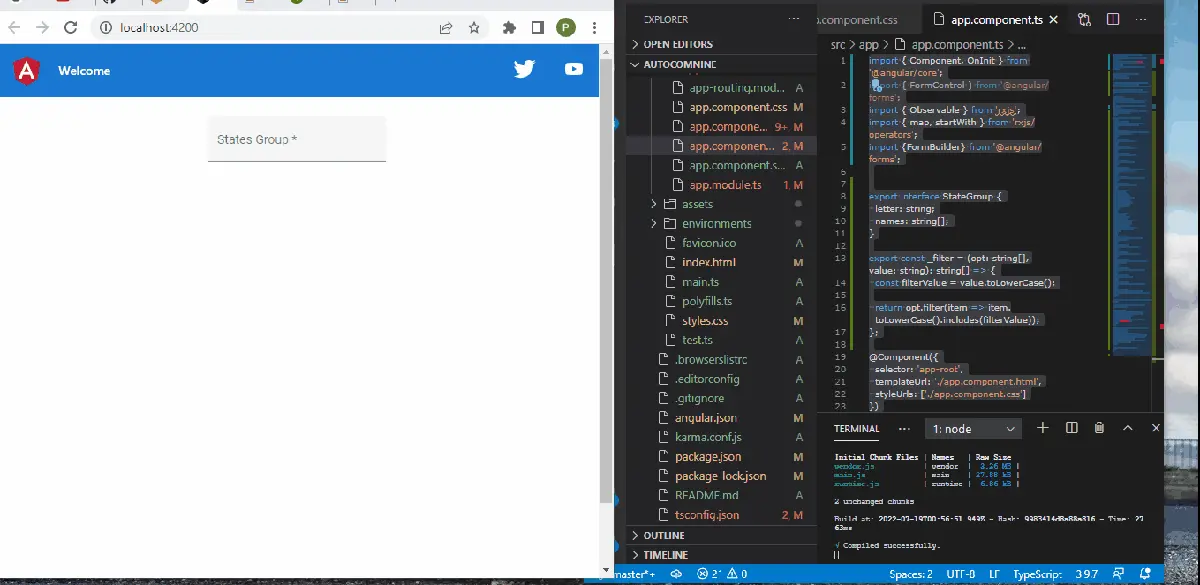
Angular Material を使用して AngularJS Autocomplete を実装する
Angular マテリアルは、Web アプリケーション用にすぐに使用できる Angular コンポーネントを提供します。この例では、autocomplete モジュールを使用します。
新しい project フォルダーを作成したら、project フォルダーに移動し、Angular マテリアルを ng add @angular/material でインストールします。 次に、material.angular.io にアクセスし、[開始]、[コンポーネント] の順にクリックし、Autocompleteを選択します。
例タブでは、States を使用しているため、以下のように HTML コード スニペットを app.component.html にコピーします。
コード スニペット - app.component.html:
<form [formGroup]="stateForm">
  <mat-form-field appearance="fill">
    <mat-label>States Group</mat-label>
    <input type="text"
           matInput
           formControlName="stateGroup"
           required
           [matAutocomplete]="autoGroup">
      <mat-autocomplete #autoGroup="matAutocomplete">
        <mat-optgroup *ngFor="let group of stateGroupOptions | async" [label]="group.letter">
          <mat-option *ngFor="let name of group.names" [value]="name">
            {{name}}
          </mat-option>
      </mat-optgroup>
    </mat-autocomplete>
  </mat-form-field>
</form>
これにより、ページの構造が、正確には States 検索バーになります。
次に、app.module.ts 内で、autocomplete コンポーネントのモジュール、状態のリストのフォーム フィールドを入力モジュールとしてインポートします。 ファイルは次のようになります。
コード スニペット - app.module.ts:
import { NgModule } from '@angular/core';
import { BrowserModule } from '@angular/platform-browser';
import { AppRoutingModule } from './app-routing.module';
import { AppComponent } from './app.component';
import { MatAutocompleteModule } from '@angular/material/autocomplete';
import { BrowserAnimationsModule } from '@angular/platform-browser/animations';
import { MatInputModule } from '@angular/material/input';
import { MatFormFieldModule } from '@angular/material/form-field';
import { ReactiveFormsModule } from '@angular/forms';

@NgModule({
  declarations: [
    AppComponent
  ],
  imports: [
    BrowserModule,
    AppRoutingModule,
    MatAutocompleteModule,
    BrowserAnimationsModule,
    MatInputModule,
    MatFormFieldModule,
    ReactiveFormsModule
  ],
  providers: [],
  bootstrap: [AppComponent]
})
export class AppModule { }
app.component.ts ファイルは、アプリケーションのメイン コードを保持します。 それでも、Angular の Web サイトでは、States の例の TS コード スニペットをコピーし、それらを AppComponent の export クラス内に配置しています。
その前に、インポートの直後に、TS コード スニペットの最初の部分である export interface StateGroup をコピーします。 以下に示すように、app.component.ts ファイルにはコードが必要です。
コード スニペット - app.component.ts:
import { Component, OnInit } from '@angular/core';
import { FormControl } from '@angular/forms';
import { Observable } from 'rxjs';
import { map, startWith } from 'rxjs/operators';
import {FormBuilder} from '@angular/forms';

export interface StateGroup {
  letter: string;
  names: string[];
}
export const _filter = (opt: string[], value: string): string[] => {
  const filterValue = value.toLowerCase();

  return opt.filter(item => item.toLowerCase().includes(filterValue));
};

@Component({
  selector: 'app-root',
  templateUrl: './app.component.html',
  styleUrls: ['./app.component.css']
})
export class AppComponent implements OnInit {
  title = 'autocomnine';
  stateForm = this._formBuilder.group({
    stateGroup: '',
  });

  stateGroups: StateGroup[] = [
    {
      letter: 'A',
      names: ['Alabama', 'Alaska', 'Arizona', 'Arkansas'],
    },
    {
      letter: 'C',
      names: ['California', 'Colorado', 'Connecticut'],
    },
    {
      letter: 'D',
      names: ['Delaware'],
    },
    {
      letter: 'F',
      names: ['Florida'],
    },
    {
      letter: 'G',
      names: ['Georgia'],
    },
    {
      letter: 'H',
      names: ['Hawaii'],
    },
    {
      letter: 'I',
      names: ['Idaho', 'Illinois', 'Indiana', 'Iowa'],
    },
    {
      letter: 'K',
      names: ['Kansas', 'Kentucky'],
    },
    {
      letter: 'L',
      names: ['Louisiana'],
    },
    {
      letter: 'M',
      names: [
        'Maine',
        'Maryland',
        'Massachusetts',
        'Michigan',
        'Minnesota',
        'Mississippi',
        'Missouri',
        'Montana',
      ],
    },
    {
      letter: 'N',
      names: [
        'Nebraska',
        'Nevada',
        'New Hampshire',
        'New Jersey',
        'New Mexico',
        'New York',
        'North Carolina',
        'North Dakota',
      ],
    },
    {
      letter: 'O',
      names: ['Ohio', 'Oklahoma', 'Oregon'],
    },
    {
      letter: 'P',
      names: ['Pennsylvania'],
    },
    {
      letter: 'R',
      names: ['Rhode Island'],
    },
    {
      letter: 'S',
      names: ['South Carolina', 'South Dakota'],
    },
    {
      letter: 'T',
      names: ['Tennessee', 'Texas'],
    },
    {
      letter: 'U',
      names: ['Utah'],
    },
    {
      letter: 'V',
      names: ['Vermont', 'Virginia'],
    },
    {
      letter: 'W',
      names: ['Washington', 'West Virginia', 'Wisconsin', 'Wyoming'],
    },
  ];
  stateGroupOptions: Observable<StateGroup[]>;
  constructor(private _formBuilder: FormBuilder) {}

  ngOnInit() {
    this.stateGroupOptions = this.stateForm.get('stateGroup')!.valueChanges.pipe(
      startWith(''),
      map(value => this._filterGroup(value || '')),
    );
  }
  private _filterGroup(value: string): StateGroup[] {
    if (value) {
      return this.stateGroups
        .map(group => ({letter: group.letter, names: _filter(group.names, value)}))
        .filter(group => group.names.length > 0);
    }
    return this.stateGroups;
  }
}
出力:
ここでは、状態の名前をリストし、検索バーに焦点を合わせたら、ngOnInit() を使用してリストを有効にします。 次に、_filterGroup 関数は、検索バーに入力した文字ごとに最も近い州を提案します。
まとめ
説明した方法を使用して、オートコンプリート機能を別の方法で適用できます。 さらに、オートコンプリート機能は多くの状況、特に大きなデータを扱う場合に適用できます。

Fisayo is a tech expert and enthusiast who loves to solve problems, seek new challenges and aim to spread the knowledge of what she has learned across the globe.
LinkedIn