Angular-Material DateTime Picker Component
-
DateTimePicker Using Angular Material Dependency -
Other Methods of Creating
DateTimePicker Component

The datepicker component is one of the components used in situations where we are filling out our personal information forms.
It is a component used in cases where we want to select our date of birth on a page or where we want to fill out the day we started a job and ended the job.
We encounter various instances where we see the DateTime picker component on web pages. Now let us learn how to implement it using angular material dependency.
DateTime Picker Using Angular Material Dependency
The angular material UI is the goto library for ready-to-use components, and we will deploy it in creating the DateTime picker.
After creating a new angular project, navigate the project folder and install material with ng add @angular/material. Now to the coding part, we navigate to src>>app, locate the app.component.html file and type in these codes:
Code Snippet for app.component.html:
<mat-form-field appearance="fill">
  <mat-label>Enter a date range</mat-label>
  <mat-date-range-input [rangePicker]="picker">
    <input matStartDate placeholder="Start date">
    <input matEndDate placeholder="End date">
  </mat-date-range-input>
  <mat-hint>MM/DD/YYYY – MM/DD/YYYY</mat-hint>
  <mat-datepicker-toggle matSuffix [for]="picker"></mat-datepicker-toggle>
  <mat-date-range-picker #picker></mat-date-range-picker>
</mat-form-field>
Here we are creating the basic structure and behaviour of the DateTime picker component.
We must import some dependencies from angular material into the app.module.ts file. It will make our DateTime picker component function.
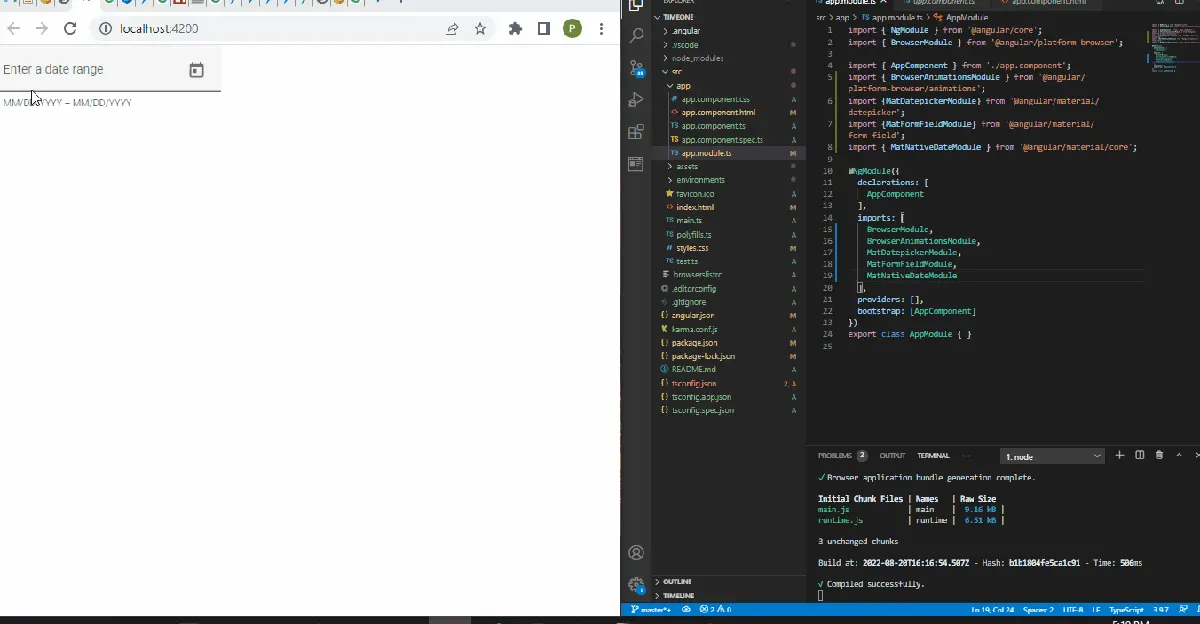
Code Snippet for app.module.ts
import { NgModule } from '@angular/core';
import { BrowserModule } from '@angular/platform-browser';
import { AppComponent } from './app.component';
import { BrowserAnimationsModule } from '@angular/platform-browser/animations';
import {MatDatepickerModule} from '@angular/material/datepicker';
import {MatFormFieldModule} from '@angular/material/form-field';
import {MatNativeDateModule} from '@angular/material/core';

@NgModule({
  declarations: [
    AppComponent
  ],
  imports: [
    BrowserModule,
    BrowserAnimationsModule,
    MatDatepickerModule,
    MatFormFieldModule,
    MatNativeDateModule
  ],
  providers: [],
  bootstrap: [AppComponent]
})
export class AppModule { }
What we have done here is import the necessary dependencies into app.module.ts. Since we would not be making any changes inside the app.component.ts file, we will leave it as it is.
This way, we will get the following output:
Other Methods of Creating DateTime Picker Component
For the sake of variety, exploration and learning, we will visit other methods we can use to design a DateTime picker component.
DateTime Picker Component With ng-bootstrap Library
Like the angular material, the ng-bootstrap is a popular library that provides widgets and dependencies for the angular framework. It is just as easy to implement the DateTime picker component.
Inside the project folder of the newly created angular application that we have created, we will install ng-bootstrap by typing in: ng add @ng-bootstrap/ng-bootstrap.
Then we start with the structure and behaviour of the component; we head into the app.component.html file to create this with codes.
Code Snippet for app.component.html:
<p>Simple datepicker</p>
<ngb-datepicker #dp [(ngModel)]="model" (navigate)="date = $event.next"></ngb-datepicker>
<hr/>
<button class="btn btn-sm btn-outline-primary me-2" (click)="selectToday()">Select Today</button>
<button class="btn btn-sm btn-outline-primary me-2" (click)="dp.navigateTo()">To current month</button>
<button class="btn btn-sm btn-outline-primary me-2" (click)="dp.navigateTo({year: 2013, month: 2})">To Feb 2013</button>
<hr/>
<pre>Month: {{ date.month }}.{{ date.year }}</pre>
<pre>Model: {{ model | json }}</pre>
With this code, we will notice that the selected date is displayed under the component; this behaviour is created with the last two lines of code.
We now need to focus on the functionality of the DateTime picker component. To do that, we will navigate to the app.component.ts file and type in these codes.
Code Snippet for app.component.ts:
import {Component} from '@angular/core';
import {NgbDateStruct, NgbCalendar} from '@ng-bootstrap/ng-bootstrap';
@Component({
  selector: 'app-root',
  templateUrl: './app.component.html',
  styleUrls: ['./app.component.css']
})
export class AppComponent {
  title = 'timetwo';
  model: NgbDateStruct;
  date: {year: number, month: number};
  constructor(private calendar: NgbCalendar) {
  }
  selectToday() {
    this.model = this.calendar.getToday();
  }
}
What we are doing with this code is trying to define the behaviour of the DateTime picker component such that when we select the date, the selectToday() function activates the Model inside the app.component.html, which prints out the dates we have chosen.
The final part deals with managing the dependencies we installed from ng-bootstrap. Inside the app.module.ts file, we will create these codes.
Code Snippet for app.module.ts
import { NgModule } from '@angular/core';
import { BrowserModule } from '@angular/platform-browser';
import { AppRoutingModule } from './app-routing.module';
import { AppComponent } from './app.component';
import { NgbModule } from '@ng-bootstrap/ng-bootstrap';
import {FormsModule} from '@angular/forms';
@NgModule({
  declarations: [
    AppComponent
  ],
  imports: [
    BrowserModule,
    AppRoutingModule,
    NgbModule,
    FormsModule
  ],
  providers: [],
  bootstrap: [AppComponent]
})
export class AppModule { }
We will get the following output after writing all the code for this section:

DateTime Picker Using ng2 NPM
The final method we want to work on is the ng2 library which provides us with a highly configurable date picker component for the angular framework.
Inside our new project folder, we install the ng2 library by typing: npm i ng2-date-picker. After installation, we head inside the app.component.html file and type in the codes that design the webpage’s structure and behaviour.
Code Snippet for app.component.html:
<dp-date-picker theme="dp-material"
[config]="datePickerConfig" required="true">
</dp-date-picker>
<br />
<input type="button" (click)="updateFormat()"  value="update date picker format" />
<br />
format : {{datePickerConfig.format}}
Now we head onto the app.component.ts file to do some more codings, bringing functionality into our DateTime picker component.
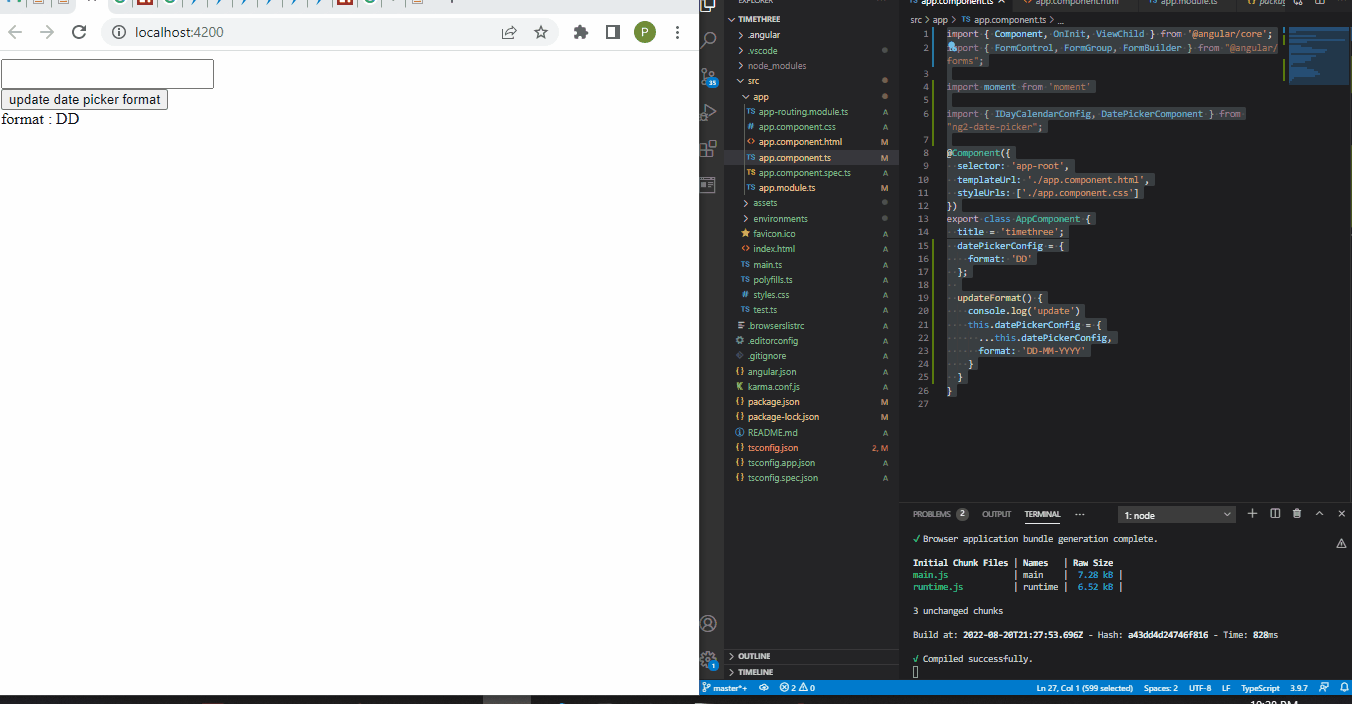
Code Snippet for app.component.ts:
import { Component, OnInit, ViewChild } from '@angular/core';
import { FormControl, FormGroup, FormBuilder } from "@angular/forms";
import moment from 'moment'
import { IDayCalendarConfig, DatePickerComponent } from "ng2-date-picker";
@Component({
  selector: 'app-root',
  templateUrl: './app.component.html',
  styleUrls: ['./app.component.css']
})
export class AppComponent {
  title = 'timethree';
  datePickerConfig = {
    format: 'DD'
  };
  updateFormat() {
    console.log('update')
    this.datePickerConfig = {
      ...this.datePickerConfig,
      format: 'DD-MM-YYYY'
    }
  }
}
First, we import some of the ng2 modules into the app.component.ts file; we will import the rest of the modules into the app.module.ts file.
Then we use the updateFormat() function to display the date we select under the DateTime picker component.
Next is to work on the app.module.ts file, where we import the rest of the modules we require from the ng2 library.
Code Snippet for app.module.ts:
import { NgModule } from '@angular/core';
import { BrowserModule } from '@angular/platform-browser';
import { ReactiveFormsModule } from '@angular/forms';
import { AppComponent } from './app.component';
import { DpDatePickerModule } from "ng2-date-picker";
@NgModule({
  imports:      [ BrowserModule, ReactiveFormsModule, DpDatePickerModule ],
  declarations: [ AppComponent ],
  bootstrap:    [ AppComponent ]
})
export class AppModule { }
Finally, to get the app to work, we need to add this configuration: "allowSyntheticDefaultImports": true inside the tsconfig.json file of our project folder.
We will see the following output after successfully following all steps for the section:

Fisayo is a tech expert and enthusiast who loves to solve problems, seek new challenges and aim to spread the knowledge of what she has learned across the globe.
LinkedIn