Angular-Material DateTime ピッカー コンポーネント

datepicker コンポーネントは、個人情報フォームに記入する状況で使用されるコンポーネントの 1つです。
ページ上で生年月日を選択したい場合や、仕事の開始日と終了日を記入したい場合に使用するコンポーネントです。
Web ページで DateTime ピッカー コンポーネントが表示されるさまざまなインスタンスに遭遇します。 それでは、角度のあるマテリアル依存関係を使用して実装する方法を学びましょう。
Angular Material Dependency を使用した DateTime ピッカー
angular マテリアル UI は、すぐに使用できるコンポーネントの goto ライブラリであり、DateTime ピッカーの作成にデプロイします。
新しい angular プロジェクトを作成したら、プロジェクト フォルダーに移動し、ng add @angular/material を使用してマテリアルをインストールします。 コーディング部分では、src>>app に移動し、app.component.html ファイルを見つけて、次のコードを入力します。
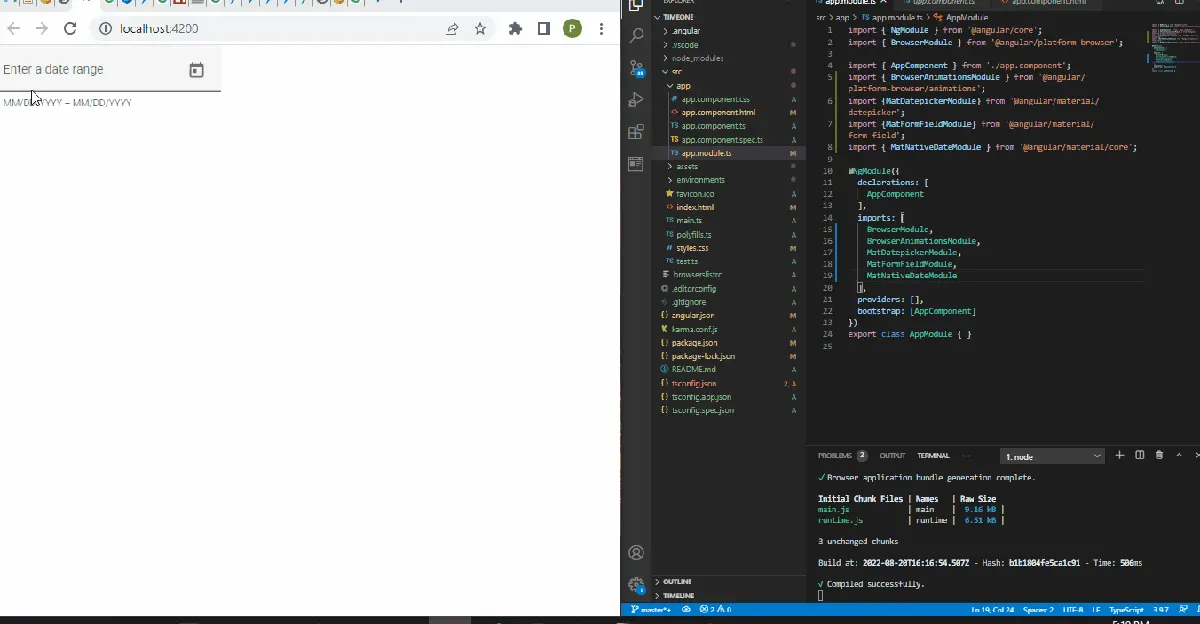
app.component.html のコード スニペット:
<mat-form-field appearance="fill">
  <mat-label>Enter a date range</mat-label>
  <mat-date-range-input [rangePicker]="picker">
    <input matStartDate placeholder="Start date">
    <input matEndDate placeholder="End date">
  </mat-date-range-input>
  <mat-hint>MM/DD/YYYY – MM/DD/YYYY</mat-hint>
  <mat-datepicker-toggle matSuffix [for]="picker"></mat-datepicker-toggle>
  <mat-date-range-picker #picker></mat-date-range-picker>
</mat-form-field>
ここでは、DateTime ピッカー コンポーネントの基本的な構造と動作を作成しています。
Angular マテリアルから app.module.ts ファイルにいくつかの依存関係をインポートする必要があります。 DateTime ピッカー コンポーネントを機能させます。
app.module.ts のコード スニペット
import { NgModule } from '@angular/core';
import { BrowserModule } from '@angular/platform-browser';
import { AppComponent } from './app.component';
import { BrowserAnimationsModule } from '@angular/platform-browser/animations';
import {MatDatepickerModule} from '@angular/material/datepicker';
import {MatFormFieldModule} from '@angular/material/form-field';
import {MatNativeDateModule} from '@angular/material/core';

@NgModule({
  declarations: [
    AppComponent
  ],
  imports: [
    BrowserModule,
    BrowserAnimationsModule,
    MatDatepickerModule,
    MatFormFieldModule,
    MatNativeDateModule
  ],
  providers: [],
  bootstrap: [AppComponent]
})
export class AppModule { }
ここで行ったことは、必要な依存関係を app.module.ts にインポートすることです。 app.component.ts ファイル内には変更を加えないので、そのままにしておきます。
このようにして、次の出力が得られます。
DateTime ピッカー コンポーネントを作成するその他の方法
多様性、探索、学習のために、DateTime ピッカー コンポーネントを設計するために使用できる他の方法にアクセスします。
ng-bootstrapライブラリを使用したDateTimeピッカー コンポーネント
angular マテリアルと同様に、ng-bootstrap は、angular フレームワークのウィジェットと依存関係を提供する人気のあるライブラリです。 DateTime ピッカー コンポーネントを実装するのも同様に簡単です。
新しく作成した角度アプリケーションのプロジェクト フォルダー内に、ng add @ng-bootstrap/ng-bootstrapと入力して、ng-bootstrapをインストールします。
次に、コンポーネントの構造と動作から始めます。 app.component.html ファイルに移動して、コードでこれを作成します。
app.component.html のコード スニペット:
<p>Simple datepicker</p>
<ngb-datepicker #dp [(ngModel)]="model" (navigate)="date = $event.next"></ngb-datepicker>
<hr/>
<button class="btn btn-sm btn-outline-primary me-2" (click)="selectToday()">Select Today</button>
<button class="btn btn-sm btn-outline-primary me-2" (click)="dp.navigateTo()">To current month</button>
<button class="btn btn-sm btn-outline-primary me-2" (click)="dp.navigateTo({year: 2013, month: 2})">To Feb 2013</button>
<hr/>
<pre>Month: {{ date.month }}.{{ date.year }}</pre>
<pre>Model: {{ model | json }}</pre>
このコードでは、選択した日付がコンポーネントの下に表示されていることがわかります。 この動作は、コードの最後の 2 行で作成されます。
DateTime ピッカー コンポーネントの機能に注目する必要があります。 これを行うには、app.component.ts ファイルに移動し、これらのコードを入力します。
app.component.ts のコード スニペット:
import {Component} from '@angular/core';
import {NgbDateStruct, NgbCalendar} from '@ng-bootstrap/ng-bootstrap';
@Component({
  selector: 'app-root',
  templateUrl: './app.component.html',
  styleUrls: ['./app.component.css']
})
export class AppComponent {
  title = 'timetwo';
  model: NgbDateStruct;
  date: {year: number, month: number};
  constructor(private calendar: NgbCalendar) {
  }
  selectToday() {
    this.model = this.calendar.getToday();
  }
}
このコードで行っているのは、DateTime ピッカー コンポーネントの動作を定義して、日付を選択すると、selectToday() 関数が app.component.html 内のモデルをアクティブにして出力するようにすることです。 私たちが選んだ日付のうち。
最後の部分は、ng-bootstrap からインストールした依存関係の管理を扱います。 app.module.ts ファイル内で、これらのコードを作成します。
app.module.ts のコード スニペット
import { NgModule } from '@angular/core';
import { BrowserModule } from '@angular/platform-browser';
import { AppRoutingModule } from './app-routing.module';
import { AppComponent } from './app.component';
import { NgbModule } from '@ng-bootstrap/ng-bootstrap';
import {FormsModule} from '@angular/forms';
@NgModule({
  declarations: [
    AppComponent
  ],
  imports: [
    BrowserModule,
    AppRoutingModule,
    NgbModule,
    FormsModule
  ],
  providers: [],
  bootstrap: [AppComponent]
})
export class AppModule { }
このセクションのすべてのコードを記述すると、次の出力が得られます。

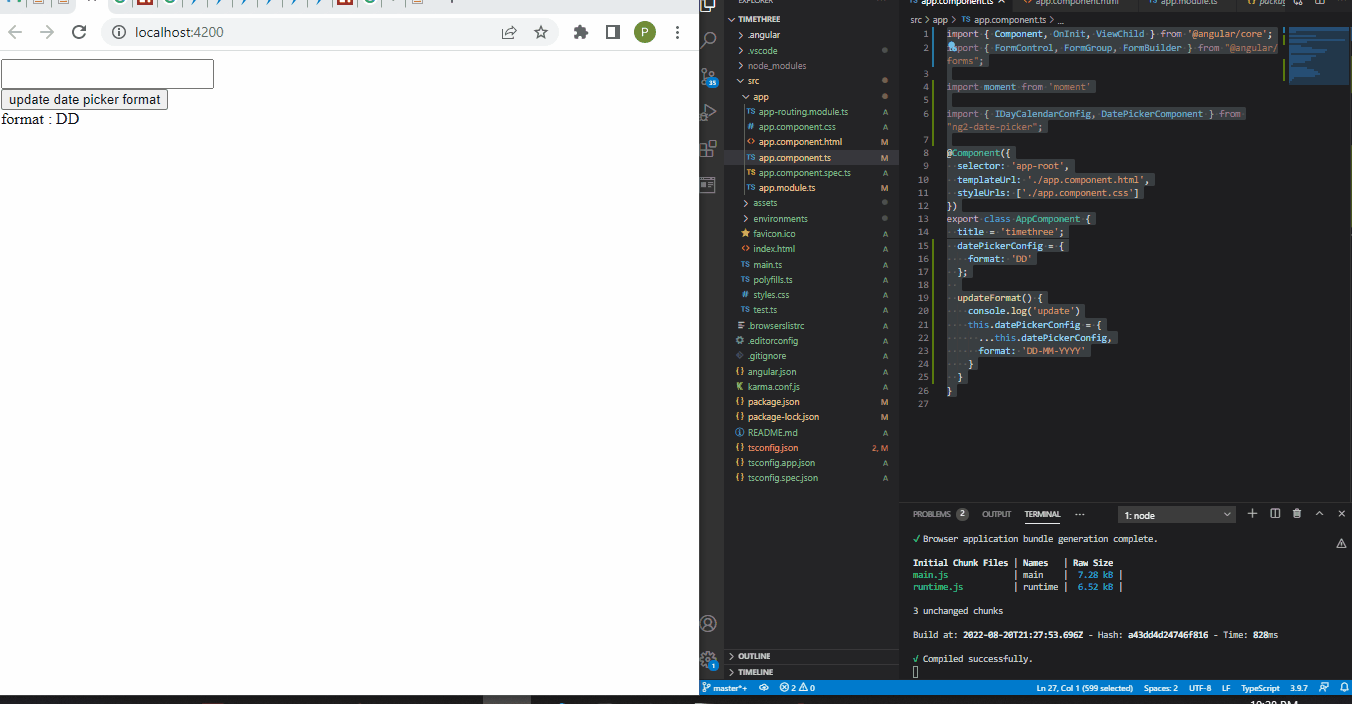
ng2 NPM を使用した DateTime ピッカー
取り組みたい最後のメソッドは、Angular フレームワーク用の高度に構成可能な日付ピッカー コンポーネントを提供する ng2 ライブラリです。
新しいプロジェクト フォルダー内に、npm i ng2-date-picker と入力して、ng2 ライブラリをインストールします。 インストール後、app.component.html ファイルに移動し、Web ページの構造と動作を設計するコードを入力します。
app.component.html のコード スニペット:
<dp-date-picker theme="dp-material"
[config]="datePickerConfig" required="true">
</dp-date-picker>
<br />
<input type="button" (click)="updateFormat()"  value="update date picker format" />
<br />
format : {{datePickerConfig.format}}
次に、app.component.ts ファイルに進み、さらにコーディングを行い、DateTime ピッカー コンポーネントに機能を組み込みます。
app.component.ts のコード スニペット:
import { Component, OnInit, ViewChild } from '@angular/core';
import { FormControl, FormGroup, FormBuilder } from "@angular/forms";
import moment from 'moment'
import { IDayCalendarConfig, DatePickerComponent } from "ng2-date-picker";
@Component({
  selector: 'app-root',
  templateUrl: './app.component.html',
  styleUrls: ['./app.component.css']
})
export class AppComponent {
  title = 'timethree';
  datePickerConfig = {
    format: 'DD'
  };
  updateFormat() {
    console.log('update')
    this.datePickerConfig = {
      ...this.datePickerConfig,
      format: 'DD-MM-YYYY'
    }
  }
}
まず、ng2 モジュールのいくつかを app.component.ts ファイルにインポートします。 残りのモジュールを app.module.ts ファイルにインポートします。
次に、updateFormat() 関数を使用して、DateTime ピッカー コンポーネントで選択した日付を表示します。
次に、app.module.ts ファイルで作業します。このファイルでは、ng2 ライブラリから必要な残りのモジュールをインポートします。
app.module.ts のコード スニペット:
import { NgModule } from '@angular/core';
import { BrowserModule } from '@angular/platform-browser';
import { ReactiveFormsModule } from '@angular/forms';
import { AppComponent } from './app.component';
import { DpDatePickerModule } from "ng2-date-picker";
@NgModule({
  imports:      [ BrowserModule, ReactiveFormsModule, DpDatePickerModule ],
  declarations: [ AppComponent ],
  bootstrap:    [ AppComponent ]
})
export class AppModule { }
最後に、アプリを機能させるには、次の構成を追加する必要があります: "allowSyntheticDefaultImports": true プロジェクト フォルダーの tsconfig.json ファイル内に。
セクションのすべての手順を正常に実行すると、次の出力が表示されます。

Fisayo is a tech expert and enthusiast who loves to solve problems, seek new challenges and aim to spread the knowledge of what she has learned across the globe.
LinkedIn