JavaScript でカスタマイズされたアラート ボックスを作成する
- jQuery UI を使用してカスタマイズされたアラート ボックスを作成する
- SweetAlert2 でカスタマイズされたアラート ボックスを作成する
- カスタム機能を使用してカスタマイズされたアラート ボックスを作成する
この記事では、jQuery UI、SweetAlert2、およびカスタム アラート関数を使用して、JavaScript でカスタマイズされたアラート ボックスを作成する方法を説明します。
jQuery UI を使用してカスタマイズされたアラート ボックスを作成する
jQuery UI を使用して、JavaScript ネイティブ alert() 関数の機能を模倣できます。 jQuery UI には多くの API がありますが、その dialog() API を使用してカスタム アラート ボックスを作成できます。
一方、ネイティブ JavaScript のネイティブ alert() 関数とは異なり、dialog() API で作成されたアラート ボックスをドラッグできます。
次のコード ブロックでは、jQuery、jQuery UI、および jQuery UI の CSS スタイルをコードにインポートしました。 したがって、dialog() API を使用してカスタム アラート ボックスを作成できます。
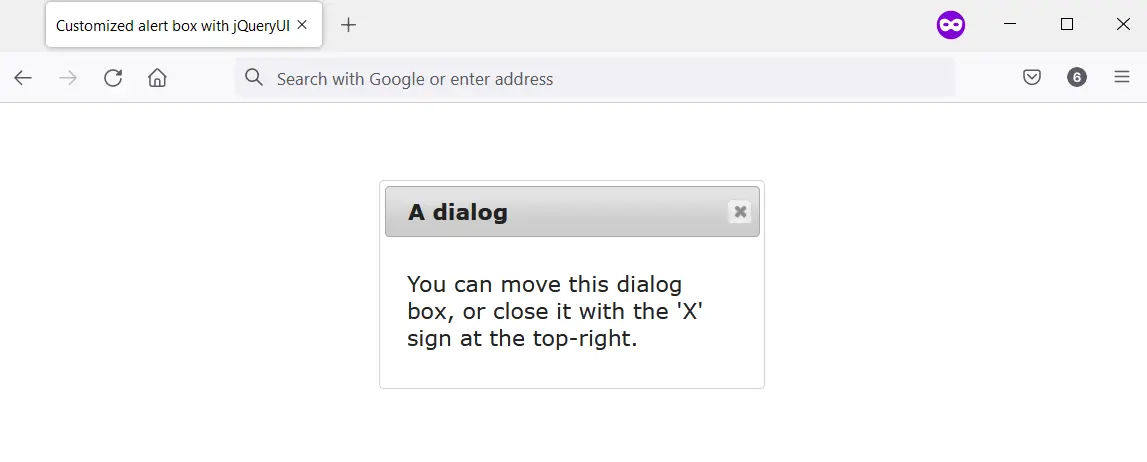
一方、dialog() API には、カスタム アラート ボックスを表示する Web ページ上の場所が必要です。 そのため、一意の ID を持つ HTML div 要素を使用します。
さらに、この div には、カスタム アラート ボックスのタイトルとなるテキストを含む title 属性が必要です。 Web ブラウザーでコードを実行すると、dialog() API で作成されたカスタム アラート ボックスが表示されます。
コード:
<head>
    <meta charset="utf-8">
    <title>Customized alert box with jQueryUI</title>
    <link rel="stylesheet" href="https://ajax.googleapis.com/ajax/libs/jqueryui/1.12.1/themes/smoothness/jquery-ui.css">
    <script src="https://ajax.googleapis.com/ajax/libs/jquery/3.6.0/jquery.min.js"></script>
    <script src="https://ajax.googleapis.com/ajax/libs/jqueryui/1.12.1/jquery-ui.min.js"></script>
    <script>
        $(function() {
            $("#jquery-ui-dialog").dialog();
        });
    </script>
</head>
<body>
    <main style="display: flex; justify-content: center;">
        <div id="jquery-ui-dialog" title="A dialog">
            <p>You can move this dialog box, or close it with the 'X' sign at the top-right.</p>
        </div>
    </main>
</body>
出力:
SweetAlert2 でカスタマイズされたアラート ボックスを作成する
SweetAlert2 を使用すると、アクセス可能でカスタマイズ可能で応答性の高いアラート ボックスを作成できます。 ネイティブ JavaScript alert() 関数を含む JavaScript ポップアップ ボックスを置き換えることを目的としています。
プロジェクトでさまざまな方法で SweetAlert2 を使用できます。 ただし、この記事では、コンテンツ配信ネットワーク (CDN) 経由で <script> タグと共に使用します。
そのため、SweetAlert2 をダウンロードする際に、HTML ボタンにイベントリスナーを付けて使用することができます。 Swal.fire() メソッドを呼び出して、イベント リスナーで引数を指定できます。
Swal.fire() に指定する引数によって、カスタマイズされたアラート ボックスの出力が決まります。
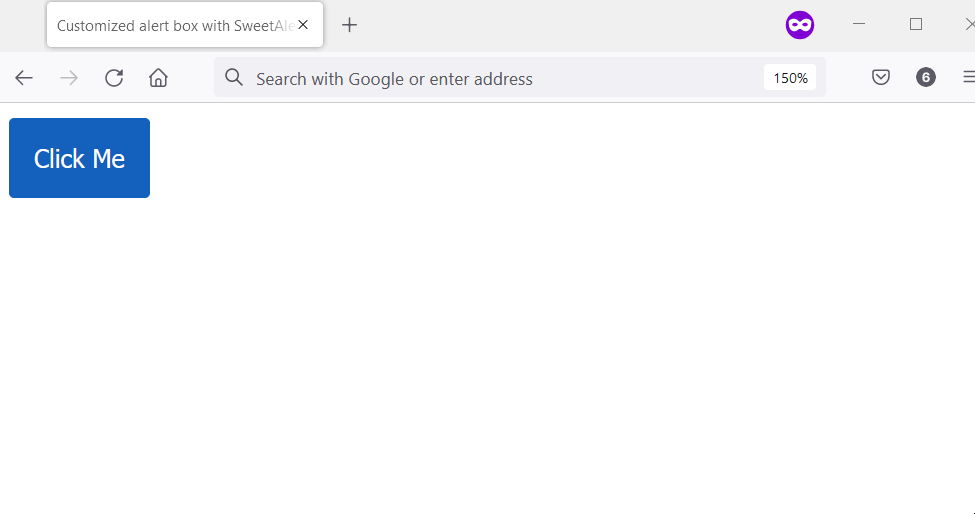
次のコード ブロックで、イベント リスナーを HTML ボタンにアタッチしました。 このボタンには、#showAlert という HTML ID 属性があります。
簡単にするために、jQuery を使用して ID を取得しました。 その後、カスタマイズされたアラートを表示する引数を指定して Swal.fire() メソッドを呼び出します。
コード:
<head>
    <meta charset="utf-8">
    <title>Customized alert box with SweetAlert2</title>
    <script src="https://ajax.googleapis.com/ajax/libs/jquery/3.6.0/jquery.min.js"></script>
    <script src="https://cdn.jsdelivr.net/npm/sweetalert2@11.4.8/dist/sweetalert2.all.min.js"></script>
    <style type="text/css">
        button {
            padding: 1em;
            background-color: #1560bd;
            color: #ffffff;
            border-radius: 0.2em;
            border-style: none;
            cursor: pointer;
        }
    </style>
</head>
<body>
    <main>
        <button id="showAlert">Click Me</button>
    </main>
</body>
<script>
    $("#showAlert").click(function(){
        Swal.fire(
            'Are you done?',
        )
    });
</script>
出力:
カスタム機能を使用してカスタマイズされたアラート ボックスを作成する
ユーザーの Web ブラウザーのネイティブ alert() ボックスを置き換えるカスタム関数を作成できます。 window オブジェクトからこれを行うと、カスタム関数は次のように機能します。
- アラート タイトルとアラート ボタン テキストの定数を設定します。
- HTML に
alert_containerの ID があるかどうかを確認します。 true の場合、カスタム アラートの作成を停止します。 - アラート コンテナの div 要素を作成し、body 要素に追加します。 その後、次の操作を行います。
- アラート コンテナに HTML ID を付与します。
- アラート コンテナに HTML クラス名を付けます。
- アラート ボックスの div 要素を作成し、アラート コンテナーに追加します。 その後、HTML クラス名を付けます。
scrollTopを使用して、アラート ボックスの上部の位置を設定します。scrollWidthとoffsetWidthを使用してアラート ボックスの左の位置を設定します。- アラート タイトルの HTML
h1要素を作成します。 次に、次の操作を行います。- アラート タイトルのテキスト ノードを作成します。 その値は、アラート タイトルの定数である必要があります。
h1をアラート ボックスに追加します。- テキスト ノードをアラート タイトルに追加します。
- HTML
button要素を作成します。 次に、次の操作を行います。- ボタン テキスト用のテキスト ノードを作成します。 その値は、アラート タイトルの定数である必要があります。
- ボタンのテキストを
button要素に追加します。 button要素をアラート ボックスに追加します。button要素に一意のクラス名を割り当てます。- イベント リスナーをボタンにアタッチします。 イベント リスナーは、カスタム アラート ボックスを閉じる必要があります。
さらに、カスタム アラートを削除する関数を作成する必要があります。 これは、ユーザーがOKボタンをクリックしたときに発生するはずです。
関数は次の手順を使用する必要があります。
- HTML
body要素を取得します。 - アラート コンテナーを取得します。
removeChildメソッドを使用して、アラート コンテナを HTMLbody要素から削除します。
最後に、CSS スタイルを作成して、カスタム アラート関数のスタイルを設定します。 後続のコード ブロックには、次の実装があります。
- カスタムアラート機能
- それを取り除く機能
- カスタム アラート機能の CSS スタイル
HTML および JavaScript コード:
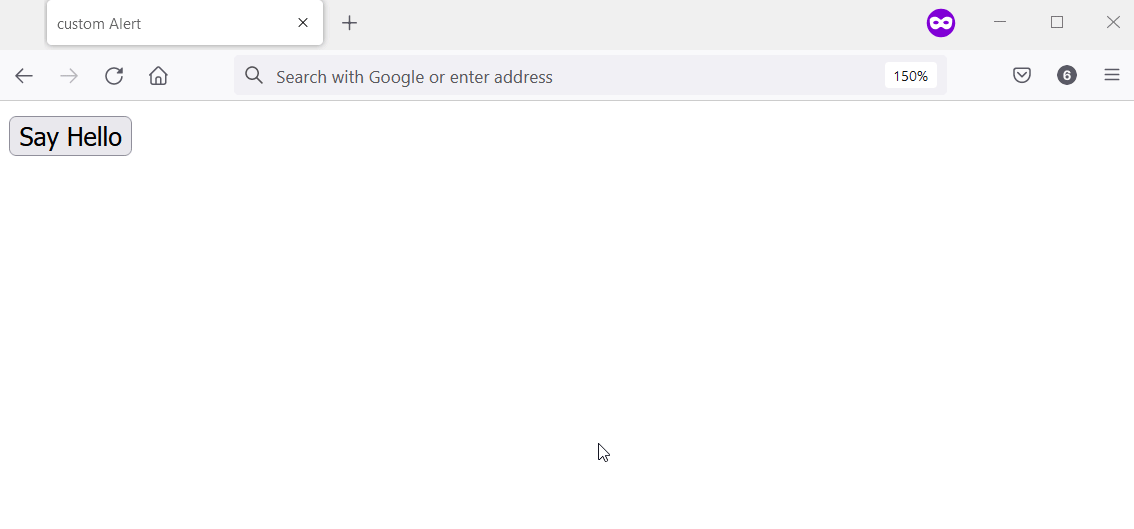
<body>
    <input type="button" value = "Say Hello" onclick="alert('Hello');" />
</body>
<script>
    // Ensure the user's web browser can run
    // JavaScript before creating the custom
    // alert box
    if (document.getElementById) {
        // Swap the native alert for the custom
        // alert
        window.alert = function (alert_message) {
            custom_alert(alert_message);
        }
    }

    function custom_alert(alert_message) {

        /* You can utilize the web page address
         * for the alert message by doing the following:

         const ALERT_TITLE = "The page at " + document.location.href + " says: ";
         */
        const ALERT_TITLE = "Alert Message";
        const ALERT_BUTTON_TEXT = "OK";

        // Check if there is an HTML element with
        // an ID of "alert_container".If true, abort
        // the creation of the custom alert.
        let is_alert_container_exist = document.getElementById("alert_container");
        if (is_alert_container_exist) {
            return;
        }

        // Create a div to serve as the alert
        // container. Afterward, attach it to the body
        // element.
        let get_body_element = document.querySelector("body");
        let div_for_alert_container = document.createElement("div");
        let alert_container = get_body_element.appendChild(div_for_alert_container);

        // Add an HTML ID and a class name for the
        // alert container
        alert_container.id = "alert_container";
        alert_container.className = "alert_container"

        // Create the div for the alert_box and attach
        // it to the alert container.
        let div_for_alert_box = document.createElement("div")
        let alert_box = alert_container.appendChild(div_for_alert_box);
        alert_box.className = "alert_box";

        // Set the position of the alert box using
        // scrollTop, scrollWidth, and offsetWidth
        alert_box.style.top = document.documentElement.scrollTop + "px";
        alert_box.style.left = (document.documentElement.scrollWidth - alert_box.offsetWidth) / 2 + "px";

        // Create h1 to hold the alert title
        let alert_header_tag = document.createElement("h1");
        let alert_title_text = document.createTextNode(ALERT_TITLE)
        let alert_title= alert_box.appendChild(alert_header_tag);
        alert_title.appendChild(alert_title_text);

        // Create a paragraph element to hold the
        // alert message
        let alert_paragraph_tag = document.createElement("p");
        let alert_message_container = alert_box.appendChild(alert_paragraph_tag);
        alert_message_container.textContent = alert_message;

        // Create the OK button
        let ok_button_tag = document.createElement("button");
        let ok_button_text = document.createTextNode(ALERT_BUTTON_TEXT)
        let ok_button = alert_box.appendChild(ok_button_tag);
        ok_button.className = "close_btn";
        ok_button.appendChild(ok_button_text);

        // Add an event listener that'll close the
        // custom alert
        ok_button.addEventListener("click", function () {
            remove_custom_alert();
        }, false);
    }

    function remove_custom_alert() {
        let HTML_body = document.querySelector("body");
        let alert_container = document.getElementById("alert_container");
        HTML_body.removeChild(alert_container);
    }
</script>
CSS コード:
.alert_container {
    position: absolute;
    top: 0px;
    left: 0px;
    width: 100%;
    height: 100%;
    background-color: #0000004d;
}

.alert_box {
    position: relative;
    width: 300px;
    min-height: 100px;
    margin-top: 50px;
    border: 1px solid #666;
    background-color: #fff;
}

.alert_box h1 {
    font-size: 0.9em;
    margin: 0;
    background-color: #1560bd;
    color: #fff;
    border-bottom: 1px solid #000;
    padding: 2px 0 2px 5px;
}

.alert_box p {
    font-size: 0.7em;
    height: 50px;
    margin-left: 55px;
    padding-left: 5px;
}

.close_btn {
    width: 70px;
    font-size: 0.7em;
    display: block;
    margin: 5px auto;
    padding: 7px;
    border: 0;
    color: #fff;
    background-color: #1560bd;
    border-radius: 3px;
    cursor: pointer;
}
出力:

Habdul Hazeez is a technical writer with amazing research skills. He can connect the dots, and make sense of data that are scattered across different media.
LinkedIn