JavaScript에서 맞춤형 알림 상자 만들기
이 기사에서는 jQuery UI, SweetAlert2 및 사용자 지정 경고 기능을 사용하여 JavaScript에서 사용자 지정 경고 상자를 만드는 방법을 설명합니다.
jQuery UI로 맞춤형 경고 상자 만들기
jQuery UI를 사용하여 JavaScript 네이티브 alert() 함수의 기능을 모방할 수 있습니다. jQuery UI에는 많은 API가 있지만 dialog() API를 사용하여 사용자 지정 경고 상자를 만들 수 있습니다.
한편, 네이티브 JavaScript 네이티브 alert() 기능과 달리 dialog() API로 생성된 경고 상자를 드래그할 수 있습니다.
jQuery, jQuery UI 및 jQuery UI용 CSS 스타일을 다음 코드 블록의 코드로 가져왔습니다. 따라서 dialog() API를 사용하여 사용자 지정 경고 상자를 만들 수 있습니다.
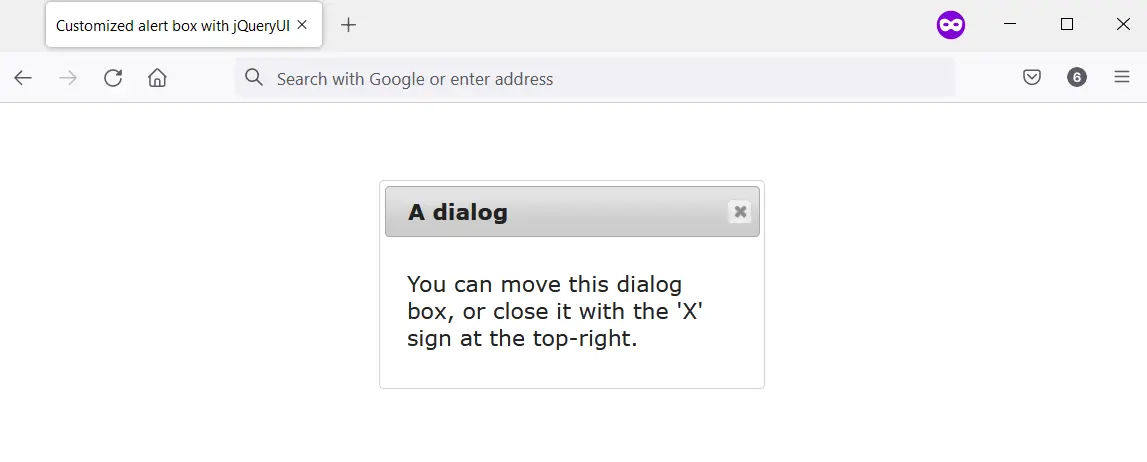
한편, dialog() API는 사용자 지정 경고 상자를 표시할 웹 페이지의 위치가 필요합니다. 따라서 고유 ID가 있는 HTML div 요소를 사용합니다.
또한 이 div에는 맞춤 알림 상자의 제목이 될 텍스트를 포함하는 title 속성이 있어야 합니다. 웹 브라우저에서 코드를 실행하면 dialog() API로 생성된 사용자 지정 경고 상자를 볼 수 있습니다.
암호:
<head>
    <meta charset="utf-8">
    <title>Customized alert box with jQueryUI</title>
    <link rel="stylesheet" href="https://ajax.googleapis.com/ajax/libs/jqueryui/1.12.1/themes/smoothness/jquery-ui.css">
    <script src="https://ajax.googleapis.com/ajax/libs/jquery/3.6.0/jquery.min.js"></script>
    <script src="https://ajax.googleapis.com/ajax/libs/jqueryui/1.12.1/jquery-ui.min.js"></script>
    <script>
        $(function() {
            $("#jquery-ui-dialog").dialog();
        });
    </script>
</head>
<body>
    <main style="display: flex; justify-content: center;">
        <div id="jquery-ui-dialog" title="A dialog">
            <p>You can move this dialog box, or close it with the 'X' sign at the top-right.</p>
        </div>
    </main>
</body>
출력:
SweetAlert2로 맞춤형 알림 상자 만들기
SweetAlert2를 사용하면 액세스 가능하고 사용자 지정 가능하며 반응이 빠른 경고 상자를 만들 수 있습니다. 기본 JavaScript alert() 기능을 포함하여 JavaScript 팝업 상자를 대체하는 것을 목표로 합니다.
프로젝트에서 다양한 방식으로 SweetAlert2를 사용할 수 있습니다. 그러나 이 기사에서는 CDN(Content Delivery Network)을 통해 <script> 태그와 함께 사용합니다.
따라서 SweetAlert2 다운로드 시 HTML 버튼에 이벤트 리스너를 첨부하여 사용할 수 있습니다. Swal.fire() 메소드를 호출하고 이벤트 리스너에 인수를 제공할 수 있습니다.
Swal.fire()에 제공하는 인수는 사용자 정의된 경고 상자의 출력을 결정합니다.
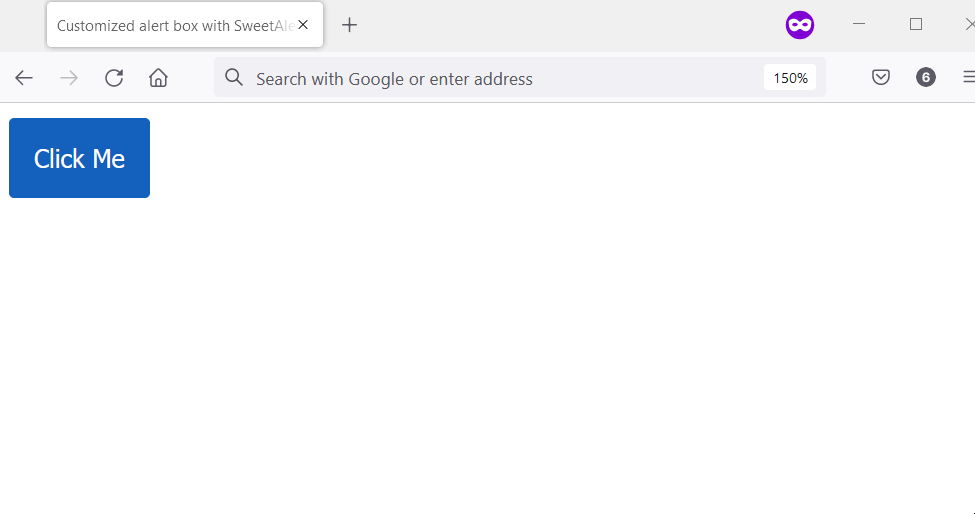
다음 코드 블록의 HTML 버튼에 이벤트 리스너를 연결했습니다. 이 버튼에는 #showAlert의 HTML ID 속성이 있습니다.
작업을 쉽게 하기 위해 jQuery를 사용하여 ID를 가져왔습니다. 그런 다음 사용자 지정 경고를 표시하는 인수와 함께 Swal.fire() 메서드를 호출합니다.
암호:
<head>
    <meta charset="utf-8">
    <title>Customized alert box with SweetAlert2</title>
    <script src="https://ajax.googleapis.com/ajax/libs/jquery/3.6.0/jquery.min.js"></script>
    <script src="https://cdn.jsdelivr.net/npm/sweetalert2@11.4.8/dist/sweetalert2.all.min.js"></script>
    <style type="text/css">
        button {
            padding: 1em;
            background-color: #1560bd;
            color: #ffffff;
            border-radius: 0.2em;
            border-style: none;
            cursor: pointer;
        }
    </style>
</head>
<body>
    <main>
        <button id="showAlert">Click Me</button>
    </main>
</body>
<script>
    $("#showAlert").click(function(){
        Swal.fire(
            'Are you done?',
        )
    });
</script>
출력:
사용자 지정 기능으로 사용자 지정 경고 상자 만들기
사용자의 웹 브라우저에서 기본 alert() 상자를 대체할 사용자 지정 함수를 만들 수 있습니다. window 개체에서 이 작업을 수행하고 사용자 지정 함수는 다음과 같이 작동합니다.
- 경고 제목 및 경고 버튼 텍스트에 대한 상수를 설정합니다.
- HTML에
alert_container라는 ID가 있는지 확인합니다. true인 경우 맞춤 알림 생성을 중지합니다. - 경고 컨테이너에 대한 div 요소를 생성하고 이를 body 요소에 추가합니다. 그런 다음 다음을 수행합니다.
- 경고 컨테이너에 HTML ID를 지정합니다.
- 경고 컨테이너에 HTML 클래스 이름을 지정합니다.
- 알림 상자에 대한 div 요소를 만들고 알림 컨테이너에 추가합니다. 그런 다음 HTML 클래스 이름을 지정합니다.
scrollTop을 사용하여 경고 상자의 상단 위치를 설정합니다.scrollWidth및offsetWidth를 사용하여 경고 상자의 왼쪽 위치를 설정합니다.- 경고 제목에 대한 HTML
h1요소를 생성합니다. 그런 다음 다음을 수행합니다.- 경고 제목에 대한 텍스트 노드를 만듭니다. 해당 값은 경고 제목 상수여야 합니다.
- 경고 상자에
h1을 추가합니다. - 경고 제목에 텍스트 노드를 추가합니다.
- HTML
버튼요소를 생성합니다. 그런 다음 다음을 수행합니다.- 버튼 텍스트에 대한 텍스트 노드를 만듭니다. 해당 값은 경고 제목 상수여야 합니다.
버튼요소에 버튼 텍스트를 추가합니다.- 경고 상자에
버튼요소를 추가합니다. 버튼요소에 고유한 클래스 이름을 할당합니다.- 버튼에 이벤트 리스너를 연결합니다. 이벤트 리스너는 사용자 지정 경고 상자를 닫아야 합니다.
또한 맞춤 알림을 제거하는 함수를 만들어야 합니다. 이는 사용자가 확인 버튼을 클릭할 때 발생해야 합니다.
함수는 다음 단계를 사용해야 합니다.
- HTML
body요소를 가져옵니다. - 경고 컨테이너를 가져옵니다.
removeChild메서드를 사용하여 HTMLbody요소에서 경고 컨테이너를 제거합니다.
마지막으로 CSS 스타일을 만들어 맞춤 알림 기능의 스타일을 지정합니다. 후속 코드 블록에서 다음에 대한 구현을 찾을 수 있습니다.
- 맞춤 알림 기능
- 제거하는 기능
- 맞춤 알림 기능을 위한 CSS 스타일
HTML 및 JavaScript 코드:
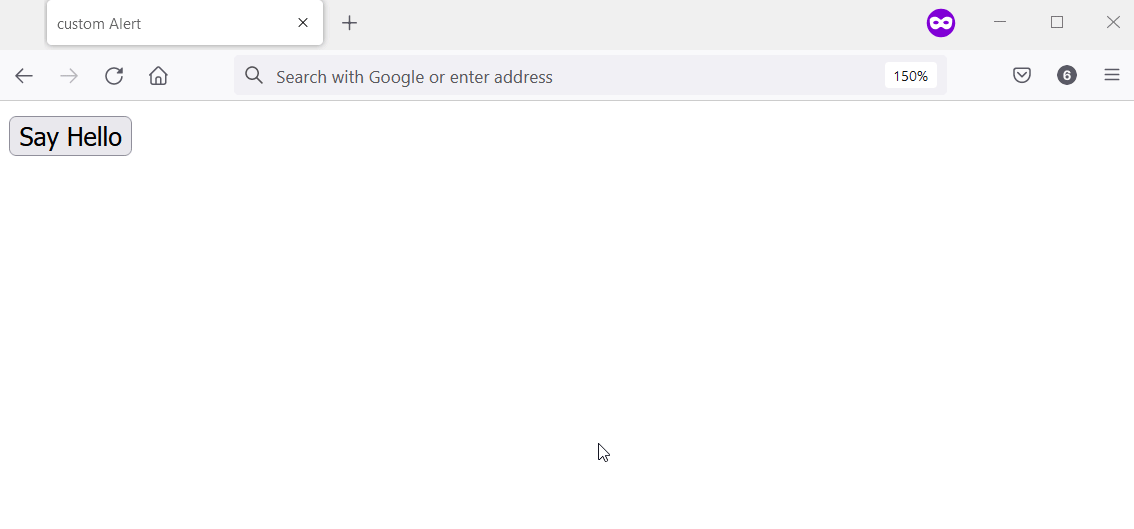
<body>
    <input type="button" value = "Say Hello" onclick="alert('Hello');" />
</body>
<script>
    // Ensure the user's web browser can run
    // JavaScript before creating the custom
    // alert box
    if (document.getElementById) {
        // Swap the native alert for the custom
        // alert
        window.alert = function (alert_message) {
            custom_alert(alert_message);
        }
    }

    function custom_alert(alert_message) {

        /* You can utilize the web page address
         * for the alert message by doing the following:

         const ALERT_TITLE = "The page at " + document.location.href + " says: ";
         */
        const ALERT_TITLE = "Alert Message";
        const ALERT_BUTTON_TEXT = "OK";

        // Check if there is an HTML element with
        // an ID of "alert_container".If true, abort
        // the creation of the custom alert.
        let is_alert_container_exist = document.getElementById("alert_container");
        if (is_alert_container_exist) {
            return;
        }

        // Create a div to serve as the alert
        // container. Afterward, attach it to the body
        // element.
        let get_body_element = document.querySelector("body");
        let div_for_alert_container = document.createElement("div");
        let alert_container = get_body_element.appendChild(div_for_alert_container);

        // Add an HTML ID and a class name for the
        // alert container
        alert_container.id = "alert_container";
        alert_container.className = "alert_container"

        // Create the div for the alert_box and attach
        // it to the alert container.
        let div_for_alert_box = document.createElement("div")
        let alert_box = alert_container.appendChild(div_for_alert_box);
        alert_box.className = "alert_box";

        // Set the position of the alert box using
        // scrollTop, scrollWidth, and offsetWidth
        alert_box.style.top = document.documentElement.scrollTop + "px";
        alert_box.style.left = (document.documentElement.scrollWidth - alert_box.offsetWidth) / 2 + "px";

        // Create h1 to hold the alert title
        let alert_header_tag = document.createElement("h1");
        let alert_title_text = document.createTextNode(ALERT_TITLE)
        let alert_title= alert_box.appendChild(alert_header_tag);
        alert_title.appendChild(alert_title_text);

        // Create a paragraph element to hold the
        // alert message
        let alert_paragraph_tag = document.createElement("p");
        let alert_message_container = alert_box.appendChild(alert_paragraph_tag);
        alert_message_container.textContent = alert_message;

        // Create the OK button
        let ok_button_tag = document.createElement("button");
        let ok_button_text = document.createTextNode(ALERT_BUTTON_TEXT)
        let ok_button = alert_box.appendChild(ok_button_tag);
        ok_button.className = "close_btn";
        ok_button.appendChild(ok_button_text);

        // Add an event listener that'll close the
        // custom alert
        ok_button.addEventListener("click", function () {
            remove_custom_alert();
        }, false);
    }

    function remove_custom_alert() {
        let HTML_body = document.querySelector("body");
        let alert_container = document.getElementById("alert_container");
        HTML_body.removeChild(alert_container);
    }
</script>
CSS 코드:
.alert_container {
    position: absolute;
    top: 0px;
    left: 0px;
    width: 100%;
    height: 100%;
    background-color: #0000004d;
}

.alert_box {
    position: relative;
    width: 300px;
    min-height: 100px;
    margin-top: 50px;
    border: 1px solid #666;
    background-color: #fff;
}

.alert_box h1 {
    font-size: 0.9em;
    margin: 0;
    background-color: #1560bd;
    color: #fff;
    border-bottom: 1px solid #000;
    padding: 2px 0 2px 5px;
}

.alert_box p {
    font-size: 0.7em;
    height: 50px;
    margin-left: 55px;
    padding-left: 5px;
}

.close_btn {
    width: 70px;
    font-size: 0.7em;
    display: block;
    margin: 5px auto;
    padding: 7px;
    border: 0;
    color: #fff;
    background-color: #1560bd;
    border-radius: 3px;
    cursor: pointer;
}
출력:

Habdul Hazeez is a technical writer with amazing research skills. He can connect the dots, and make sense of data that are scattered across different media.
LinkedIn