HOWTO · Go
Go で Electron API を使用して GUI を作成する
このチュートリアルでは、GoLang で electron API を使用して GUI を作成する方法を示します。
このページの内容
このチュートリアルでは、GoLang で electron API を使用して GUI を作成する方法を示します。
Go で Electron API を使用して GUI を作成する
GoLang の GUI を作成するには、Electron API または Astilectron を使用します。 Astilectron は、Electron を搭載したパッケージです。 この API は、HTML、CSS、Javascript、および GoLang を使用してアプリケーションを生成するための Electron API のバージョンである GitHub で提供されます。
Electron パッケージを使用する前に、GitHub から取得する必要があります。 Electron パッケージの公式デモを入手して実行してみましょう。
Electron パッケージを入手してデモを実行する
次の手順に従って、Astilectron デモをインストールして実行します。
-
最初のステップは、Astilectron をインポートすることです。 プロジェクトの
srcディレクトリで cmd で次のコマンドを実行します。go get -u github.com/asticode/go-astilectron -
go-astilectronをダウンロードしたら、次のステップはデモを入手することです。 次のコマンドを実行して、デモを取得します。go get -u github.com/asticode/go-astilectron-demo/...
-
electron デモがダウンロードされたら、次のステップは
bind.goファイルをYourProject/src/github.com/asticode/go-astilectron-demo/ディレクトリから削除することです。 後でバインドできるように、ファイルを削除します。 -
次のステップは、
astilectron bundlerをインストールすることです。 以下のコマンドを実行して、バンドラーをダウンロードしてインストールします。go get -u github.com/asticode/go-astilectron-bundler/... go install github.com/asticode/go-astilectron-bundler/astilectron-bundler
-
次に、
C:\Users\Sheeraz\go\src\github.com\asticode\go-astilectron-demoディレクトリに移動し、次のコマンドを実行します。#go to the directory cd C:\Users\Sheeraz\go\src\github.com\asticode\go-astilectron-demo # astilectron-bundler command astilectron-bundler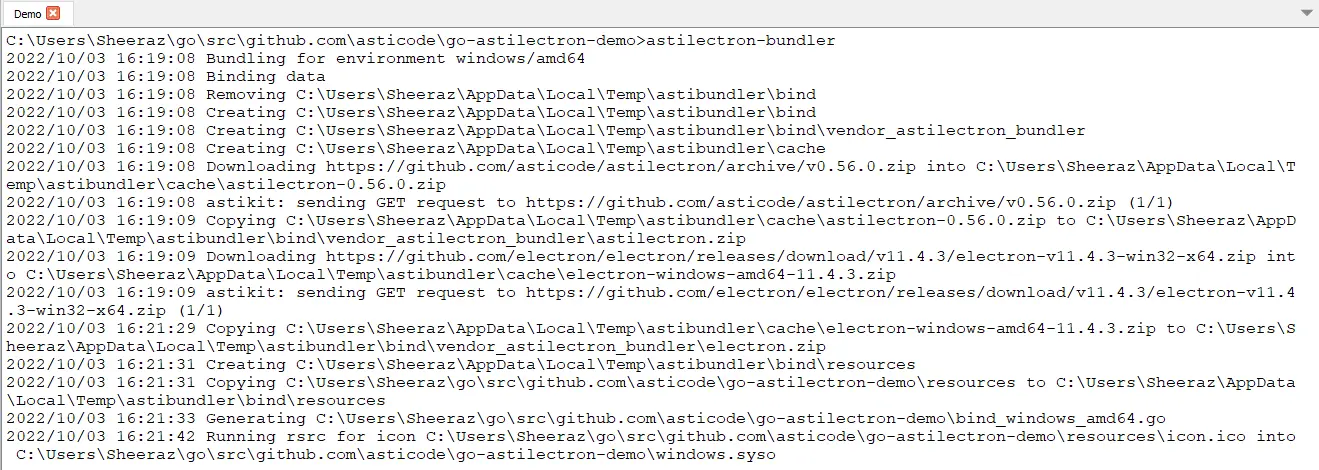
-
Bundler コマンドが成功したら、デモをテストできます。
C:\Users\Sheeraz\go\src\github.com\asticode\go-astilectron-demo\output\windows-amd64ディレクトリに移動し、Astilectron demo.exeファイルを実行します。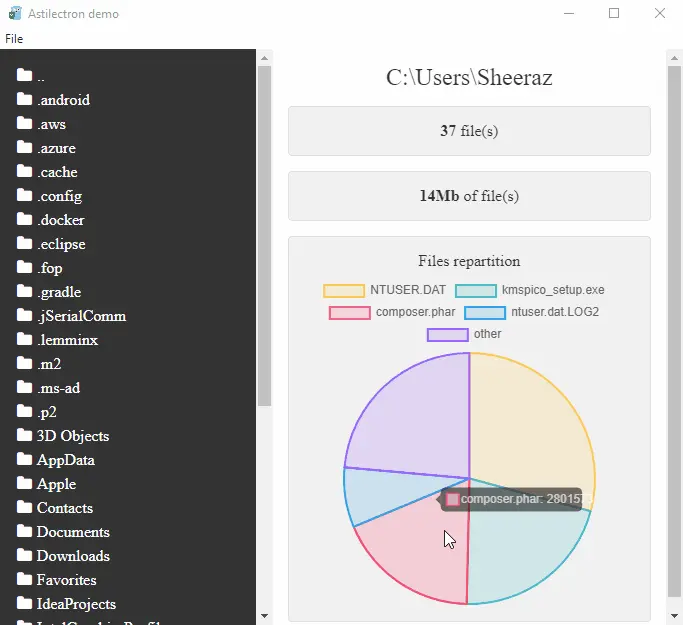
-
現時点では、開いたフォルダーのメモリ構造を示す Windows 上の Astilectron のデモを見ることができますが、他のオペレーティング システム用のデモをバンドルすることもできます。
go-astilectron-demoディレクトリのbundler.jsonファイルに次の部分を追加します。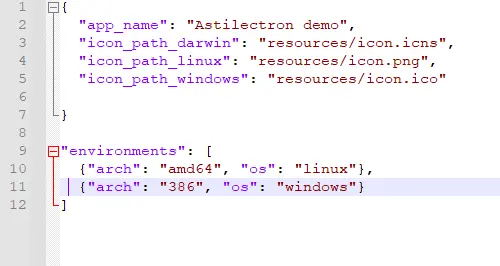
-
環境を追加したら、プロセスを繰り返して、必要なオペレーティング システム用の新しい
Astilectron demo.exeファイルを作成する必要があります。
Astilectron を使用した HTML の例
Astilectron をインストールする上記の手順の後、アプリケーション用の独自の GUI を作成できるようになりました。 HTML と CSS で基本的な例を試してみましょう。
HTML アプリをビルドして実行するための GoLang コード:
package main

import (
	"fmt"
	"log"

	"github.com/asticode/go-astikit"
	"github.com/asticode/go-astilectron"
)

func main() {
	// Set the logger
	demologger := log.New(log.Writer(), log.Prefix(), log.Flags())

	// Create astilectron with the application name and base directory
	demoastilectron, apperror := astilectron.New(demologger, astilectron.Options{
		AppName:           "Delftstack",
		BaseDirectoryPath: "Demo",
	})
	if apperror != nil {
		demologger.Fatal(fmt.Errorf("main: creating the astilectron is failed: %w", apperror))
	}
	defer demoastilectron.Close()

	// Handle the signals
	demoastilectron.HandleSignals()

	// Start Creating the app
	if apperror = demoastilectron.Start(); apperror != nil {
		demologger.Fatal(fmt.Errorf("main: starting the astilectron is failed: %w", apperror))
	}

	// Create a New Window
	var win *astilectron.Window
	if win, apperror = demoastilectron.NewWindow("index.html", &astilectron.WindowOptions{
		Center: astikit.BoolPtr(true),
		Height: astikit.IntPtr(800),
		Width:  astikit.IntPtr(800),
	}); apperror != nil {
		demologger.Fatal(fmt.Errorf("main: new window creation is failed: %w", apperror))
	}
	if apperror = win.Create(); apperror != nil {
		demologger.Fatal(fmt.Errorf("main: new window creation is failed: %w", apperror))
	}

	// Blocking pattern
	demoastilectron.Wait()
}
上記のコードは、アプリの実行中に IDE によってダウンロードされる github.com/asticode/go-astikit も使用します。 HTML のコードは次のとおりです。
<!DOCTYPE html>
<html lang="en" >
<head>
    <meta charset="UTF-8">
    <title>Delftstack Login Form</title>

<style>
body {
    background-color: lightgreen;
    font-size: 1.6rem;
    font-family: "Open Sans", sans-serif;
    color: #2b3e51;
}

h2 {
    font-weight: 300;
    text-align: center;
}

p {
    position: relative;
}

input {
    display: block;
    box-sizing: border-box;
    width: 100%;
    outline: none;
    height: 60px;
    line-height: 60px;
    border-radius: 4px;
}

input[type="text"],
input[type="email"] {
    width: 100%;
    padding: 0 0 0 10px;
    margin: 0;
    color: #8a8b8e;
    border: 1px solid #c2c0ca;
    font-style: normal;
    font-size: 16px;
    position: relative;
    display: inline-block;
    background: none;
}


input[type="submit"] {
    border: none;
    display: block;
    background-color: lightblue;
    color: #fff;
    font-weight: bold;
    text-transform: uppercase;
    font-size: 18px;
    text-align: center;
}
#login-form {
    background-color: #fff;
    width: 35%;
    margin: 30px auto;
    text-align: center;
    padding: 20px 0 0 0;
    border-radius: 4px;
    box-shadow: 0px 30px 50px 0px rgba(0, 0, 0, 0.2);
}

#create-account {
    background-color: #eeedf1;
    color: #8a8b8e;
    font-size: 14px;
    width: 100%;
    padding: 10px 0;
    border-radius: 0 0 4px 4px;
}
</style>
</head>
<body>

<div id="login-form">
    <h2>Delftstack.com Login</h2>
    <form >
        <p>
            <input type="text" id="username" name="username" placeholder="Username" required><i class="validation"><span></span><span></span></i>
        </p>
        <p>
            <input type="email" id="email" name="email" placeholder="Email Address" required><i class="validation"><span></span><span></span></i>
        </p>
        <p>
            <input type="submit" id="login" value="Login">
        </p>
    </form>
        <div id="create-account">
            <p>Don't have an account? <a href="#">Register Here</a><p>
        </div>
</div>
</body>
</html>
上記の Go コードは、指定された HTML コードを go-astilectron ウィンドウで実行します。 出力を参照してください。