Angular のオブジェクトの配列

この記事では、Angular のオブジェクトの配列について、例とその仕組みについて説明します。
Angular のオブジェクトの配列
Angular アプリケーションで作業している間、オブジェクトの配列を作成しなければならない多くの状況があります。TypeScript のオブジェクトの配列の例から始めましょう。
オブジェクトの配列を保持するには、オブジェクトの値とタイプを指定して、オブジェクトの配列を宣言する必要があります。オブジェクトの配列が入力され、ラジオボタンの表示またはドロップダウンに表示されます。
配列のオブジェクトを作成する方法はたくさんあります。宣言された任意のオブジェクトタイプを使用して、配列を宣言およびリセットできます。
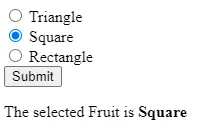
オブジェクトには、キーと値を含むプロパティがあります。与えられた構文で文字列の配列を宣言およびリセットする方法を示します。
# Angular

shapes:Array<string> = ['Triangle','Square','Rectangle'];
出力:
TypeScript では、任意のタイプを使用してオブジェクトを要求できます。次の例で fruits オブジェクトを作成しましょう。
# Angular

public fruits: Array<any> = [
    { title: "Banana", color: "Yellow" },
    { title: "Apple", color: "Red" },
    { title: "Guava", color: "Green" },
    { title: "Strawberry", color: "Red" }
  ];
object(<any>)タイプは置き換えることができます。
# Angular

public fruits: Array<object> = [
    { title: "Banana", color: "Yellow" },
    { title: "Apple", color: "Red" },
    { title: "Guava", color: "Green" },
    { title: "Strawberry", color: "Red" }
  ];
Angular のエイリアスオブジェクトタイプ配列
typescript で type キーワードを操作すると、カスタムタイプの新しいエイリアスを作成できます。Fruit オブジェクトエイリアスを設計し、エイリアスタイプの配列をアセンブルしました。
# AngularJs

type Fruit = Array<{ id: number; name: string }>;
次の例では、配列タイプの Fruit エイリアスを作成し、オブジェクト値で Array を初期化します。
コード-app.component.ts:
# Angular
import { Component } from '@angular/core';

type Fruit = Array<{ id: number; name: string }>;

@Component({
  selector: 'my-app',
  templateUrl: './app.component.html',
  styleUrls: ['./app.component.css'],
})

export class AppComponent {
  fruits: Fruit = [
    { id: 1, name: "Apple" },
    { id: 2, name: "Banana" },
    { id: 3, name: "Guava" },
    { id: 4, name: "Strawberry" }
  ];
  constructor() {}
  ngOnInit() {}
}
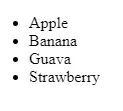
ここで、オブジェクトをフロントエンドファイルに表示します。
コード-app.component.html:
# angular
<ul>
  <li *ngFor="let fruit of fruits">{{fruit.name}}</li>
</ul>
出力:
インターフェイスタイプを利用してオブジェクトの配列を宣言できます。オブジェクトに複数のプロパティがあり、処理するのが難しい場合、オーバーヘッドアプローチにはいくつかの欠陥があります。このアプローチは、オブジェクトデータを Angular および typescript で保持するためのインターフェイスを作成します。
バックエンド/データベースから RESTAPI(RESTful API)を介して到達するデータを処理すると便利です。以下に示すコマンドを使用して、インターフェースを作成できます。
# Angular

ng g interface Fruit
fruit.ts ファイルを作成します。
# Angular

export interface fruits {
  id: number;
  name: string;

  constructor(id,name) {
      this.id = id;
      this.name = name;
    }
}
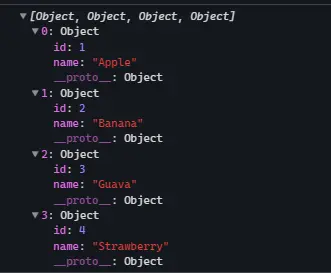
Angular TypeScript コンポーネントでは、フルーツのインターフェイスを作成できます。
# Angular

import { Component, OnInit } from "@angular/core";
import {Fruit} from './Fruit'
@Component({
  selector: "my-app",
  templateUrl: "./app.component.html",
  styleUrls: ["./app.component.css"]
})

export class appComponent implements OnInit {
  public fruits: Fruit[] = [
    { id: 1, name: "Apple" },
    { id: 2, name: "Banana" },
    { id: 3, name: "Guava" },
    { id: 4, name: "Strawberry" }
  ];
  constructor() {}

  ngOnInit() {
  console.log(this.fruits)
  }
}
出力:

Rana is a computer science graduate passionate about helping people to build and diagnose scalable web application problems and problems developers face across the full-stack.
LinkedIn