How to Use ReactDOM.createPortal() in React
-
Create a Number Generating App Using
ReactDOM.createPortal()in React -
Create a CSS Overlay Effect Using
ReactDOM.createPortal()in React - Conclusion

React is about devising the best ways to write clean, easy-to-understand codes. The createPortal() function in React is one such way.
The ReactDOM.createPortal() function is a convenient way to split long lines of codes into sections. When we separate the child component from the parent component to make each component brief, the createPortal() function connects both components without losing effectiveness.
Also, if we want to render the contents in the child component before the parent component, the ReactDOM.createPortal() can be used. That said, let us look at ways we can put this function into use by building simple apps.
Create a Number Generating App Using ReactDOM.createPortal() in React
In this example, we will see how we can control the state of the parent component from the child component, whereas the child component is not directly within the div with the onClick event handler.
We will create a new project folder, navigate to the public folder, access the index.html file, and create divs, which serve as the DOM through which the child component will be rendered. So the index.html will look like this:
Code Snippet- indx.html:
<div id="app-container"></div>
<div id="modal-container"></div>
Then we head into the index.js file to do the real coding. Here, we will import the createPortal() function from react-dom.
Code Snippet- index.js:
import React from 'react';
import ReactDOM, { render, createPortal } from 'react-dom';

const appContainer = document.getElementById('app-container');
const modalContainer = document.getElementById('modal-container');

class Parent extends React.Component {
  state = {clicks: 0};
  onClick = () => {

    this.setState(state => ({clicks: state.clicks + 1}));
  };
  render() {
    return (
      <div onClick={this.onClick}>
        <p>Number of clicks: {this.state.clicks}</p>

        {ReactDOM.createPortal(<Child />, modalContainer)}
      </div>
    );
  }
}

function Child() {
  return <button>Click</button>;
}
ReactDOM.render(<Parent />, appContainer);
Output:
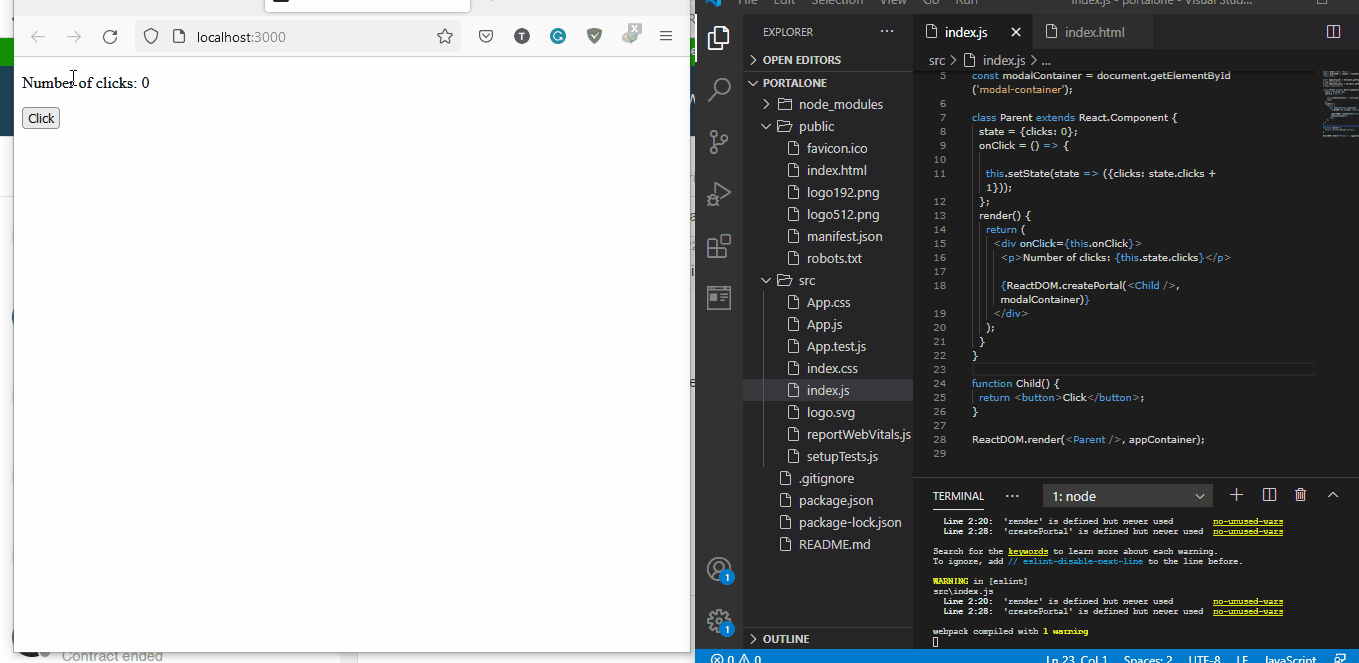
The Click button is not within the component that defines the action to be taken when the button is clicked, but we can see the button updating the parent component.
Create a CSS Overlay Effect Using ReactDOM.createPortal() in React
With the createPortal() function, we can create styling components in the .js file that will cover the web page once the button is clicked, even when the styling is not within the function component that defines the actions of the button.
We will create a new file inside the src folder and name it overlayStyles.js. This will contain the overlay CSS stylings rendered over the web page when the button is clicked.
Then we navigate to the index.js file and put in these codes:
Code Snippet- index.js:
import React from "react";
import ReactDOM, { render } from "react-dom";
import { overlay, overlayContent } from "./overlayStyles";

class Overlay extends React.Component {
  constructor(props) {
    super(props);
    this.overlayContainer = document.createElement("div");
    document.body.appendChild(this.overlayContainer);
  }

  componentWillUnmount() {
    document.body.removeChild(this.overlayContainer);
  }

  render() {
    return ReactDOM.createPortal(
      <div style={overlay}>
        <div style={overlayContent}>{this.props.children}</div>
      </div>,
      this.overlayContainer
    );
  }
}

class App extends React.Component {
  state = {
    showOverlay: false
  };

  toggleOverlay = () => {
    this.setState(prevState => {
      return { showOverlay: !prevState.showOverlay };
    });
  };

  render() {
    return (
      <div>
        <h1>Dashboard</h1>
        {this.state.showOverlay && (
          <Overlay>
            <div>
              Overlay Content{" "}
              <button onClick={this.toggleOverlay}>Close</button>
            </div>
          </Overlay>
        )}
        <button onClick={this.toggleOverlay}>Open Overlay</button>
      </div>
    );
  }
}

render(<App />, document.getElementById("root"));
Then in the overlayStyles.js file, we add the CSS codes like this:
Code Snippet- overlayStyles.js:
export const overlay = {
  height: "100%",
  width: "100%",
  position: "fixed",
  StayInPlaceZIndex: "1",
  SitOnTopLeft: "0",
  top: "0",
  backgroundColor: "rgb(0,0,0)",
  BlackFallbackColorBackgroundColor: "rgba(0,0,0, 0.9)",
  BlackWOpacityOverflowX: "hidden",
  DisableHorizontalScrollTransition: "0.5s"
};

export const overlayContent = {
  position: "relative",
  top: "25%",
  width: "100%",
  textAlign: "center",
  marginTop: "30px",
  color: "white"
};
Output:
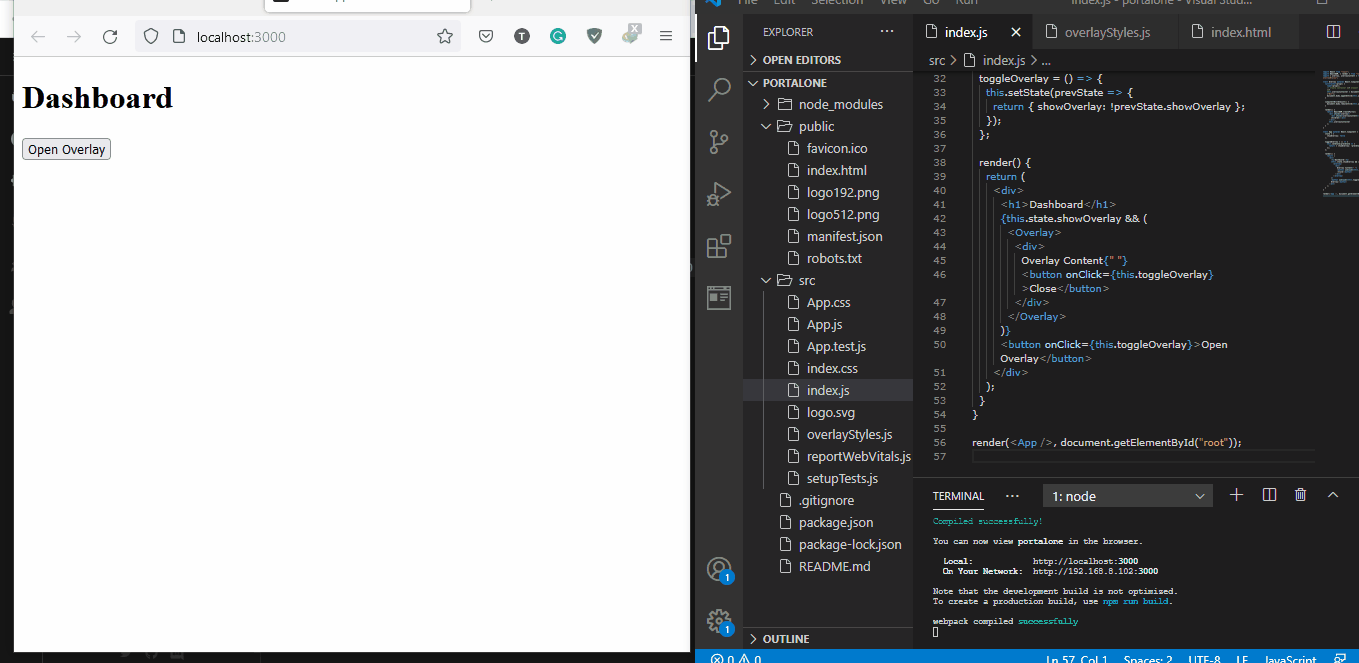
When we click the Open Overlay button, we see that it activates the stylings even when they are not within the component that handles the onClick events.
Conclusion
The ReactDOM.createPortal() function makes it easy for coders to separate a component to be used for a specific function inside an application, like when we want an item to be previewed when we hover over it.

Fisayo is a tech expert and enthusiast who loves to solve problems, seek new challenges and aim to spread the knowledge of what she has learned across the globe.
LinkedIn