How to Use NPM UUID in Reactjs
- Create a Simple ID Generating App Using NPM UUID in Reactjs
- Create a To-Do List App Using NPM UUID in Reactjs
- Create a Note-Taking App Using NPM UUID in Reactjs
- Conclusion

When apps are built in react, there are instances where we use components that are similar in identification. The UUID ensures these components are reconciled, and where two components are totally similar, they are updated; otherwise, each component is rendered individually.
The UUID means Universal Unique Identifier, which helps us to identify items that are similar in composition but have very slight differences. It is very useful for making a list of items.
It is also ideal for identifying and differentiating items placed on e-commerce websites. For instance, for a shoe-selling website, the UUID will help us identify the various kinds of shoes displayed on that website.
Because the IDs generated by the UUID are not repeated, it is very effective for creating myriad apps on the React framework. We will see below how we can apply the UUID for creating different kinds of applications.
Create a Simple ID Generating App Using NPM UUID in Reactjs
The UUID is a third-party dependency, so after we have created our project folder using npx, we will navigate to that project folder from our terminal and install the UUID dependency using npm install uuid.
Once that is done, we will import the UUID inside App.js. We will also import ReactDOM from react-dom and then add some codes:
Code Snippet- App.js:
import React from "react";
import ReactDOM from "react-dom";
import { v4 as uuidv4 } from "uuid";
import "./App.css";

function App() {
  return (
    <div className="App">
      <h1>{uuidv4()}</h1>
    </div>
  );
}

const rootElement = document.getElementById("root");
ReactDOM.render(<App />, rootElement);
Output:
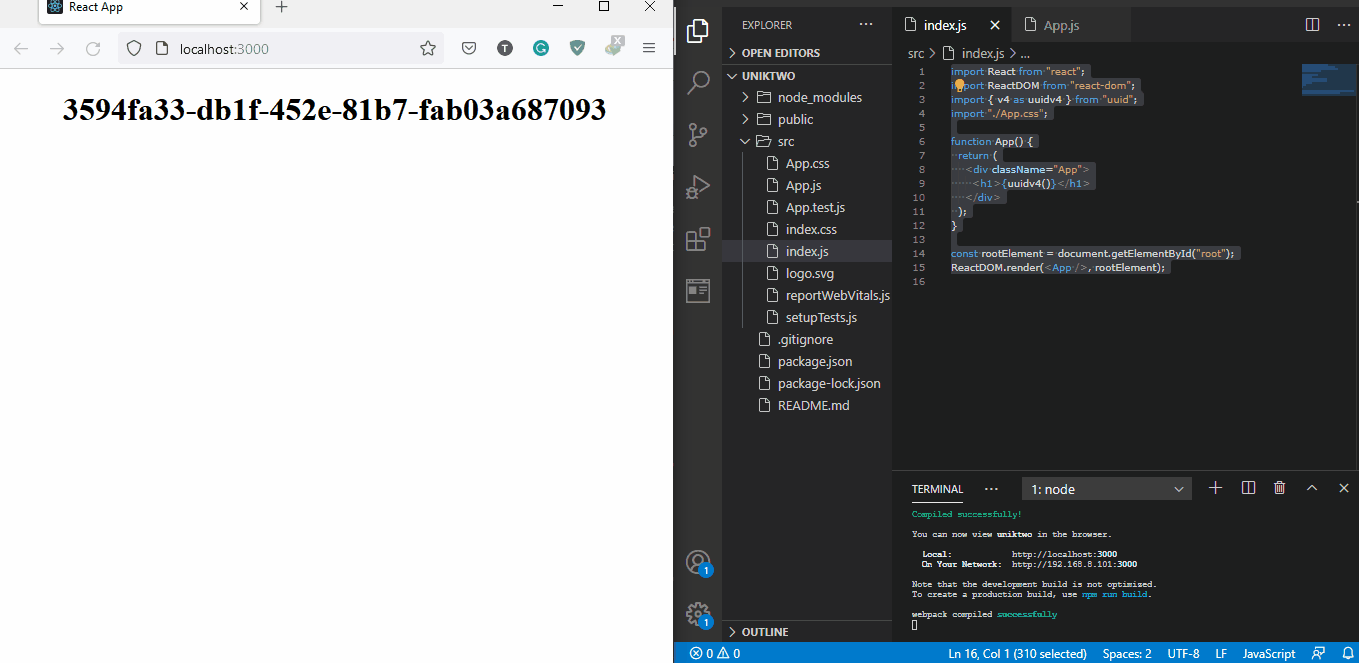
We will see a long stretch of codes displayed when we open the webpage. This shows the UUID in its raw state, and once we refresh, a new code is generated.
This is because the UUID generates a new ID upon request, even when the request we sent is very similar, and it is never repeated.
Create a To-Do List App Using NPM UUID in Reactjs
Let us apply the UUID to create a Todolist app in react. The UUID is very useful because a to-do list involves using the app to make a list; the UUID helps us generate IDs for each item in the list.
For starters, we will need to create a new react project, navigate into the project folder using the terminal and then install a couple of dependencies.
We will install bootstrap to enable us to set up the buttons and the list. We will use npm install react-bootstrap.
Next, we will install a transition group for React. This will allow for animated effects when we add or remove items from the list.
We will do that with npm install react-transition-group inside the project folder.
Last is the UUID; we use npm i uuid inside the project folder. After the installations, we will import each dependency inside the index.js file, and then we will start the coding.
Code Snippet- index.js:
import React, { useState } from 'react';
import ReactDOM from 'react-dom';
import { Container, ListGroup, Button } from 'react-bootstrap';
import { CSSTransition, TransitionGroup } from 'react-transition-group';
import { v4 as uuidv4 } from "uuid";
import './App.css';
function TodoList() {
const [items, setItems] = useState([
{ id: uuidv4(), text: 'Buy eggs' },
{ id: uuidv4(), text: 'Pay bills' },
{ id: uuidv4(), text: 'Invite friends over' },
{ id: uuidv4(), text: 'Fix the TV' },
]);
return (
<Container style={{ marginTop: '2rem' }}>
<ListGroup style={{ marginBottom: '1rem' }}>
<TransitionGroup className="todo-list">
{items.map(({ id, text }) => (
<CSSTransition
key={id}
timeout={500}
classNames="item">
<ListGroup.Item>
<Button
className="remove-btn"
variant="danger"
size="sm"
onClick={() =>
setItems(items =>
items.filter(item => item.id !== id)
)
}
>
×
</Button>
{text}
</ListGroup.Item>
</CSSTransition>
))}
</TransitionGroup>
</ListGroup>
<Button
onClick={() => {
const text = prompt('Enter some text');
if (text) {
setItems(items => [
...items,
{ id: uuidv4(), text },
]);
}
}}
>
Add Item
</Button>
</Container>
);
}
ReactDOM.render(
<TodoList />,
document.getElementById('root')
);
Output:
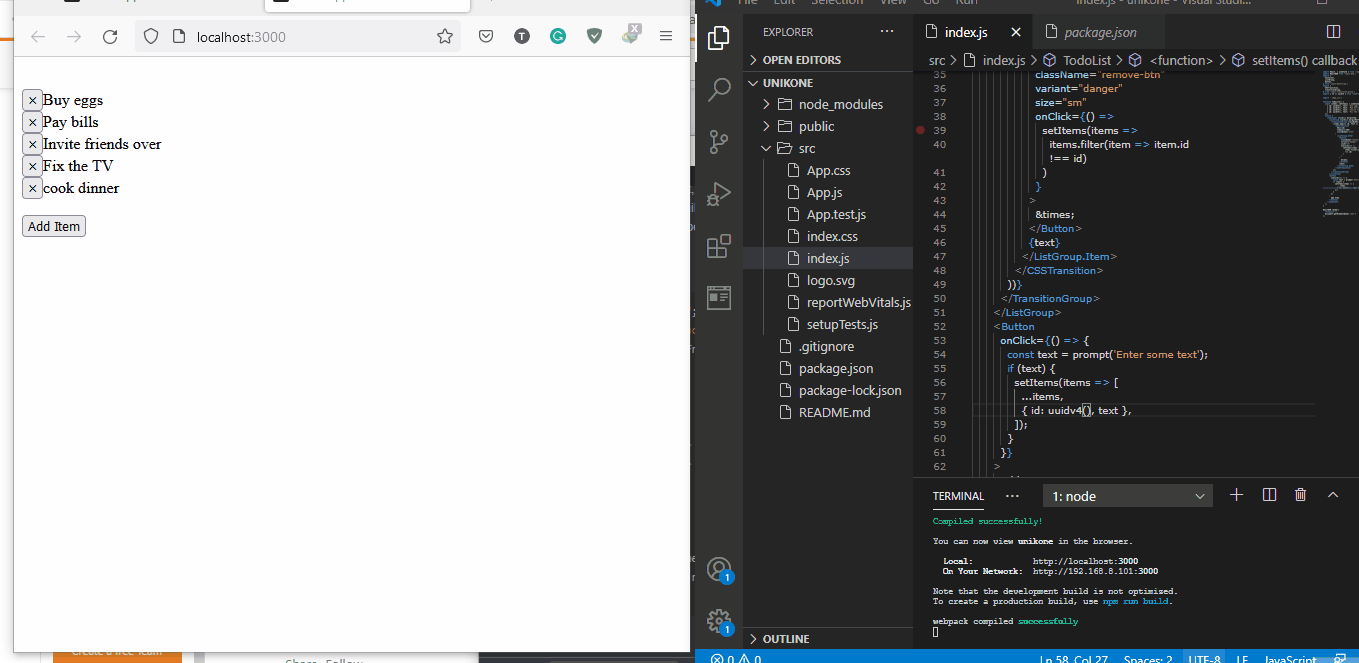
In the app, we will add and remove items, and the states of the component will change. Hence we need to apply the useState hook to our component to handle the changes in the component.
Then we will assign the onClick event handler to the two buttons; the first button is attached to every item that is added as a delete button. This enables us to delete items from the list using the item’s ID.
The second button is used to add items to the list. Once the Add Item button is clicked, a pop-up with an input field comes up, and this is where we type in the item we wish to add.
Once we do that, the new item is shown on the list. Once a new item is added, a new ID is automatically generated for it.
The onClick event handler uses this ID to remove the items.
Create a Note-Taking App Using NPM UUID in Reactjs
This note-taking app works the same as the to-do list app we previously worked on, as we add and remove items from a list.
It shows just how effective and applicable the UUID dependency can be. It makes app-building apps such as this easier.
To begin, we will create a new project, and then in the project folder, we will install the UUID dependency using npm install uuid. Then we will create two more files inside the src, Main.js and Sidebar.js.
The Main.js will be the app’s main interface where we will write the notes. The Sidebar.js will be where we manage the notes.
Inside the App.js file, we will import the UUID, Main.js, Sidebar.js, and then type in these codes:
Code Snippet- App.js:
import { useState } from "react";
import {v4 as uuidv4} from "uuid";
import "./App.css";
import Main from "./Main";
import Sidebar from "./Sidebar";

const newNote = () => {
  return { id: uuidv4(), title: "", body: "", lastModified: Date.now() };
};

function App() {
  const [notes, setNotes] = useState([]);
  const [filterednotes, setFilteredNotes] = useState([]);
  const [activeNote, setActiveNote] = useState(false);

  const onAddNote = () => {
    setNotes([newNote(), ...notes]);
  };

  const onUpdateNote = (updatedNote) => {
    const updatedNotesArray = notes.map((note) => {
      if (note.id === activeNote) {
        return updatedNote;
      }
      return note;
    });

    setNotes(updatedNotesArray);
  };

  const onDeleteNote = (idToDelete) => {
    setNotes(notes.filter((note) => note.id !== idToDelete));
  };

  const getActiveNote = () => {
    return notes.find((note) => note.id === activeNote);
  };

  return (
    <div className="App">
      <Sidebar
        notes={notes}
        setNotes={setNotes}
        onAddNote={onAddNote}
        onDeleteNote={onDeleteNote}
        activeNote={activeNote}
        setActiveNote={setActiveNote}
        filterednotes={filterednotes}
        setFilteredNotes={setFilteredNotes}
      />
      <Main activeNote={getActiveNote()} onUpdateNote={onUpdateNote} />
    </div>
  );
}

export default App;
Here, we assign our components to the useState hook, so the state of the components is updated as we work in the app. The onAddNote event handler kickstarts the newNote function, adding a new note.
Also, since we are building a note-taking app, we need a dependency to help us render the notes in HTML. We will install the markdown with npm install react-markdown and import it inside Main.js, then we will add these codes.
Code Snippet- Main.js:
import ReactMarkdown from "react-markdown";
const Main = ({ activeNote, onUpdateNote }) => {
const onEditField = (key, value) => {
onUpdateNote({
...activeNote,
[key]: value,
lastModified: Date.now()
});
};
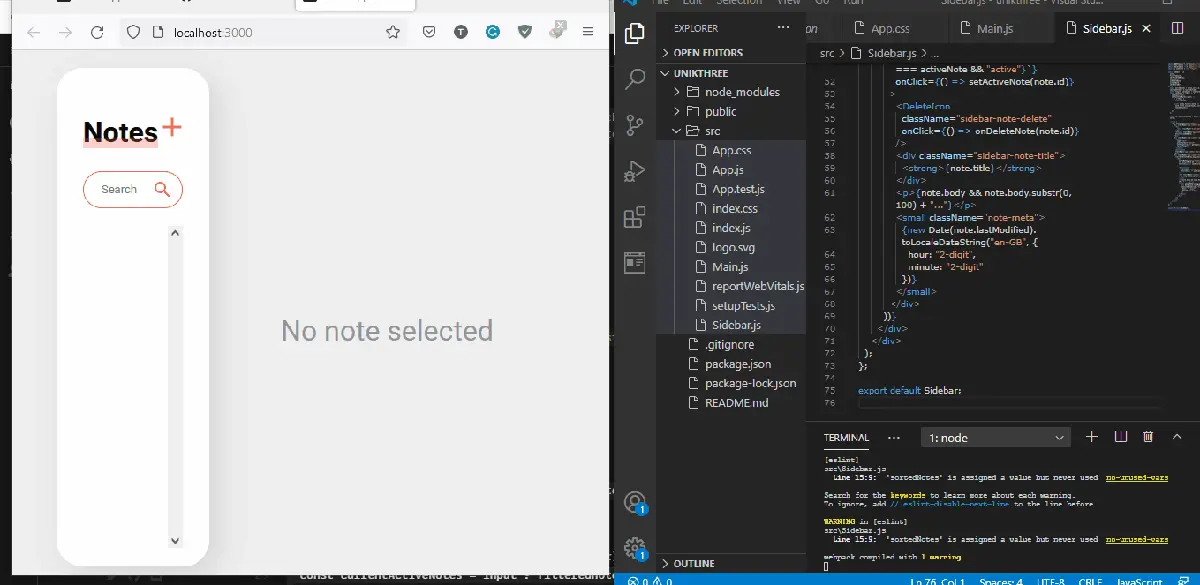
if (!activeNote)
return <div className="no-active-note">No note selected</div>;
return (
<div className="app-main">
<div className="app-main-note-edit">
<input
type="text"
id="title"
placeholder="Title"
value={activeNote.title}
onChange={(e) => onEditField("title", e.target.value)}
autoFocus
/>
<textarea
id="body"
placeholder="Write your note here..."
value={activeNote.body}
onChange={(e) => onEditField("body", e.target.value)}
/>
</div>
<div className="app-main-note-preview">
<h1 className="preview-title">{activeNote.title}</h1>
<ReactMarkdown className="markdown-preview">
{activeNote.body}
</ReactMarkdown>
</div>
</div>
);
};
export default Main;
Here we are typing inside the created note, so we assign our components to the onChange event handler. This handles all the changes we make inside the text area of the note-taking app.
Next, we want to code the sidebar, but first, we must install the material-UI dependencies that will render the search, delete and add buttons as icons. So we install with npm install @material-ui/core and then npm install @material-ui/icons.
Then we import the icons we will use and do some coding in the Sidebar.js file:
Code Snippet- Sidebar.js:
import AddIcon from "@material-ui/icons/Add";
import SearchIcon from "@material-ui/icons/Search";
import DeleteIcon from "@material-ui/icons/Delete";
import { useState } from "react";

const Sidebar = ({
  notes,
  filterednotes,
  setFilteredNotes,
  onAddNote,
  onDeleteNote,
  activeNote,
  setActiveNote
}) => {
  const sortedNotes = notes.sort((a, b) => b.lastModified - a.lastModified);
  const [input, setInput] = useState("");
  const getInput = (text) => {
    setInput(text);
    setFilteredNotes((prev) => {
      if (!text) {
        return notes;
      }
      return notes.filter((note) =>
        note.title.toLowerCase().includes(text.toLowerCase())
      );
    });
  };

  const currentActiveNotes = input ? filterednotes : notes;

  return (
    <div className="app-sidebar">
      <div className="app-sidebar-header">
        <h1>
          <span className="highlight">Notes</span>
        </h1>
        <AddIcon className="app-sidebar-header-add" onClick={onAddNote} />
      </div>
      <div className="app-sidebar-search">
        <input
          type="text"
          placeholder="Search"
          onChange={(e) => getInput(e.target.value)}
          value={input}
        ></input>
        <SearchIcon className="app-sidebar-search-icon" />
      </div>
      <div className="app-sidebar-notes">
        {currentActiveNotes.map((note) => (
          <div
            className={`app-sidebar-note ${note.id === activeNote && "active"}`}
            onClick={() => setActiveNote(note.id)}
          >
            <DeleteIcon
              className="sidebar-note-delete"
              onClick={() => onDeleteNote(note.id)}
            />
            <div className="sidebar-note-title">
              <strong>{note.title}</strong>
            </div>
            <p>{note.body && note.body.substr(0, 100) + "..."}</p>
            <small className="note-meta">
              {new Date(note.lastModified).toLocaleDateString("en-GB", {
                hour: "2-digit",
                minute: "2-digit"
              })}
            </small>
          </div>
        ))}
      </div>
    </div>
  );
};

export default Sidebar;
To beautify the web app, we need to put these codes inside the App.css:
Code Snippet- App.css:
@import url("https://cdnjs.cloudflare.com/ajax/libs/normalize/8.0.1/normalize.min.css");
@import url("https://fonts.googleapis.com/css2?family=Roboto:wght@300;400;500;700&display=swap");

* {
  box-sizing: border-box;
}

/* GLOBAL STYLES */
:root {
  --light-grey: #f4f4f4;
  --red-color: #ff5f5f;
  --h1-font: 35px;
  --reg-font: 24px;
  --top-padding: 30px;
}

body {
  font-family: "Roboto", sans-serif;
  width: 100%;
  height: 100vh;
  overflow: hidden;
  font-size: 16px;
  background-color: #eeeeee;
}

.App {
  display: flex;
  padding: 20px 50px;
  height: 100vh;
}

/* SIDEBAR STYLES */

.app-sidebar {
  background-color: #fff;
  width: 30%;
  height: 95vh;
  box-shadow: 10px 10px 30px 1px rgba(0, 0, 0, 0.1);
  border-radius: 30px;
  padding: var(--top-padding) 30px;
}

.app-sidebar-header {
  display: flex;
  position: relative;
  padding: 25px 0;
  background-color: white;
}

.app-sidebar-header h1 {
  margin: 0;
}

.highlight {
  position: relative;
}

.highlight:after {
  content: "";
  display: inline-block;
  position: absolute;
  width: 100%;
  height: 30%;
  top: 25px;
  left: 0;
  background-color: var(--red-color);
  opacity: 0.3;
}

.app-sidebar-header-add {
  transform: scale(1.5);
  color: var(--red-color);
  position: absolute;
  right: 0px;
  cursor: pointer;
}

.app-sidebar-search {
  border: 1px solid var(--red-color);
  display: flex;
  justify-content: space-between;
  padding: 8px 10px;
  border-radius: 30px;
}

.app-sidebar-search input {
  border: none;
  padding-left: 10px;
  font-size: 13px;
  width: 100%;
}

.app-sidebar-search-icon {
  color: var(--red-color);
}

.app-sidebar-notes {
  margin-top: 20px;
  height: calc(95vh - 200px);
  overflow-y: scroll;
}

.app-sidebar-note {
  padding: 20px;
  cursor: pointer;
  border-radius: 15px;
  border: 1px solid var(--red-color);
  margin-bottom: 10px;
  position: relative;
  background-color: #fff;
  overflow: hidden;
}

.sidebar-note-delete {
  position: absolute;
  right: 20px;
  top: 50%;
  transform: translateY(-50%);
  color: var(--red-color);
}

.sidebar-note-title {
  display: flex;
  justify-content: space-between;
  color: #999;
}

.app-sidebar-note p {
  margin: 3px 0;
  font-size: 13px;
  color: #999;
}

.app-sidebar-note small {
  display: block;
  color: #999;
  margin-top: 10px;
  font-size: 10px;
}

.app-sidebar-note:hover {
  background: #ddd;
}

.app-sidebar-note.active,
.app-sidebar-note.active p,
.app-sidebar-note.active small,
.app-sidebar-note.active .sidebar-note-delete {
  background: var(--red-color);
  color: #fff;
}

.app-sidebar-note.active .sidebar-note-title {
  color: black;
}

.app-main {
  width: 70%;
  height: 90vh;
}

.app-main-note-edit,
.app-main-note-preview {
  height: 47vh;
  border-radius: 30px;
  margin-left: 20px;
  margin-bottom: 10px;
}

.no-active-note {
  width: 70%;
  height: 100vh;
  line-height: 100vh;
  text-align: center;
  font-size: 2rem;
  color: #999;
}

.app-main-note-edit {
  padding: 25px;
  background-color: var(--red-color);
}

.app-main-note-edit input,
textarea {
  display: block;
  border: none;
  margin-bottom: 20px;
  width: 100%;
  height: calc(47vh - 130px);
  padding: 20px;
  resize: none;
  font-size: inherit;
  font-family: inherit;
  border-radius: 15px;
}

.app-main-note-edit input {
  height: 50px;
  font-size: 1.5rem;
}

.app-main-note-preview {
  border-top: 1px solid #ddd;
  overflow-y: scroll;
  background-color: #fff;
}

.preview-title {
  padding: 45px 45px 0 45px;
  margin: 0;
}

.markdown-preview {
  padding: 0 45px 45px 45px;
  font-size: 1rem;
  line-height: 2rem;
}
Output:
Conclusion
The UUID’s effectiveness in identifying and managing a list of items is critical in building apps, especially in e-commerce and portfolio apps, where coders will be dealing with organizing an extensive list of items into categories and subcategories.

Fisayo is a tech expert and enthusiast who loves to solve problems, seek new challenges and aim to spread the knowledge of what she has learned across the globe.
LinkedIn