How to Send Email From React Web Application

Ideally, React is a frontend framework for building the user interfaces of apps. Because of React’s flexibility and ease of installing dependencies, React can be used to build a full application, having both the frontend and backend.
This is also true when we want to build applications that an email app that requires data to be exchanged between servers, but how do we build an emailing app with React?
Create an Email App With the EmailJS API
The EmailJS is one such dependency that enables users to create emailing app inside the React framework. Thanks to the dependency, we would not need to build a backend for the app as it takes care of the server side; all we need to do is put in the right codes.
To begin, we will head to emailjs.com to create an account. Once we have confirmed the account, we set up an email service.
On the left sidebar of the website, we click on Email Services, and from the list, pick Gmail; we will see a pop-up. Click Connect Account, select the email we want to connect to the service, then select Add Service to create the Email Service.
Once this is successful, we should get a Service ID and a test email sent to the email we connected to the service.
Next, we select Email Templates on the left sidebar and click Create New template to create an email template. Once we are satisfied with how it is, we click Save.
A template ID will be created. We will need this inside our code.
Now, proceed to create a React project folder. Once we have done this, we navigate to the project folder and install the EmailJS dependency, using:
npm install emailjs-com
Now, we import the dependency into the App.js file and then add some codes, like this:
Code Snippet- App.js:
import React from 'react';
import emailjs from 'emailjs-com';

export default function ContactUs() {

  function sendEmail(e) {
    e.preventDefault();

    emailjs.sendForm('service_j0q23dh', 'template_rhntbdy', e.target, 'ehCd9ARJUiDG1yjXT')
      .then((result) => {
        window.location.reload()
      }, (error) => {
        console.log(error.text);
      });
  }

  return (
    <form className="contact-form" onSubmit={sendEmail}>
      <input type="hidden" name="contact_number" />
      <label>Name</label>
      <input type="text" name="from_name" />
      <label>Email</label>
      <input type="email" name="from_email" />
      <label>Subject</label>
      <input type="text" name="subject" />
      <label>Message</label>
      <textarea name="html_message" />
      <input type="submit" value="Send" />
    </form>
  );
}
Now inside the emailjs.sendForm('YOUR_SERVICE_ID' 'YOUR_TEMPLATE_ID' target, 'YOUR_USER_ID'), you will replace each element with the ones that you have created.
After the mail is successfully sent, the window.location.reload() function refreshes the page, preparing it for another task. Then we go ahead to build the email page.
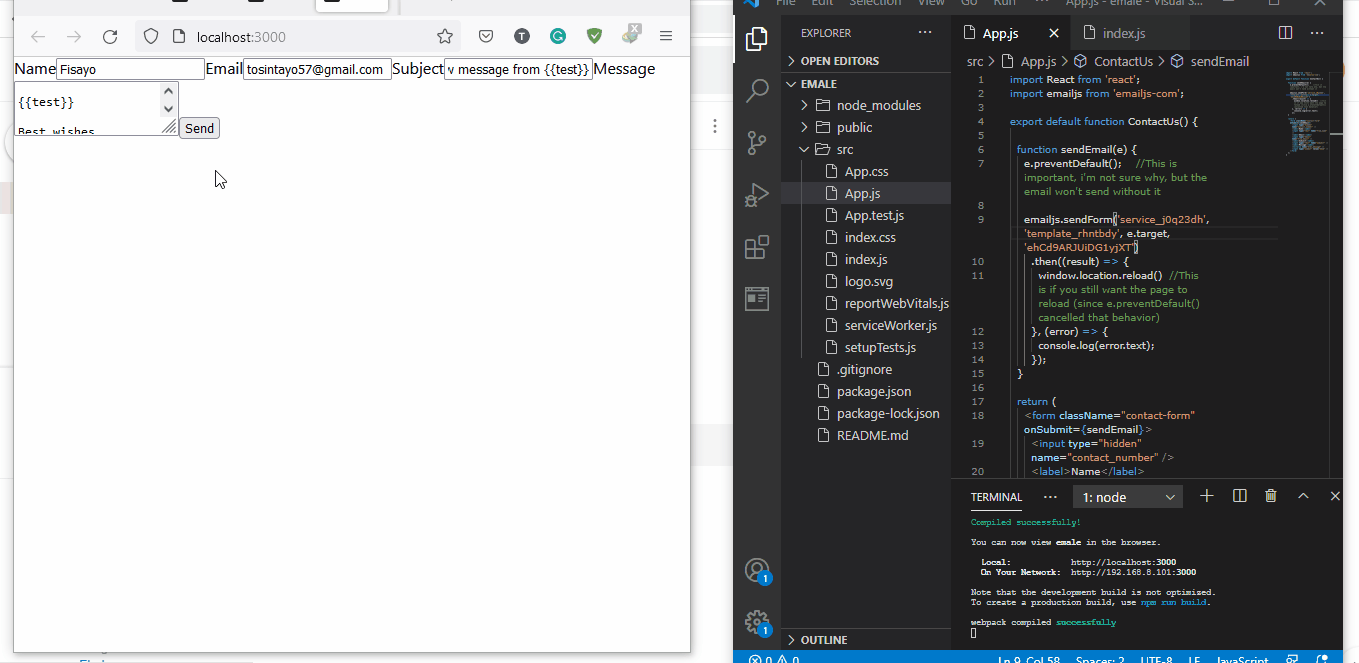
We assign the onSubmit event handler to the submit button. Once it is clicked, the email will be sent.
Output:
Send an Email With Expressjs and Mailgun
This time, we will create a full stack React email sending app. It will have both front and backend, sending the email from its own server.
To start with the frontend, create a new React app and install some dependencies. Install Axios with npm install axios; this handles the requests we will send to the backend.
Next is to install Toastify with npm install react-toastify. This dependency helps create a stylish notification that pops up when we have successfully sent the email or otherwise.
Inside the App.js file, import the installed dependencies as shown below, then add these codes along:
Code Snippet- App.js:
import './App.css';
import { useState } from 'react';
import { toast, ToastContainer } from 'react-toastify';
import 'react-toastify/dist/ReactToastify.css';
import axios from 'axios';

function App() {
  const [email, setEmail] = useState('');
  const [subject, setSubject] = useState('');
  const [message, setMessage] = useState('');
  const [loading, setLoading] = useState(false);

  const submitHandler = async (e) => {
    e.preventDefault();
    if (!email || !subject || !message) {
      return toast.error('Please fill email, subject and message');
    }
    try {
      setLoading(true);
      const { data } = await axios.post(`/api/email`, {
        email,
        subject,
        message,
      });
      setLoading(false);
      toast.success(data.message);
    } catch (err) {
      setLoading(false);
      toast.error(
        err.response && err.response.data.message
          ? err.response.data.message
          : err.message
      );
    }
  };
  return (
    <div className="App">
      <ToastContainer position="bottom-center" limit={1} />
      <header className="App-header">
        <form onSubmit={submitHandler}>
          <h1>Send Email</h1>
          <div>
            <label htmlFor="email">Email</label>
            <input
              onChange={(e) => setEmail(e.target.value)}
              type="email"
            ></input>
          </div>
          <div>
            <label htmlFor="subject">Subject</label>
            <input
              id="subject"
              type="text"
              onChange={(e) => setSubject(e.target.value)}
            ></input>
          </div>
          <div>
            <label htmlFor="message">Message</label>
            <textarea
              id="message"
              onChange={(e) => setMessage(e.target.value)}
            ></textarea>
          </div>
          <div>
            <label></label>
            <button disabled={loading} type="submit">
              {loading ? 'Sending...' : 'Submit'}
            </button>
          </div>
        </form>
      </header>
    </div>
  );
}

export default App;
The states of the elements on the page will be changing, so we assign each component to the useState function, then we set up the Axios to handle the data that will be input inside each field.
This is done inside the submitHandler component. Toastify checks for notifications and relays them appropriately.
Next, we create the form part of the email app. The submit button is assigned to the submitHandler function, triggered once the submit button is clicked, thanks to the onSubmit event handler.
To beautify the page, include this snippet of stylings inside the App.css file, like below:
Code Snippet- App.css:
.App {
  text-align: center;
}

.App-logo {
  height: 40vmin;
  pointer-events: none;
}

@media (prefers-reduced-motion: no-preference) {
  .App-logo {
    animation: App-logo-spin infinite 20s linear;
  }
}

.App-header {
  background-color: #282c34;
  min-height: 100vh;
  display: flex;
  flex-direction: column;
  align-items: center;
  justify-content: center;
  font-size: calc(10px + 2vmin);
  color: white;
}

.App-link {
  color: #61dafb;
}

@keyframes App-logo-spin {
  from {
    transform: rotate(0deg);
  }
  to {
    transform: rotate(360deg);
  }
}

form > div {
  display: flex;
  justify-content: space-between;
  align-items: center;
  margin: 1rem;
}
form > div > label {
  margin: 1rem;
}
form > div > input,
form > div > textarea {
  padding: 0.5rem;
  min-width: 20rem;
  font-family: Verdana, Geneva, Tahoma, sans-serif;
}
Now, let’s get to the backend. We will create a new folder outside our project folder and name it backend. Then we navigate this folder inside the terminal and type in npm init -y to initiate the node.
Then we locate the .gitignore file and open it. It is just above the package.json file of the project folder, right below the src folder.
Remove the / behind the node_modules. This will make the node-modules in the backend folder become active.
Still, in the project folder, open the package.json file. After the name input, add this to the next line: "proxy": "http://localhost:4000/",; this is the proxy where the backend will run.
Now install these dependencies simultaneously like this:
npm install dotenv express mailgun-js
The dotenv helps us protect vital data we will use inside our codes, like Private API Keys. express handles the server connections from the backend, while mailgun provides us with the API Keys we will need to serve up our email app.
Next, we will create two files, server.js and .env. Inside the server.js file, write these codes:
Code Snippet- server.js:
const express = require('express');
const dotenv = require('dotenv');
const mg = require('mailgun-js');

dotenv.config();

const mailgun = () =>
  mg({
    apiKey: process.env.MAILGUN_API_KEY,
    domain: process.env.MAILGUN_DOMIAN,
  });

const app = express();
app.use(express.json());
app.use(express.urlencoded({ extended: true }));

app.post('/api/email', (req, res) => {
  const { email, subject, message } = req.body;
  mailgun()
    .messages()
    .send(
      {
        from: 'John Doe <john@mg.yourdomain.com>',
        to: `${email}`,
        subject: `${subject}`,
        html: `<p>${message}</p>`,
      },
      (error, body) => {
        if (error) {
          console.log(error);
          res.status(500).send({ message: 'Error in sending email' });
        } else {
          console.log(body);
          res.send({ message: 'Email sent successfully' });
        }
      }
    );
});

const port = process.env.PORT || 4000;
app.listen(port, () => {
  console.log(`serve at http://localhost:${port}`);
});
We import the downloaded dependencies and then create the codes to put them into use. The API and DOMAIN keys that we will get when we register with mailgun.com is written inside the .env file, like below:
Code Snippet- .env:
MAILGUN_DOMIAN=sandbox540579ee3e724d14a5d72e9d087111a6.mailgun.org
MAILGUN_API_KEY=68fb630dbe57d3ba42d3a13774878d62-1b8ced53-29cac61a
We import them to the server.js file. Then we set up the email requests and responses and the port we want the server to run on.
To get the keys inside the .env file, proceed to mailgun.com and register. Next, proceed to Sending on the left sidebar, click on Domains, and you should see sandboxXXXXmailgun.org, which is the domain key.
Copy and paste it as seen in the .env file above, and then click the domain key. On the far right, you should see API Keys; reveal the Private API Key, copy and paste it into the .env file.
Still on the domain page, on the far right, you’ll see Authorized Recipients, type in the email you want to send. Go to that email to confirm that you want to receive an email from your mailgun profile.
Then go back to the domain page, and refresh it to ensure that the recipient email has been verified.
Back to the terminal, proceed to the project folder, and type in npm start to start the app. Open another terminal tab, cd to the backend folder, and type in node server.js to kickstart the backend folder.
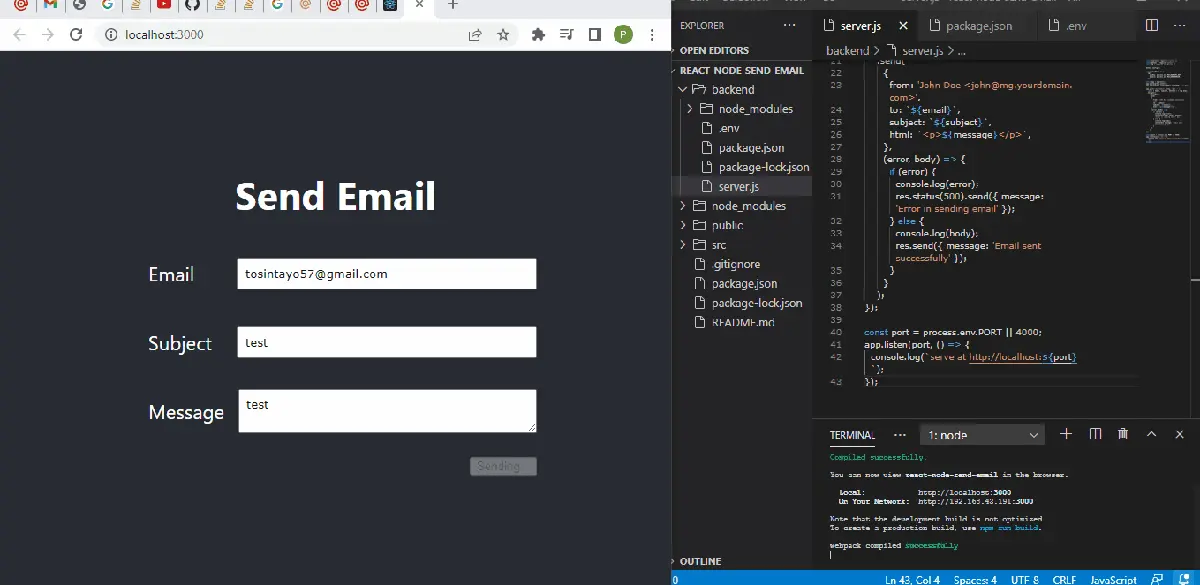
Go to the app and send the email.
Output:
Conclusion
So far, you can create almost any app using the React framework because of its flexibility in bringing multiple pieces of components, APIs, and dependencies together to create a lightweight, flexible, but very effective and efficient web application.

Fisayo is a tech expert and enthusiast who loves to solve problems, seek new challenges and aim to spread the knowledge of what she has learned across the globe.
LinkedIn