How to Upload File to Google Drive Using Python

This article will teach us how to use Python to upload files to Google Drive. To achieve this, we will make use of the Google Drive API.
So, go to the Google Developer Console and create a new project. It could take five to ten seconds or even a few minutes.
Upload File to Google Drive Using Python
Python is a popular programming language because it has many features and libraries that can be put to various uses. The capability to upload files to Google Drive is one of its services.
There are several scenarios where we might need to upload a file to Google Drive. For instance, if something happens to our computer, we might want to share the file with another person or create a backup copy.
No matter the motivation, using Python to upload files to Google Drive is a straightforward process. The following paragraphs will demonstrate how to carry out the task.
We’ll need to prepare a few things before we start. To start things off, we will require Python to be pre-installed on each computer.
If we do not already have it installed, we can download it from the Python website.
Next, to access Google Drive, we will need a Gmail account first. We’re going to presume that each of us uses Gmail. So let’s begin.
Step 1: Google API Playground
We can find more information about the Google API Playground by searching Google. We have to click on the first link to move further.

After selecting the first link, we will automatically be taken to the next page, which is as follows:

Step 2: Google Drive API
On the Google Developers page, we must find our way to the Drive API, among the other options.
We will search for an option called Drive API 3 and select it. When we choose it, a list of links will appear before us.
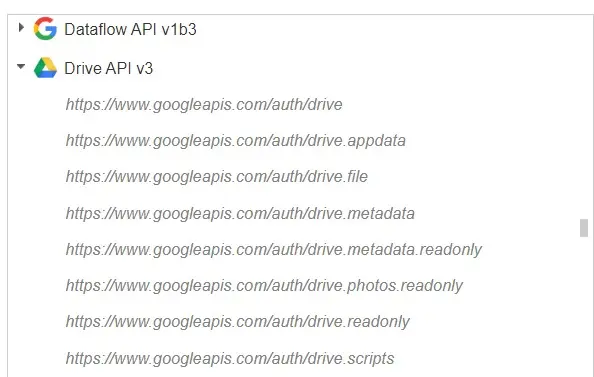
We must select the first link presented in the list of links. If we want to choose anything, we need to click on it first, and then we will see a checkmark appear next to it.
So here we will click on the first link.

After a brief wait of approximately three to five seconds, we will be redirected to our Gmail account.
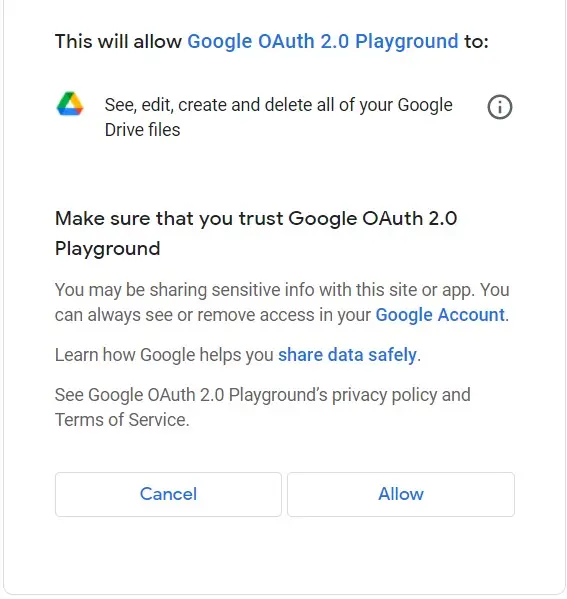
Step 3: Gmail Account
Click on the Gmail account that we want to upload the file into its drive and then follow the on-screen instructions. There will be two options, Cancel and Allow, displayed on the screen.
To proceed, we must select Allow from the drop-down menu. When we click on the Google account, Google Auth will ask if we want to permit the action.
Step 4: Authorization Code
When we finally give in and click the Allow button, we will be redirected to a new page where we may retrieve our permission code.
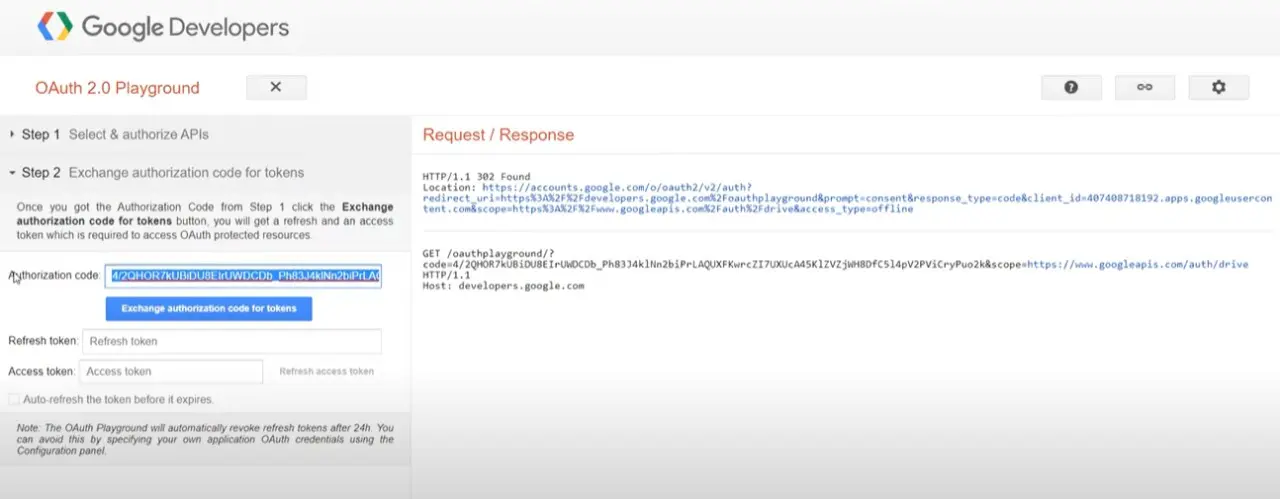
On the other hand, we won’t copy it because we don’t require an authorization code. Instead, we will click the button that trades the authorization code to access the token.

After clicking on the button, we will get the access token.

While working on the Python code, we will need to make a copy of the access token and store it somewhere safe. We will use Python to facilitate the uploading of files into our Google Drive, and the access token will be required.
Python Code for Uploading Files in Google Drive
Step 1: Libraries
First things first, import the required libraries and modules. We must import JSON and requests in this case.
We use JSON for uploading files and requests for requesting API to allow us to upload the file.
Example code:
import json
import requests
Step 2: Access Token
Second, we’ll make a dictionary and use the access token as the value of one of its keys. In this scenario, authorization is the key, and the access token is the value.
Example code:
headers = {"Authorization": "Bearer Paste your access token here"}
We can copy and paste the access token after Bearer with space only.
Step 3: File Name
Now we can create another dictionary and give a name to the file we want to upload.
Example code:
para = {
    "name": "##name for python uploaded file####",
}
Step 4: Path
Now we will have to access the file we want to upload. For this, we have to provide the path of the file.
Python will follow the path and reach the file to open it.
Example code:
files = {
    "data": ("metadata", json.dumps(para), "application/json; charset=UTF-8"),
    "file": open("Pythonfile.jpg", "rb"),
}
Step 5: Request
Now we will use the requests module of Python to request the Google Drive APIs to upload the file. For information on using requests in Python, refer to How to Run Python Script in Terminal: A Step-by-Step Tutorial.
Example code:
r = requests.post(
    "https://www.googleapis.com/upload/drive/v3/files?uploadType=multipart",
    headers=headers,
    files=files,
)
Step 6: Print
Now we combine all the above steps with running the code. Ultimately, we will use the print statement to see if our code works.
Example code:
import json
import requests

headers = {"Authorization": "Bearer Paste your access token here"}
para = {
    "name": "##name for python uploaded file####",
}
files = {
    "data": ("metadata", json.dumps(para), "application/json; charset=UTF-8"),
    "file": open("Pythonfile.jpg", "rb"),
}
r = requests.post(
    "https://www.googleapis.com/upload/drive/v3/files?uploadType=multipart",
    headers=headers,
    files=files,
)
print(r.text)
Output:
{
 "kind": "drive#file",
 "id": "1Furfhe8BFbkEhXn1xcYPr8jYAACNpfV7p",
 "name": "##python uploaded image####",
 "mimeType": "image/jpeg"
}
If we get this output with no errors, our code works correctly, and the file we wanted to upload must be uploaded into Google Drive.
Step 7: Verify
We can go and check Google Drive to verify whether the file is uploaded. We are 100% sure our files will be uploaded into the drive by following the mentioned steps.
Using Python, we can now upload files to Google Drive. Setting up this procedure is easy and takes just a few minutes, and that’s all there is to it.

My name is Abid Ullah, and I am a software engineer. I love writing articles on programming, and my favorite topics are Python, PHP, JavaScript, and Linux. I tend to provide solutions to people in programming problems through my articles. I believe that I can bring a lot to you with my skills, experience, and qualification in technical writing.
LinkedIn