How to Undistort Images Using OpenCV

This tutorial will discuss undistorting an image using the undistort() function of OpenCV.
Undistort Images Using OpenCV
While capturing images with cameras, some images get distorted. The distortion added in the images is mostly due to the camera used to capture the image.
The distortion present in an image can be radial or tangential. In radial distortion, the straight lines in an image become curved, and the lines become more curved if they are at the image’s corners.
If the lines are at the center of the image, their distortion will be small and cannot be noticed. For example, see the distorted image below.
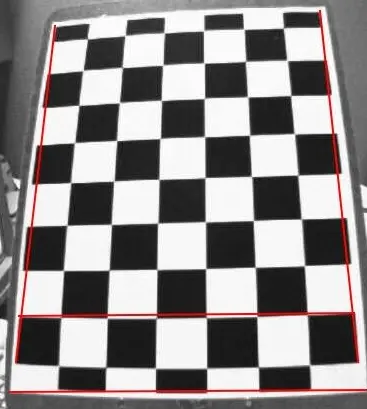
In the above image, the edges of the chess board are connected with a straight red line, so we can easily see the distortion present in the image. We can see that the edge lines in the above image are curved, and the further the line from the center of the image, the more curved they become.
In tangential distortion, the image plane and the lens used to take the image are not parallel to each other, and because of that, some areas present in the image will look farther, and some areas will look nearer than they look in the actual image. For example, see the image below, which shows tangential distortion.
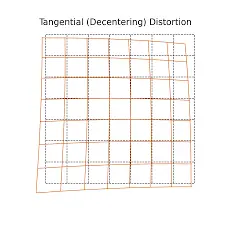
In the above image, the red grid shows the output image plane, and the blue grid shows the input image plane. The tangential distortion depends on the angle of the lens used to take the picture.
If the lens angle changes, the distortion will change, and the distortion will increase if the lens angle increases. We must find five parameters known as distortion coefficients to undistort an image.
We also need to find information about the camera used to capture the images, like the lens’s focal length and optical centers. Using the focal length and optical center values, we can make a camera matrix that will be used to undistort an image.
We can reuse a camera matrix on other images if the same camera takes them, but if the camera changes, we need to find the matrix again because the focal length and optical center values can change depending on the camera. The camera matrix will be a 3-by-3 matrix like the matrix shown below.
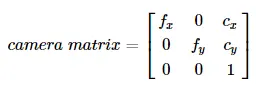
In the above camera matrix, the variable fx and fy contains the focal length values and the variable cx and cy contains the values of the optical center of the lens used to capture the images. The focal length and the optical center values are the intrinsic parameters of a camera.
We also need to find the extrinsic parameters of a camera which show the rotation and translation vectors used to translate a point in the 3D coordinate system. To find the distortion parameter, we need to use some sample distorted images, and we need to use some specific points present in these images and their position.
All the sample images should be taken by the same camera so that an accurate camera matrix will be calculated, and the distorted images of that camera should be undistorted using the camera matrix. For example, let’s take 10 chess board images and extract the 3D real-world points and their 2D coordinates, which contain the location of the 3D points.
These points are taken from the chess board where two black squares touch each other. We will use these points to calibrate the camera used to capture the sample images and the image we want to calibrate.
A 3D real-world point contains three values x, y, and z. To simplify the procedure, we will take the sample images at a fixed distance from the camera, eliminating the value z of the 3D real word points.
Now we will pass the location of all the points present in the image in the 3D real-world points like (0, 0), (1, 0), and so on. These points represent the squares’ location in the chess board image.
If we know the size of the squares in the chess image, we can skip some points rather than add all the points. For example, if the square is 30 millimeters, we can add points like (0, 0), (30, 0), and so on.
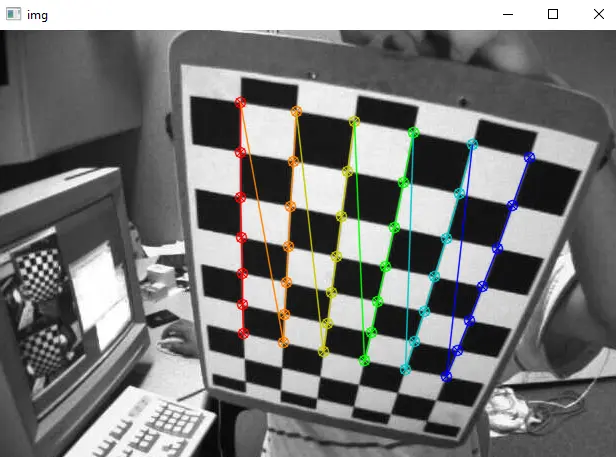
Know that we must find the corners of the squares on the chess board. We can use the cv2.findChessboardCorners() to find the corners of the squares.
We have to pass the pattern we are looking for inside the cv2.findChessboardCorners() function like an 8-by-8 grid. A chess board normally has 8-by-8 squares, but we will use a 7-by-6 grid in this example.
The function will return the corner points placed in an order starting from left to right and top to bottom. The function will also return a Boolean, which will be true if the pattern we are looking for is obtained.
The sample images we want to use might not contain the required pattern, so we have to use the images that contain the required pattern to find the corner points.
We can use the Boolean output of the cv2.findChessboardCorners() to check if the pattern is obtained or not, and if the pattern is obtained, we will store the corner points, and if not found, we will not store the corner points and move to the next image.
Check this link for more details about the cv2.findChessboardCorners() function. To increase the accuracy of the corner points, we can use the cv2.cornerSubPix() function.
Check this link for more details about the cv2.cornerSubPix() function. We can also use the cv2.drawChessboardCorners() function to draw the corner points on the chess board images.
Check this link for more details about the cv2.drawChessboardCorners() function. For example, let’s read 10 sample chess board images, find the 3D real world and 2D image points, and draw them on the images.
See the code below.
import numpy as np
import cv2

term_criteria = (cv2.TERM_CRITERIA_EPS + cv2.TERM_CRITERIA_MAX_ITER, 30, 0.001)
obj_points = np.zeros((6 * 7, 3), np.float32)
obj_points[:, :2] = np.mgrid[0:7, 0:6].T.reshape(-1, 2)
real_points = []
img_points = []
chess_images = [1, 2, 3, 4, 5, 6, 7, 8, 9, 10]

for name in chess_images:
    chess_img = cv2.imread(str(name) + ".png")
    chess_gray = cv2.cvtColor(chess_img, cv2.COLOR_BGR2GRAY)
    ret, corners = cv2.findChessboardCorners(chess_gray, (7, 6), None)

    if ret == True:
        real_points.append(obj_points)
        corners2 = cv2.cornerSubPix(
            chess_gray, corners, (11, 11), (-1, -1), term_criteria
        )
        img_points.append(corners)
        cv2.drawChessboardCorners(chess_img, (7, 6), corners2, ret)
        cv2.imshow("img", chess_img)
        cv2.waitKey(0)
cv2.destroyAllWindows()
Output:
In the above code, we used the zeros() function of the numpy library to create a matrix of zeros and then used the mgrid() function to put values in the matrix that will be used as the 3D real-world points.
The real_points and img_points variables store the 3D real-world points and the 2D image points of all the sample images.
We used a for loop to process each image separately. We will read each image using the imread() function and then we converted each image to grayscale using the cv2.cvtColor() function.
We used the if statement to check if the pattern is obtained or not, and if it is obtained, we will store the points to the real_points and img_points variables.
We used the cv2.cornerSubPix() function to increase the corner points’ accuracy and pass the termination criteria we have defined above inside the function along with the grayscale image and its corners to increase the accuracy of the corner points. We used the append() function to add the corner points to the 2D image points.
We can use the 3D real-world points, and the 2D image points to find the 5 distortion parameters using the cv2.calibrateCamera() function. Check this link for details about the cv2.calibrateCamera() function.
We can use two parameters from the 5 distortion parameters and the input image size to find the camera matrix using the cv2.getOptimalNewCameraMatrix() function.
The cv2.getOptimalNewCameraMatrix() function will also return the region of interest, which can be used to crop the image. Now, we can use the distortion parameters and the camera matrix to undistort an image using the cv2.undistort() function of OpenCV.
Check this link for more details about the cv2.getOptimalNewCameraMatrix() function. For example, let’s read an image from the 10 distorted sample images and undistort it using the cv2.undistort() function.
See the code below.
import numpy as np
import cv2

term_criteria = (cv2.TERM_CRITERIA_EPS + cv2.TERM_CRITERIA_MAX_ITER, 30, 0.001)
obj_points = np.zeros((6 * 7, 3), np.float32)
obj_points[:, :2] = np.mgrid[0:7, 0:6].T.reshape(-1, 2)
real_points = []
img_points = []
chess_images = [1, 2, 3, 4, 5, 6, 7, 8, 9, 10]

for name in chess_images:
    chess_img = cv2.imread(str(name) + ".png")
    chess_gray = cv2.cvtColor(chess_img, cv2.COLOR_BGR2GRAY)
    ret, corners = cv2.findChessboardCorners(chess_gray, (7, 6), None)
    if ret == True:
        real_points.append(obj_points)
        corners2 = cv2.cornerSubPix(
            chess_gray, corners, (11, 11), (-1, -1), term_criteria
        )
        img_points.append(corners)

ret, mtx, dist, rvecs, tvecs = cv2.calibrateCamera(
    real_points, img_points, chess_gray.shape[::-1], None, None
)
img = cv2.imread("5.png")
h, w = img.shape[:2]
newcameramtx, roi = cv2.getOptimalNewCameraMatrix(mtx, dist, (w, h), 1, (w, h))
dst = cv2.undistort(img, mtx, dist, None, newcameramtx)
x, y, w, h = roi
dst = dst[y : y + h, x : x + w]

cv2.imshow("Undistorted Image", dst)
cv2.imshow("distorted image", img)
cv2.waitKey(0)
cv2.destroyAllWindows()
Output:
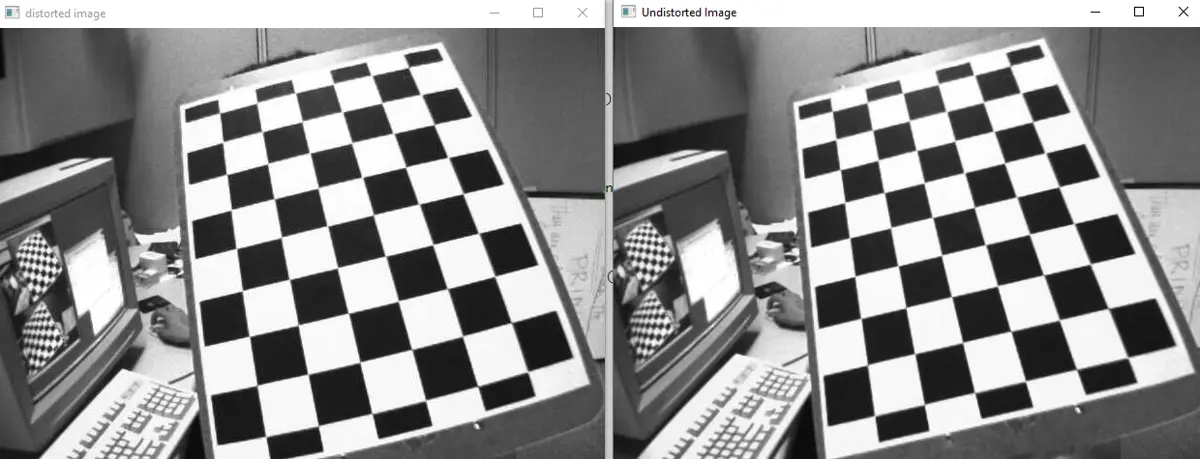
In the above output, the left image is the distorted image, and the right image is the undistorted image. In the above code, we used the cv2.imshow() function to show the image and store the undistorted image using the cv2.imwrite() function.
Check this link for more details about the cv2.undistort() function. In the above example, we used the square grids to find the pattern, but if the grids are circular, we can use the cv2.findCirclesGrid() function to find the pattern.
Check this link for more details about the cv2.findCirclesGrid() function.
