Tkinter Tabs
-
Use the
Notebook()Widget to Create Tabs in Tkinter -
Use the
ScrollbarWidget to View Multiple Tabs in Tkinter
Python provides a list of GUI frameworks that can improve GUI-based applications in Python. The most widely used Python interface is the Tk interface or tkinter.
The tkinter module offers a variety of widgets that can be used to upgrade GUI applications faster and more easily compared to other links provided by Python. The tkinter.ttk module works as an extension of an existing tk module.
Ttk module is loaded with 18 widgets, 12 of which were in the tkinter module, such as Button, Test Button, Label, Canvas, Frame, Label, Scrollbar, and more.
We found the recently added widgets in the Tkinter: Combobox, Notebook, Sizegrip, Progressbar, Separator, and Treeview.
This article demonstrates how the Notebook widget for the ttk module creates a tab in Tkinter. Ttk.Notebook widget controls a collection of windows and displays one at a time.
Each child’s window is linked to a tab. The user can select one tab at a time to view the window’s contents.
Use the Notebook() Widget to Create Tabs in Tkinter
We need to import the following to create the tab widget using the Notebook() method.
from tkinter import *
from tkinter import ttk
We can access two variants of the Tkinter that exist in the tkinter module. If you are a user of Python 3, follow the above one.
Python 2 users should use the below one.
from Tkinter import *
If you are here to learn how to create tabs in Tkinter, we will assume that you can create Tk() objects or root windows because we will not teach you how to create a GUI window or widgets. We will discuss related topics that could help you.
tabsystem = ttk.Notebook(master=None, **options)
The Notebook() takes multiple parameters such as below.
master- This parameter accepts an instance ofTk().options- There are multiple options available to pass in theNotebookmethod likeheight,paddingandwidth(these options are optional).
We need to create the Frame widget for using a tab. We have to create a Frame widget as a tab in our code.
tab1 = Frame(tabsystem)
We can add tabs on GUI as many as possible using the add() method.
The add() requires two parameters, such as below.
add(child, **options)
child- Achildwidget you have created byFrameclass usingtabsystemparent. In our case,tab1is a child.options- Theadd()method can execute multiple options likesticky,state,padding,text,image,compound,underline.
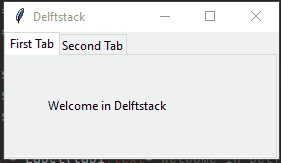
tabsystem.add(tab1, text="First Tab")
We passed tab1 in this code, created by the Frame widget and set a title in the text option.
Now we will display the tabs, so we need to use the pack() method; this method holds a position and is displayed there.
tabsystem.pack(expand=1, fill="both")
We have learned how to create tabs and manage them, so this is the complete code; let’s run it.
from tkinter import *
from tkinter import ttk

# Create an instance of Tk
window = Tk()
window.title("Delftstack")

# Create a tab control that manages multiple tabs
tabsystem = ttk.Notebook(window)

# Create new tabs using Frame widget
tab1 = Frame(tabsystem)
tab2 = Frame(tabsystem)

tabsystem.add(tab1, text="First Tab")
tabsystem.add(tab2, text="Second Tab")
tabsystem.pack(expand=1, fill="both")

label = Label(tab1, text="Welcome in Delftstack")

label.grid(column=1, row=1, padx=40, pady=40)
label2nd = Label(tab2, text="Now we are able to see another tab")
label2nd.grid(column=1, row=1, padx=40, pady=40)

window.mainloop()
Output:
Use the Scrollbar Widget to View Multiple Tabs in Tkinter
This section teaches how to work the Scrollbar widget with multiple tabs. We use a browser and open multiple tabs in one window in our daily routine.
We will need multiple tabs when using the GUI application or any software to do separate activities. But what happens when we open lots of tabs in a window?
We will face difficulties accessing other tabs. That is why we need the Scrollbar widget to view other tabs.
We are familiar with creating tabs and know everything about the Notebook widget because we have learned in the previous section, so we will move forward and see how to use the scrollbar to view tabs.
After creating the Tk() object, we will create a canvas to set the widgets in a canvas window.
cnv = Canvas(window, borderwidth=1)
This Canvas widget takes two parameters. The window parameter is a root or object of the Tk class.
We need to create a Frame widget that will accept cnv canvas as its parent window.
frame = Frame(cnv)
We need to create a horizontal scrollbar to view horizontally using the Scrollbar widget.
hscrollbar = Scrollbar(window, orient="horizontal", command=cnv.xview)
hscrollbar.grid(row=1, column=0, sticky="nsew")
We can set the orientation using the orient option, and the command option takes instructions on which type of view you want to display.
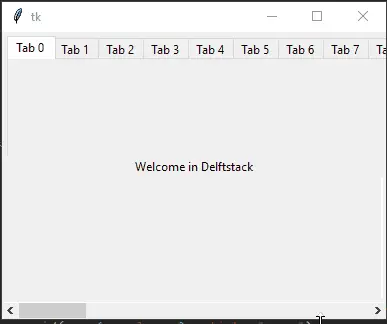
In the following, we created a loop that will iterate 40 times and generate a new tab in every iteration.
The Label widget also will take its position in every new tab.
for tab in range(40):
    tabs = tabsystem.add(Frame(tabsystem), text=f" Tab {tab}  ")
    label = Label(tabs, text=f"Welcome in Delftstack")

    label.grid(column=0, row=0, sticky="ew")
This function will allow us to view multiple tabs, so we configured the canvas using the cnv global variable. The scrollregion option helps to adjust the scrollable area.
We passed the bbox("all") method. It will return coordinates until the remaining items and return None after getting zero.
def frame_configure(event):
    global cnv
    cnv.configure(scrollregion=cnv.bbox("all"))
The frame is bounded using the bind() method, and this method will call the frame_configure function so that an event will have occurred.
frame.bind("<Configure>", frame_configure)
Source Code:
from tkinter import *
import tkinter.ttk as ttk

# Create a window
window = Tk()
# Create a canvas
cnv = Canvas(window, borderwidth=1)
frame = Frame(cnv)
# Create an object of horizontal scrollbar
hscrollbar = Scrollbar(window, orient="horizontal", command=cnv.xview)
hscrollbar.grid(row=1, column=0, sticky="nsew")

cnv.configure(xscrollcommand=hscrollbar.set)
cnv.grid(row=0, column=0, sticky="nsew")
# This method that helps to create canvas window
cnv.create_window((5, 4), window=frame, anchor="nw", tags="frame")

tabsystem = ttk.Notebook(frame, width=100, height=100)
for tab in range(40):
    tabs = tabsystem.add(Frame(tabsystem), text=f" Tab {tab}  ")
    label = Label(tabs, text=f"Welcome in Delftstack")

    label.grid(column=0, row=0, sticky="ew")

tabsystem.grid(row=0, column=0, sticky="ew")


def frame_configure(event):
    global cnv
    cnv.configure(scrollregion=cnv.bbox("all"))


frame.bind("<Configure>", frame_configure)

window.mainloop()
Output:

Hello! I am Salman Bin Mehmood(Baum), a software developer and I help organizations, address complex problems. My expertise lies within back-end, data science and machine learning. I am a lifelong learner, currently working on metaverse, and enrolled in a course building an AI application with python. I love solving problems and developing bug-free software for people. I write content related to python and hot Technologies.
LinkedIn