Flask WebSockets
With this explanation, we will learn what a WebSocket is and how it works between client and server. We will also learn how to make a real-time chat application with the help of the flask_socketio module in Flask.
Create a Real-Time Application With the Help of the flask_socketio WebSocket in Flask
A WebSocket is a way to open sockets between a client and a server. Using WebSockets, we can send messages in real-time.
It is not the typical request-response model of the web; it is like an open connection always exists, and the server and the client can talk back to each other constantly.
Let us now build the chat app; the first side we will handle is the server-side. There are two sides: the first is server-side, which will be handled from the Flask and the second one is client-side, which will be handled from JavaScript.
An extension flask_socketio allows the client to connect with the server, so we will need to install the flask_socketio module using the following command.
pip install Flask-SocketIO
It will install flask_socketio along with any dependencies that it needs. flask_socketio is very similar to a typical flask app, and the patterns are the same, but some of the things we use are slightly different.
We will import some classes and the send function to build this app. Then we will create an app instance, and since all messages are encrypted, we need the secret key; we will define the secret key as a config value.
Now we will create an object for the SocketIO() class and instantiate it by passing the app, and the second argument is to allow all domains.
app.config["SECRET_KEY"] = "ffff111jjj52"
socketio = SocketIO(app, cors_allowed_origins="*")
Now we will define a route that will listen for a particular event that we specify inside the route, and then we will create a function that would be called anytime when we send the message with the function name Text_MSG().
This function takes a parameter called msg, and we will print it out to ensure everything is working on the console.
We will take the message coming from anyone and send it out to everyone connected to the server at that moment. We will use the send() function, which will take two parameters: one will be the msg that is a text message, and the second one is a broadcast that will be equal to True.
If we pass False to the broadcast or do not pass this argument, then it will default to sending the message to whoever we got the message from in the first place.
Since we are broadcasting and going to send the same message that we received from one client, we will send it back to all the clients, including the client from whom we just received it.
@socketio.on("message")
def Text_MSG(msg):
    print("text-message: " + msg)
    send(msg, broadcast=True)
Instead of using the app.run(), we will use socketio.run(app), with extra functionality to run the flask app in a real-time environment.
if __name__ == "__main__":
    socketio.run(app)
Let’s get into the building in the front end, which will be an HTML page. We will import a couple of scripts from a CDN for the client-side socket.io library. We will also use jQuery to handle the click event on the button.
<script type="text/javascript" src="https://cdnjs.cloudflare.com/ajax/libs/socket.io/1.4.8/socket.io.min.js"></script>
<script src="https://ajax.googleapis.com/ajax/libs/jquery/2.2.4/jquery.min.js"></script>
In the body tag, we will write the JavaScript code. Because we are using jQuery, we will have to use the ready() method, and inside this $(document).ready(), we will need to connect to the server where the flask app is running.
We will create an object called socket and instantiate it using connect() and pass the URL for the Flask server. Once we have created an object, we need to ensure that when we connect to the server, we can send a message to it.
$(document).ready(function() {

    var socket = io.connect('http://127.0.0.1:5000');

    socket.on('connect', function() {
        socket.send('User has connected!');
    });

});
It means we are listening for a particular event, and the connection event happens whenever we first connect to the server, and once that happens, it calls this socket.on() callback function. This callback function will send to the server that the user has connected, and the server will pick it up to read it and send it back to everyone.
Let’s add the code to mirror any message sent to the server so we will listen for another event instead of connect. The message callback function will append the messages to our list of messages, and we will also pin a list item with the text of the message.
socket.on('message', function(msg) {
    $("#messages").append('<li>'+msg+'</li>');
    console.log('Received message');
});
The last thing we will do is to allow to send a message using the button. So we will put a click event on the send button and attach the myMessage id with the input tag id.
Once we send that, we will clear out our message to make room for a new message using the val('') method.
$('#sendbutton').on('click', function() {
    socket.send($('#myMessage').val());
    $('#myMessage').val('');
});
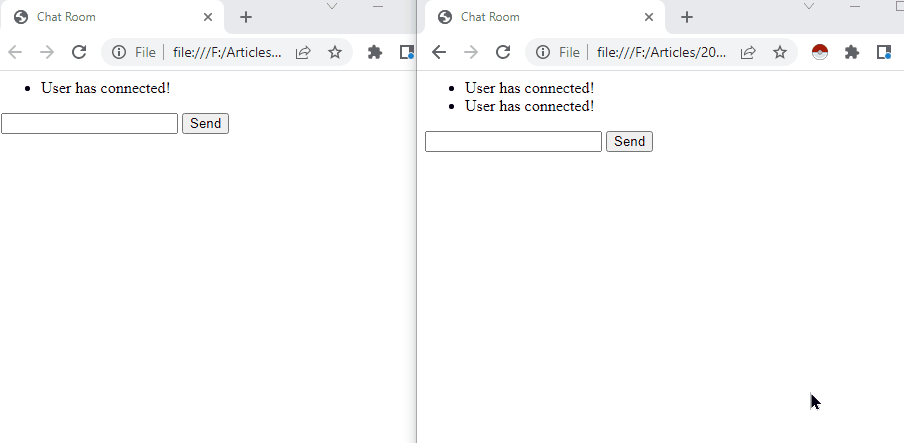
Now we will save it and run the Flask server, and then we will open up an index.html file in two windows. When we put some text inside the input field and hit the send button, we will simultaneously receive messages in another window.
pip install --upgrade python-socketio==4.6.0

pip install --upgrade python-engineio==3.13.2

pip install --upgrade Flask-SocketIO==4.3.1
Complete Python Code:
from flask import Flask
from flask_socketio import SocketIO, send

app = Flask(__name__)
app.config["SECRET_KEY"] = "ffff111jjj52"
socketio = SocketIO(app, cors_allowed_origins="*")


@socketio.on("message")
def Text_MSG(msg):
    print("text-message: " + msg)
    send(msg, broadcast=True)


if __name__ == "__main__":
    socketio.run(app)
Complete HTML Code:
<html>
<head>
<title>Chat Room</title>
<script type="text/javascript" src="https://cdnjs.cloudflare.com/ajax/libs/socket.io/1.4.8/socket.io.min.js"></script>
<script src="https://ajax.googleapis.com/ajax/libs/jquery/2.2.4/jquery.min.js"></script>
</head>
<body>
<script type="text/javascript">
$(document).ready(function() {

    var socket = io.connect('http://127.0.0.1:5000');

    socket.on('connect', function() {
        socket.send('User has connected!');
    });

    socket.on('message', function(msg) {
        $("#messages").append('<li>'+msg+'</li>');
        console.log('Received message');
    });

    $('#sendbutton').on('click', function() {
        socket.send($('#myMessage').val());
        $('#myMessage').val('');
    });

});
</script>
<ul id="messages"></ul>
<input type="text" id="myMessage">
<button id="sendbutton">Send</button>
</body>
</html>

Hello! I am Salman Bin Mehmood(Baum), a software developer and I help organizations, address complex problems. My expertise lies within back-end, data science and machine learning. I am a lifelong learner, currently working on metaverse, and enrolled in a course building an AI application with python. I love solving problems and developing bug-free software for people. I write content related to python and hot Technologies.
LinkedIn