How to Synchronize MySQL Database
- MySQL Database Synchronization
- Configure Source Machine Firewall
- Configure Source Database
- Create Replication User
- Configure Slave Server
This article aims to demonstrate how to achieve database synchronization for backup and record-keeping purposes.
MySQL Database Synchronization
While handling large amounts of data, it can be crucial to consider scenarios where the data may become compromised.
The reason why it was compromised can depend on many factors that must be considered when designing or planning different strategies to tackle this particular problem.
Opting to implement search measures is extremely important; depending on the value of the data, it can cost a company or establishment a huge amount of losses in case the data is lost to some technical fault without any backup reserves as the data is permanently lost.
The Solution
The solution to this problem can vary based on different conditions and restrictions. All in all, one of the most common approaches for the database is below.
- Client/Server Model - Instead of using databases, use applications directly communicating with the server to access/store data.
- Master/Slave Model - One server is assigned to writing data (master) and whereas the other (can be more than one) is solely dedicated to reading the data (slave).
- Offline Model - After a fixed amount of time, do the required locally and send it to the server.
In this article, we will talk about implementing the Master/Slave Model.
Prerequisites
- Two machines act as servers running Ubuntu (20.0+). Each machine should have a non-admin user and
sudopermissions configured properly. Also requires the firewalls to be configured with UFW. - MySQL is installed on both machines. Preferably the latest version (8.0+).
Configure Source Machine Firewall
With the firewall set using UFW, the firewall will block any incoming connections from the replica server. To fix this, execute the following commands on the source machine.
sudo ufw allow REPLICA_SERVER_IP_ADDR to any port MySQL_PORT
Which, if executed successfully, will show the output:
Rule Added
Keep in mind that in the following command:
REPLICA_SERVER_IP_ADDR- IP Address of the replica server.MySQL_PORT- Port of MySQL server (Default is3306).
In the command above, we are adding a rule to the UFW which instructs it to allow any incoming connections coming from the IP REPLICA_SERVER_IP_ADDR to the port MySQL_PORT.
Configure Source Database
Some of its settings need to be tweaked for the source database to proceed with data replication.
To do that, we need to access the MySQL server configuration file named mysqld.cnf. On Ubuntu 20+, it can be found in the /etc/mysql/mysql.conf.d/ directory.
Open this file using your preferred text editor. Alternatively, use the following command:
sudo gedit /etc/mysql/mysql.conf.d/mysqld.cnf
In the mysql.cnf file, search for the following line:
. . .
bind-address            = 127.0.0.1
. . .
The bind-address property dictates where the database will accept connections from 127.0.0.1 representing localhost; this means that the server will only accept connection requests from the machine where the server is currently installed.
To accept connections from the replica server, we need to change the address given to the bind-address property. Changing it to the IP Address of the source server will do the trick.
After changing the IP Address, your file should look like this:
. . .
bind-address            = SRC_SERVER_IP_ADDR
. . .
The SRC_SERVER_IP_ADDR is the IP Address of the source machine.
Next, we need to assign the master a unique id. Each server will be a part of a replicated environment, so each server must be assigned a unique id to ensure no conflicts between the servers.
To do so, search for server-id in the mysql.cnf file. The result will look as follows:
. . .
# server-id             = 1
. . .
The # sign indicates that this line is currently commented out; delete the sign and choose any integer value to assign to the server. After making changes, the line will look as follows:
. . .
server-id             = 10
. . .
After which, search for the log_bin directive, and uncomment it. The log_bin is necessary for the replica server to read to understand how it is supposed to replicate the database.
After making changes, the line should look as follows:
. . .
log_bin                       = /var/log/mysql/mysql-bin.log
. . .
Lastly, search for the binlog_do_db directive; this line will also be commented, uncomment it and set its value as to the name of the database you want to replicate. After modification, it will look like this:
. . .
binlog_do_db          = DB_NAME

# For multiple DBs
binlog_do_db          = DB_NAME_1
binlog_do_db          = DB_NAME_2
. . .
Alternatively, you can exclude a certain database and replicate the rest using binlog_ignore_db.
. . .
binlog_ignore_db          = DB_NAME_TO_IGNORE
. . .
After making these changes in mysqld.cnf, save the file and restart the mysql service.
You can do so using the command below.
sudo systemctl restart mysql
Create Replication User
The replica server must provide a username and password to connect with the source server. Replica servers can connect using any user profile available on the source machine, but in this tutorial, we will create a dedicated user for replication.
Follow the steps to create a user for replication purposes.
On your source machine, execute the following command:
sudo mysql -u USER -p PASS
Where:
USER- Username of the userPASS- Password of the user
Inside the MySQL prompt, you can create a new user with the following command:
mysql> CREATE USER 'REPLICA_USER'@'REPLICA_IP' IDENTIFIED WITH mysql_native_password BY 'PASS';
Where:
REPLICA_USER- The username of the user for the replica serverREPLICA_IP- IP Address of the replica machinePASS- Password of the user
After the user has been successfully created, we need to grant it appropriate permissions. The user must have the REPLICATION SLAVE at the very least.
Grant the user application using the following command:
mysql> GRANT REPLICATION SLAVE ON *.* TO 'REPLICA_USER'@'REPLICA_IP';
Afterward, we must flush the privileges to clear up any used memory and caches using the GRANT and CREATE USER commands.
mysql> FLUSH PRIVILEGES;
And finally, we need to check the status of our database and use the read lock to prevent any write operations from happening while the log status capture is in progress.
To do so, execute the following commands:
mysql> FLUSH TABLES WITH READ LOCK;
Then check the status of the server using the following command:
mysql> SHOW MASTER STATUS;
Which will return output in the following format:
+------------------+----------+--------------+------------------+-------------------+
| File             | Position | Binlog_Do_DB | Binlog_Ignore_DB | Executed_Gtid_Set |
+------------------+----------+--------------+------------------+-------------------+
| mysql-bin.000001 |      899 | db           |                  |                   |
| mysql-bin.000002 |      900 | db2          |                  |                   |
+------------------+----------+--------------+------------------+-------------------+
2 rows in set (0.01 sec)
After this, you can replicate the entire database using mysqldump:
sudo mysqldump -u root db > db.sql
A file named new_db.sql will be generated, which you can transfer to the slave machine to complete the backup process.
As the backup is done, you can unlock the tables.
mysql> UNLOCK TABLES
Configure Slave Server
In the slave server, you need to create a new database where the database will be replicated. You can do so as follows:
mysql> CREATE DATABASE DATABASE_NAME
Now import the exported sqldump from the source machine.
sudo mysql db < /PATH/db.sql
Once the database has been imported into the slave machine, configure the directives in mysqld.cnf as follows:
server-id = 11
log_bin = /data/mysql/mysql-bin.log
binlog_do_db = DATABASE_NAME
After making the necessary changes, restart the MySQL service.
sudo systemctl restart mysql
Finally, to start replicating data from the server, execute the following commands:
In the MySQL prompts after login, do as follows:
mysql> CHANGE REPLICATION SOURCE TO
mysql> SOURCE_HOST='SRC_SERVER_IP_ADDR',
mysql> SOURCE_USER='REP_USER',
mysql> SOURCE_PASSWORD='PASS',
mysql> SOURCE_LOG_FILE='mysql-bin.000001',
mysql> SOURCE_LOG_POS=899;
And finally, start the slave server.
mysql > START REPLICA
Now the server will begin replicating changes from the source server.
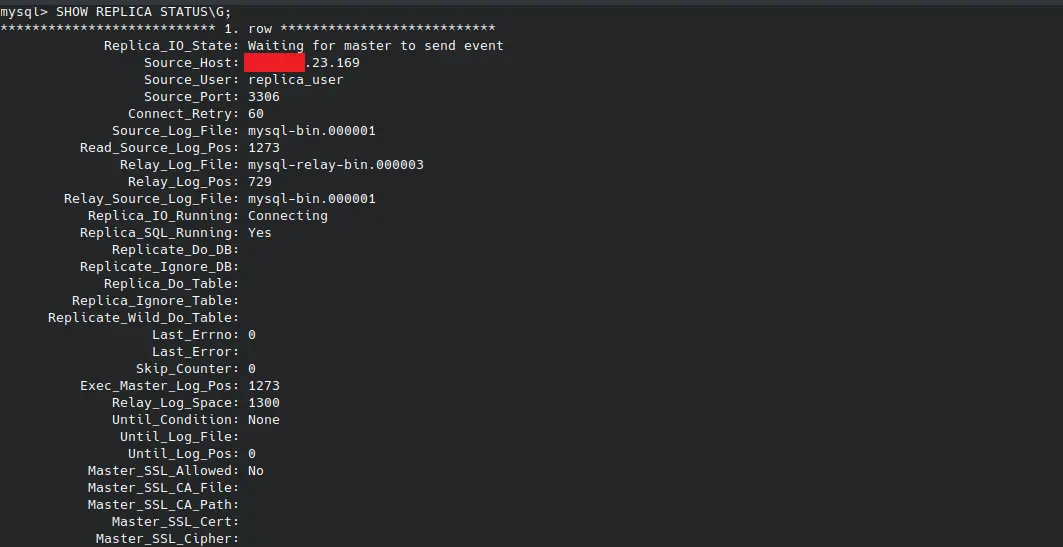
To view the status of the replica server, use the following command:
SHOW REPLICA STATUS\G
The \G re-formats the output for better readability.
The output of the above command is in the following format:

Hello! I am Salman Bin Mehmood(Baum), a software developer and I help organizations, address complex problems. My expertise lies within back-end, data science and machine learning. I am a lifelong learner, currently working on metaverse, and enrolled in a course building an AI application with python. I love solving problems and developing bug-free software for people. I write content related to python and hot Technologies.
LinkedIn