How to Use OpenCV JavaScript to Capture and Play Video
- Use OpenCV JavaScript to Capture and Play Videos From a Camera
- Use OpenCV JavaScript to Capture and Play Videos From a File

This tutorial will discuss capturing video from a camera and displaying it on a webpage using OpenCV JavaScript.
Use OpenCV JavaScript to Capture and Play Videos From a Camera
We can capture video from a camera using the WebRTC, HTML canvas and video element. The WebRTC is used in real-time communication applications like real-time communication with a camera and microphone.
We can use the navigator.mediaDevices.getUserMedia method of WebRTC in JavaScript to capture video from a camera.
The method’s first argument is the HTML video element which can be created using the <video> tag in HTML and we can get the video element using its id and the document.getElementById() function of JavaScript.
The first argument of the document.getElementById() function is used to get the video, audio, or both elements of the video. The second argument of the navigator.mediaDevices.getUserMedia method is used to set the stream’s source, which should be a video element.
The third argument shows the error that occurred during the capturing process. We can specify the height and width of the video inside the <video> tag.
We can also play the video using the autoplay property and mute it using the muted property. For example, let’s capture a video from a camera and play it on a webpage. See the code below.
HTML Code:
<!DOCTYPE html>
<html lang="en">

<head>
    <title>OpenCV JavaScript</title>
    <script defer src="script.js"></script>
    <style>
        body {
            margin: 0;
            padding: 0;
            width: 100vw;
            height: 100vh;
            justify-content: center;
            padding-left: 5vw;
        }
    </style>
</head>

<body>
    <h1>Input Video</h1>
    <video id="video" width="300" height="200" autoplay muted></video>
</body>

</html>
JavaScript Code:
const Source_video = document.getElementById('video')

function startSource_Video() {
  navigator.getUserMedia(
      {video: {}}, stream => Source_video.srcObject = stream,
      err => console.error(err))
}

startSource_Video()
To run the above code, we have to save the HTML code inside a .html file like test.html and the JavaScript code inside a JavaScript file like script.js.
We have to include the script.js file inside the header of the .html file using the <script> tag along with the defer attribute, ensuring the script file is loaded before any other content.
We can now use OpenCV functions on the video to process the video according to our requirements. For example, we can convert the color video to a grayscale video.
To convert the video to grayscale, we have to create two variables of type cv.Mat, which will store the input and the output video. We must pass three arguments inside the cv.Mat() function.
The first & second arguments are the input video’s height and width, and the third is the image type.
We know that a video consists of many images or frames, and to convert the video into grayscale, we have to read each frame one by one and convert it into grayscale using the cv.cvtColor() function.
Then, display it inside an HTML canvas element using the cv.imshow() function of OpenCV. To capture the video, we can use the cv.VideoCapture() function of OpenCV.
To capture the video, we must pass the video element or its id inside the function. Then, to get the frames from the video, we can use the read() function with the variable in which the video is stored.
After that we can pass frame, destination variable, and color conversion parameter inside the cv.cvtColor() function to convert the frame into gray scale.
We can show the frames one by one using the cv.imshow() function, and we have to pass the canvas element or its id inside the function and the variable containing the image or frame which we want to show on the webpage.
We must add a millisecond delay to process each frame individually using the setTimeout() function. The delay values can change depending on the video’s number of frames. For example, for a 30 FPS video, the delay in milliseconds will be equal to (1000/30 - process_time).
The processing time is equal to the time taken to convert each frame to grayscale, and we can get this time using the Date.now() function which returns the current time, and we can use this function before and after the image is processed.
So their difference will be equal to the required delay. So, for example, let’s capture and convert video from a camera into grayscale using OpenCV JavaScript.
In this example, we also have to link the opencv.js file with the HTML file using the script tag, which we can download from this link. See the code below.
HTML Code:
<!DOCTYPE html>
<html lang="en">

<head>
    <title>OpenCV JavaScript</title>
    <script defer src="opencv.js"></script>
    <script defer src="script.js"></script>
    <style>
        body {
            margin: 0;
            padding: 0;
            width: 100vw;
            height: 100vh;
            justify-content: center;
            padding-left: 5vw;
        }
    </style>
</head>

<body>
    <h1>Input Video</h1>
    <video id="video" width="300" height="200" autoplay muted></video>
    <div>
        <h1>Output Video</h1>
    <canvas id="canvasOutput" width="300" height="100"></canvas>
</div>
</body>

</html>
JavaScript Code:
const Source_video = document.getElementById('video')
let canvas = document.getElementById('canvasOutput')


function startSource_Video() {
  navigator.getUserMedia(
      {video: {}}, stream => Source_video.srcObject = stream,
      err => console.error(err))
}

startSource_Video()

cv['onRuntimeInitialized'] = () => {
  let srcImage =
      new cv.Mat(Source_video.height, Source_video.width, cv.CV_8UC4);
  let dstImage =
      new cv.Mat(Source_video.height, Source_video.width, cv.CV_8UC1);
  let cap = new cv.VideoCapture(Source_video);

  const FPS = 30;
  function processSource_Video() {
    let begin_delay = Date.now();
    cap.read(srcImage);
    cv.cvtColor(srcImage, dstImage, cv.COLOR_RGBA2GRAY);
    cv.imshow(canvas, dstImage);
    let delay = 1000 / FPS - (Date.now() - begin_delay);
    setTimeout(processSource_Video, delay);
  };
  setTimeout(processSource_Video, 0);
};
Ensure the script files script.js and opencv.js and the .html file have the same directory before opening the .html file with a web browser.
The above code will capture the video from the computer’s camera, and if the camera is not available, it will give an error that can be seen on the web browser’s console.
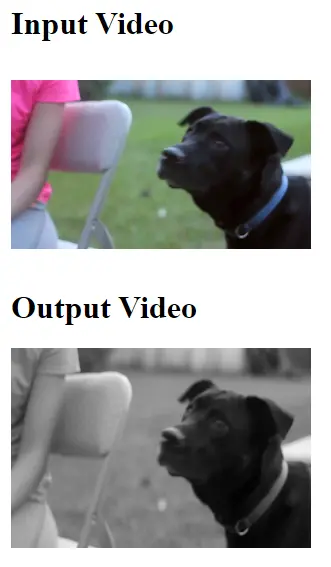
Use OpenCV JavaScript to Capture and Play Videos From a File
In the above section, we have captured the video from a camera and displayed it on a webpage, but we can also read a video from a file and process it with OpenCV JavaScript.
For example, we can read an mp4 video from a folder, convert it into grayscale, and then display it on the webpage. We can use the same code that we used in the above section.
We only have to delete a function from the script.js file used to get a video from the camera. Then, add a source inside the <video> tag, which specifies the video file’s path along with its name and extension like video.mp4.
The remaining code should be the same. See the code below.
HTML Code:
<!DOCTYPE html>
<html lang="en">

<head>
    <title>OpenCV JavaScript</title>
    <script defer src="opencv.js"></script>
    <script defer src="script.js"></script>
    <style>
        body {
            margin: 0;
            padding: 0;
            width: 100vw;
            height: 100vh;
            justify-content: center;
            padding-left: 5vw;
        }
    </style>
</head>

<body>
    <h1>Input Video</h1>
    <video src="bon_fire_dog_2.mp4" id="video" width="300" height="200" autoplay muted></video>
    <div>
        <h1>Output Video</h1>
        <canvas id="canvasOutput" width="300" height="100"></canvas>
    </div>
</body>

</html>
JavaScript Code:
const Source_video = document.getElementById('video')
let canvas = document.getElementById('canvasOutput')

cv['onRuntimeInitialized'] = () => {
  let srcImage =
      new cv.Mat(Source_video.height, Source_video.width, cv.CV_8UC4);
  let dstImage =
      new cv.Mat(Source_video.height, Source_video.width, cv.CV_8UC1);
  let cap = new cv.VideoCapture(Source_video);

  const FPS = 30;
  function processSource_Video() {
    let begin_delay = Date.now();

    cap.read(srcImage);
    cv.cvtColor(srcImage, dstImage, cv.COLOR_RGBA2GRAY);
    cv.imshow(canvas, dstImage);

    let delay = 1000 / FPS - (Date.now() - begin_delay);
    setTimeout(processSource_Video, delay);
  };
  setTimeout(processSource_Video, 0);
};
Output:
To run the above code, we have to save the HTML code inside a .html file like test.html and the JavaScript code inside a JavaScript file like script.js.
We have to include the script.js file and the opencv.js file inside the header of the HTML file using the <script> tag.
We used the defer attribute in the above HTML code to ensure the script file is loaded before any other content. We used the <style> tag to add CSS style to the webpage.
In the above JavaScript code, we used the onRuntimeInitialized function to OpenCV, ensuring the opencv.js is initialized before it is used.
